Power For An Amstrad Spectrum

If you were an American child of the early 1980s then perhaps you were the owner of a Commodore 64, an Apple II, or maybe a TRS-80. On the other side of the Atlantic in the UK the American machines were on the market, but they mostly lost out in the hearts and minds of eager youngsters to a home-grown crop of 8-bit micros. Computer-obsessed British kids really wanted Acorn’s BBC Micro, but their parents were more likely to buy them the much cheaper Sinclair ZX Spectrum.

Sinclair Research was fronted by the serial electronic entrepreneur [Clive Sinclair], whose love of miniaturization and ingenious cost-cutting design sometimes stretched the abilities of his products to the limit. As the 8-bit boom faded later in the decade the company faltered, its computer range being snapped up by his great rival in British consumer electronics, [Alan Sugar]’s Amstrad.

The Amstrad Spectrums replaced the rubber and then shaky plastic keys of the Sinclair-era machines with something considerably more decent, added joystick ports and a choice of a built-in cassette deck or one of those odd 3″ floppy disk drives for which Amstrad seemed to be to only significant customer. For that they needed a more capable power supply offering a selection of rails, and it is this unit that concerns us today. [Drygol] had a friend with an Amstrad-made Sinclair 128K Spectrum +2 with a broken power supply. His solution was to wire in a supply retrieved from a small form factor PC that had all the requisite lines, and for safety he encased it in an improbably huge piece of heat shrink tubing.

Wiring a PSU to a DIN plug for a retro computer is not an exceptional piece of work in itself even if it’s tidily done and nice to see older hardware brought back to life. What makes this piece worth a look instead is the teardown of what is a slightly unusual footnote to the 8-bit home computer story. We’re shown the familiar Z80 and support chips with the Spectrum edge connector and modulator on a through-hole board with a piece of cutting edge tech for a 1980s home computer, a single SMD chip unusually mounted nestled in a hole cut in the board.

Amstrad eventually stopped making Spectrums in the early 1990s, having also tried the Sinclair name on a spectacularly awful PC-compatible home computer. [Clive Sinclair] continued to release electronic products over the following decades, including a portable computer, the last of his trademark miniature radio receivers, and an electric bicycle accessory. Amstrad continue to make computers to this day, and [Alan Sugar] has achieved fame of a different sort as host of the UK version of The Apprentice. He has not yet become Prime Minister.

We’ve featured another Amstrad Spectrum +2 losing its tape deck for a slimmer machine. On that note, the Spectrum wasn’t Amstrad’s only entry in the 8-bit market, and we’ve also shown you a compact clone of their CPC464. As for [Drygol], he’s featured here several times. His mass-restoration of Commodore 64s for instance, or bringing a broken Atari ST back from the dead.

Interactive ESP8266 Development With PunyForth

Forth is one of those interesting languages that has a cult-like following. If you’ve never looked into it, its strength is that it is dead simple to put on most CPUs, yet it is very powerful and productive. There are two main principles that make this possible. First, parsing is easy because any sequence of non-space characters makes up a legitimate Forth word. So while words like “double” and “solve” are legal Forth words, so is “#$#” if that’s what you want to define.

The other thing that makes Forth both simple and powerful is that it is stack-based. If you are used to a slide rule or an HP calculator, it is very natural to think of “5+2*3” as “5 2 3 * +” but it is also very simple for the computer to interpret.

[Zeroflag] created PunyForth–a Forth-like language for the ESP8266. You can also run PunyForth for cross development purposes on Linux (including the Raspberry Pi). The system isn’t quite proper Forth, but it is close enough that if you know Forth, you’ll have no trouble.

Continue reading “Interactive ESP8266 Development With PunyForth”

Adding Drone Instrumentation With No Additional Parts

Soon the skies will be filled with drones, or so the conventional wisdom goes, and these flying droids will deliver pizza, mail, packages, and medical supplies right to one of the taller trees in our backyards. To date, advanced fixed-wing UAVs and toy quadcopters have proven themselves to be exceptionally dumb; they have no idea what their airspeed is, and no, ground speed measured by GPS will not keep you in the air.

The sensors to measure airspeed and angle of attack can be adapted to small drones, but [gallinazo] has a better idea: why not estimate these figures using sensors a drone already has? He’s measuring synthetic airspeed, something that would have already saved a few hundred lives if it were implemented passenger airliners.

Small drones are able to take a few measurements of their surroundings using standard accelerometers, magnetometers, and of course recording the position of the throttle and control surfaces. All of these variables are related to airspeed – at a constant throttle setting, with no movement of the control surfaces, an aircraft will eventually settle at a stable airspeed.

The trick, though, is to tie all of these variables together to produce a number related to the airspeed of the drone. This is done with a Python script implementing a radial basis function and eating all the memory on [gallinazo]’s desktop. This Python script is effectively a black box that turns the throttle position, bank angle, elevator position, and pitch rate into an airspeed.

Does this black box work? Judging by the graphs comparing synthetic airspeed to measured airspeed, this is amazing work. [gallinazo]’s airspeed estimator accurately and reliably matches the measured airspeed. It does this with zero extra parts on the airframe.

All of the code required to implement this synthetic airspeed indicator is available on GitHub, and could conceivably be implemented in a small RC plane after all the variables are pre-computed. Awesome work that pushes the state of the art forward quite a bit.


Convert That Cheap Laser Engraver To 100% Open-Source Toolchain

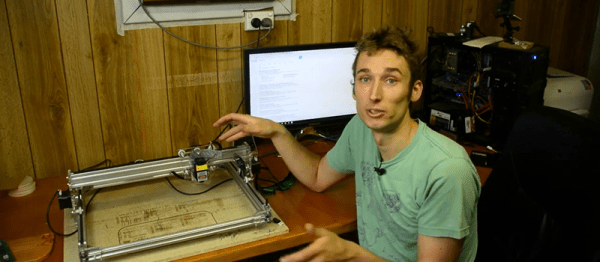
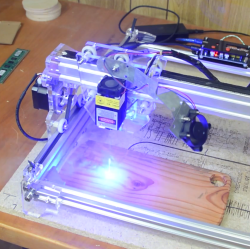
laserweb-on-cheap-laser-squareLaserWeb is open-source laser cutter and engraver software, and [JordsWoodShop] made a video tutorial (embedded below) on how to convert a cheap laser engraver to use it. The laser engraver used in the video is one of those economical acrylic-and-extruded-rail setups with a solid state laser emitter available from a variety of Chinese sellers (protective eyewear and any sort of ventilation or shielding conspicuously not included) but LaserWeb can work with just about any hardware, larger CO2 lasers included.

LaserWeb is important because most laser engravers and cutters have proprietary software. The smaller engravers like the one pictured above use a variety of things, and people experienced with larger CO2 laser cutters may be familiar with a piece of software called LaserCut — a combination CAD program and laser control that is serviceable, but closed (my copy even requires a USB security dongle, eww.)

LaserWeb allows laser engravers and cutters to be more like what most of us expect from our tools: a fully open-source toolchain. For example, to start using LaserWeb on one of those affordable 40 W blue-box Chinese laser cutters the only real hardware change needed is to replace the motion controller with an open source controller like a SmoothieBoard. The rest is just setting up the software and enjoying the added features.

Continue reading “Convert That Cheap Laser Engraver To 100% Open-Source Toolchain”

Building Beautiful Boards With Star Simpson

Over the last decade or so, the cost to produce a handful of custom PCBs has dropped through the floor. Now, you don’t have to use software tied to one fab house – all you have to do is drop an Eagle or KiCad file onto an order form and hit ‘submit’.

With this new found ability, hackers and PCB designers have started to build beautiful boards. A sheet of FR4 is no longer just a medium to populate parts, it’s a canvas to cover in soldermask and silkscreen.

Over the last year, Star Simpson has been working on a project to make electronic art a reality. Her Circuit Classics take the original art from Forrest Mims’ Getting Started In Electronics notebooks and turn them into functional PCBs. It’s a kit, an educational toy, and a work of art on fiberglass, all in one.

At the 2016 Hackaday Superconference, Star gave her tips and tricks for producing beautiful PCBs. There’s a lot going on here, from variable thickness soldermasks, vector art on a silkscreen, and even multicolored boards that look more at home in an art gallery than an electronics workbench.

Continue reading “Building Beautiful Boards With Star Simpson”

Creating A PCB In Everything: KiCad, Part 3

This is the third and final installment of a series of posts on how to create a PCB in KiCad, and part of an overarching series where I make the same schematic and board in dozens of different software tools. A few weeks ago, we took a look at making a schematic in KiCad, and more recently turned that schematic into a board ready for fabrication.

For our KiCad tutorials, we’ve already done the basics. We know how to create a PCB, make a part from scratch, and turn that into a board. This is the bare minimum to be considered competent with KiCad, but there’s so much more this amazing tool has to offer.

In part three of this KiCad tutorial, we’re going to take a look at turning our board into Gerbers. This will allow us to send the board off to any fab house. We’re going to take a look at DRC, so we can make sure the board will work once we receive it from the fab. We’re also going to take a look at some of the cooler features KiCad has to offer, including push and shove routing (as best as we can with our very minimalist board) and 3D rendering.

Continue reading “Creating A PCB In Everything: KiCad, Part 3”

B Battery Takes A 9V Cell

Old American radios (and we mean really old ones) took several kinds of batteries. The A battery powered the filaments (generally 1.5V at a high current draw). The B battery powered the plate (much lower current, but a higher voltage–typically 90V). In Britain these were the LT (low tension) and HT (high tension) batteries. If you want to rebuild and operate old radios, you have to come up with a way to generate that B voltage.

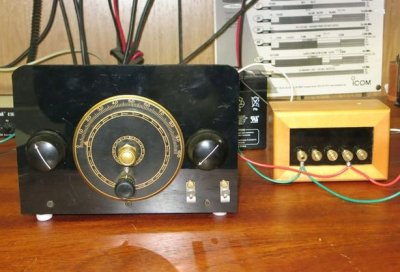
Most people opt to use an AC supply. You can daisy-chain a bunch of 9V batteries, but that really ruins the asthetics of the radio. [VA3NGC] had a better idea: he built a reproduction B battery from a wooden box, some brass hardware, a nixie tube power supply, and a 9V battery (which remains hidden). There’s also a handful of zener diodes, resistors, and capacitors to allow different taps depending on the voltage required.

b-battery-in-useThe project looks great. The wooden box apparently was a recycle item and the brass hardware makes it look like it belongs with the old radios it powers. This is a good example of how there’s more to vintage restoration than just the electronics. Sure, the function is important, but to really enjoy the old gear, the presentation is important, too.

Not all tube radios took 90V B+, but since this battery has taps, that isn’t a problem. The old Radio Shack P-Box kit took 22.5V. Of course, if you are going to build your own battery, maybe you ought to build your own triodes, too.