Boneblocker Is A Big LED Wall That Rocks

[Nick Lombardy] took on a job almost every maker imagines themselves doing at some point. He built a giant LED wall and he did a damn fine job of it, too. Introducing BoneBlocker.

BoneBlocker is an 8 x 14 wall of glass blocks that lives at a bar called The Boneyard. Each block was given a length of WS2812B LED strip. 30 LED/meter strips were chosen, as initial maths on the 60 LED/meter strips indicated the whole wall would end up drawing 1.5 kW. Discretion, and all that.

The glowing game controller.

The whole display is run from a WT32-ETH01 board, which is a fast ESP32-based module that has onboard Ethernet to boot. [Nick] used the WLED library as he’d seen others doing great things with it, performance-wise. He ended up using one board per column to keep things fast, but he reckons this was also probably a little bit of overkill.

His article steps through the construction of the wall, the electronics, and the software required to get some games working on the display. The final result is quite something. Perhaps the best bit is his explanation of the custom controller he built for the game. Dig into it, you won’t be disappointed.

In particular, we love how the glass blocks elevate this display to a higher aesthetic level. We’ve seen other great projects tread this same route, too. Video after the break.

Continue reading “Boneblocker Is A Big LED Wall That Rocks”

DIY DNA Lamp

DIY Electronics Plus Woodworking Equal Custom Lamp

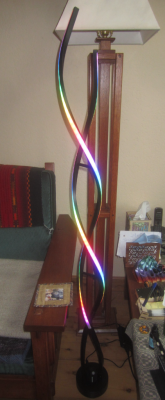
There is something about wooden crafts that when combined with electronics, have a mesmerizing effect on the visual senses. The Gesture Controlled DNA Wooden Desk Lamp by [Timber Rough] is a bit of both with a nice desk piece that’s well documented for anyone who wants to build their own.

Construction starts with a laser cutter being employed to add kerfs, such that the final strips can be bent along a frame tube to form the outer backbone of the DNA helix structure. Add to the mix some tung oil, carnauba wax, and some glue — along with skill and patience — and you get the distinct shape of sugar-phosphate backbone.

The electronics include an ESP8266 with the PAJ7620 gesture sensor that controls two WS2812B RGB LED Strips. The sensor in question is very capable, and comes with the ability to recognize nine human hand gestures along with proximity which makes it apt for this application. The sensor is mounted atop the structure with the LEDs twisting down the frame to the base where the ESP8266 is tucked away. Tiny glass bottles are painted with acrylic spray varnish and then glued to the LEDs to form the base pairs of the double helix. We thought that the varnish spray was a clever idea to make light diffusers that are quick and cheap for most DIYers.

We previously covered how this particular gesture sensor can be used to control much more than a lamp if you seek more ideas in that realm.

Continue reading “DIY Electronics Plus Woodworking Equal Custom Lamp”

Build Your Own RGB Fill Light For Photography

Photography is all about light, and capturing it for posterity. As any experienced photographer will tell you, getting the right lighting is key to getting a good shot. To help in that regard, you might like to have a fill light. If you follow [tobychui]’s example, you can build your own!

Colors!

The build relies on addressable WS2812B LEDs as the core of the design. While they’re not necessarily the fanciest LEDs for balanced light output, they are RGB LEDs, so they can put out a ton of different colors for different stylistic effects. The LEDs are under the command of a Wemos D1, which provides a WiFI connection for wireless control of the light.

[tobychui] did a nice job of building a PCB for the project, including heatsinking to keep the array of 49 LEDs nice and cool. The whole assembly is all put together inside a 3D printed housing to keep it neat and tidy. Control is either via onboard buttons or over the WiFi connection.

Files are on GitHub if you’re seeking inspiration or want to duplicate the build for yourself. We’ve seen some other similar builds before, too. Meanwhile, if you’re cooking up your own rad photography hacks, don’t hesitate to let us know!

Logic analyzer capture, showing the rails constantly oscillating at a high rate

When Your Level Shifter Is Too Smart To Function

By now, 3.3V has become a comfortable and common logic level for basically anything you might be hacking. However, sometimes, you still need to interface your GPIOs with devices that are 5 V, 1.8 V, or something even less common like 2.5 V. At this point, you might stumble upon autosensing level shifters, like the TXB010x series Texas Instruments produces, and decide that they’re perfect — no need to worry about pin direction or bother with pullups. Just wire up your GPIOs and the two voltage rails you’re good to go. [Joshua0] warns us, however, that not everything is hunky dory in the automagic shifting world.

During board bring-up and multimeter probing, he found that the 1.8 V-shifted RESET signal went down to 1.0V — and its 3.3 V counterpart stayed at 2.6V. Was it a current fight between GPIOs? A faulty connection? Voltage rail instability? It got more confusing as the debugging session uncovered the shifting operating normally as soon as the test points involved were probed with the multimeter in a certain order. After re-reading the datasheet and spotting a note about reflection sensitivity, [Joshua0] realized he should try and probe the signals with a high-speed logic analyzer instead.

Continue reading “When Your Level Shifter Is Too Smart To Function”

Simple NTP Clock Uses Custom RGB 7-Segment Displays

A great majority of hackers build a clock at some point. It’s a great way to get familiar with electronics and (often) microcontrollers, and you get to express some creativity along the way. Plus, you get something useful when you’re done! [Tadas Ustinavičius] recently trod this well-worn path and built a neat little NTP clock of their own.

The build uses an ESP 12F as the core of the operation. It’s charged with querying an NTP time server via its WiFi connection in order to maintain accurate timekeeping around the clock. For display, it drives a series of custom 7-segment displays that [Tadas] built using 3D-printed housings. They use WS2812B addressable LEDs and thus can display a rainbow of colors.

For initial configuration, the phone creates its own WiFi hotspot with a web interface for changing settings. Once configured, it connects to the Internet over WiFi to query an NTP server at regular intervals.

It’s a simple build that does a simple job well. Projects like these can be very valuable, as they teach you all kinds of useful skills. If you’ve been working on your own clock design, don’t hesitate to let us know. You can use a microcontroller, relays, or even a ball.

Fail Of The Week: PCB LED Cube Fails Successfully

Remember LED cubes? We sure do — they were all the rage for a while, and then it seemed like everyone just sort of lost interest in them. There are probably a lot of reasons for that, not least of which is likely the amount of work it takes to put one together from discrete LEDs and separate pieces of wire. Could there be a better way?

Of course there could, and [Sasa Karanovic] thought he had it all figured out with this PCB-based LED cube. At first glance, it seems to make perfect sense; after all, weren’t PCBs invented to take the place of all that pesky point-to-point wiring in the early days of electronics? The boards [Sasa] designed are pretty cool, actually. They’ve each got room for 16 addressable WS2812 LEDs in 5 mm packages, with every possible bit of substrate removed to block the minimum amount of light. That left very little room for traces on the 2-mm-wide arms, so the PCBs had to have four layers, which raised eyebrows at the PCB house when [Sasa] submitted the design.

Such an airy and open design obviously has the potential for mechanical issues, which [Sasa] addressed by adding pads at three corners of each board; a vertical PCB connects to each LED board to provide mechanical support and distribute signals to the LEDs. The cube seems solid enough as a result, and even when handled the LED boards don’t really flop around too much. See the cube in action in the video below.

What’s nice about this design is the perfect spacing between the LEDs in all three dimensions, and the way everything lines up nice and straight. That would be really hard to do with wire, even for the most practiced of circuit sculptors. [Sasa] seems to agree, but still deems the build a failure because the PCBs block too much of the view. We suppose he’s got a point, and we’re not sure how well this would scale to an 8×8 cube. We’re not sure how we’d feel about paying for PCBs that are mostly air either, but as failures go, this one still manages to be pretty successful. Continue reading “Fail Of The Week: PCB LED Cube Fails Successfully”

1D Fireworks Are Nice And Quiet

Maybe you do it out of respect for the dogs and parents of young children in the neighborhood. Or maybe you do it because they’re harmful to the environment, or just because it’s too darn cold outside. Whatever your reasoning for not setting off fireworks, don’t fret — you can probably put together your own silent one-dimensional “fireworks” display from what you’ve got in the parts bin.

[Daniel Westhof]’s design is simple, requiring little more than a Wemos D1 Mini and a strip of WS2812 LEDs. Once activated, a red rocket shoots up from the ground and detonates, sending lights in both directions on the strip to imitate the bombs bursting in air. It’s controlled with a small push button switch, and there’s a deliciously large red LED indicator that shows the thing is ready for detonation.

You might be surprised to find that there’s a wide array of 1D gaming and animation projects out there, many of which made possible by the ubiquitous addressable RGB LED strip. We’ve seen a dungeon crawler, at least two different versions of the classic PONG, and even the makings of a simplified Wolfenstein.