One of Atmel’s smallest microcontrollers, the ATtiny, is among the most inexpensive and reliable chips around for small applications. It’s also one of the most popular. If you don’t need more than a few inputs or outputs, there’s nothing better. As a show of its ability to thrive under adverse conditions, [Trammell Hudson] was able to shoehorn an ATtiny into an RFID circuit in a way that tests the limits of the chip design.
The RFID circuit only uses two of the ATtiny’s pins and neither of which is the ground or power pin. The ATtiny is equipped with protective diodes on its input pins, and if you apply an AC waveform to the input pins, the chip is able to use the leakage current to power itself. Once that little hurdle is crossed, the ATtiny can do the rest of its job handling the RFID circuitry.
This project takes a deep dive into the internals of the ATtiny. If you’ve ever wondered what was going on inside of everyone’s favorite tiny microcontroller, or if you’re looking for an RFID circuit that keeps parts counts to an absolute minimum, this is the project for you. The ATtiny is more than just a rugged, well-designed chip, though. It’s capable of a lot more than such a small chip should be able to.
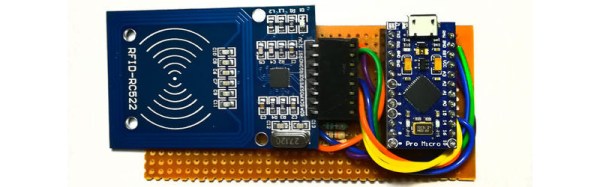
Sometimes we see projects whose name describes very well what is being achieved, without conveying the extra useful dimension they also deliver. So it is with [Prasanth KS]’s Windows PC Lock/Unlock Using RFID. On the face of it this is a project for unlocking a Windows PC, but when you sit down and read through it you discover a rather useful primer for complete RFID newbies on how to put together an RFID project. Even the target doesn’t do it justice, there is no reason why this couldn’t be used with any other of the popular PC operating systems besides Windows.
The project takes an MRFC-522 RFID module and explains how to interface it to an Arduino. In this case the Arduino in question is an Arduino Pro Micro chosen for its ability to be a USB host. The supplied code behaves as a keyboard, sending the keystroke sequence to the computer required to unlock it. The whole is mounted in what seems to be a 3D printed enclosure, and for ease of use the guts of the RFID tag have been mounted in a ring.
As we said above though, the point of this project stretches beyond a mere PC unlocker. Any straightforward RFID task could use this as a basis, and if USB is not a requirement then it could easily use a more run-of-the-mill Arduino. If you’re an RFID newbie, give it a read.
You’d think that with as many sick people as there are in the world, it wouldn’t be too difficult for a doctor in training to get practice. It’s easy to get experience treating common complaints like colds and the flu, but it might take the young doctor a while to run across a dissecting abdominal aortic aneurysm, and that won’t be the time for on the job training.
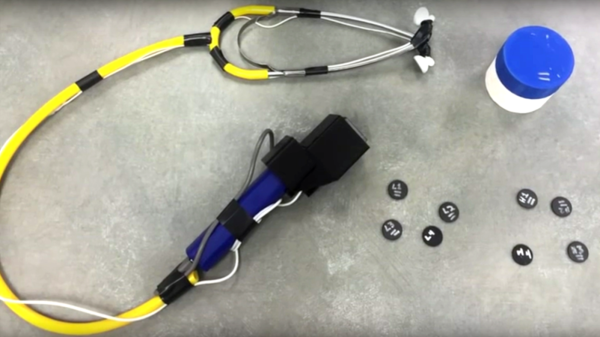
Enter the SP, or standardized patient – people trained to deliver information to medical students to simulate a particular case. There’s a problem with SPs, though. While it’s easy enough to coach someone to deliver an oral history reflecting a medical condition, the student eventually needs to examine the SP, which will reveal none of the signs and symptoms associated with the simulated case. To remedy this, [Chris Sanders] and [J Scott Christianson] from the University of Missouri developed an open-source RFID stethoscope to simulate patient findings.
This is one of those “why didn’t I think of that?” ideas. A cheap stethoscope is fitted with an Arduino, and RFID reader, and a small audio board. RFID tags are placed at diagnostic points over an SP’s chest and abdomen. When the stethoscope is placed over a tag, a specific sound file is fetched from an SD card and played over earbuds. The student doesn’t have to ask, “What am I hearing?” anymore – the actual sound of bruits or borborygmi are heard.
We can easily see expanding this system – RFID tags that trigger a faux ultrasound machine to display diagnostic images, or tiny OLED screens displaying tagged images into an otoscope. A good place to start expanding this idea might be this digital stethoscope recorder and analyzer.
How often do you see problems that need fixing? How often do you design your own solutions to them — even if they won’t be implemented at scale? Seeing that many of the municipal parking lots in his native Sri Lanka use a paper ticketing system which is prone to failure, [Shazin Sadakath] whipped up his own solution: an efficient RFID tag logging system.
Digging out an HZ-1050 RFID reader — as well an RFID card and two tags — [Sadakath] set to work connecting it to his Raspberry Pi and cooking up a batch of code and a dashboard to work with. A Python script — using a PiGPIO library — reads the Wiegand Format RFID number, storing it in an SQLite3 database. A Bootstrap, Javascript, and JQuery trifecta make up the dashboard that pulls the RFID info from said server and organizes it into a functional format.
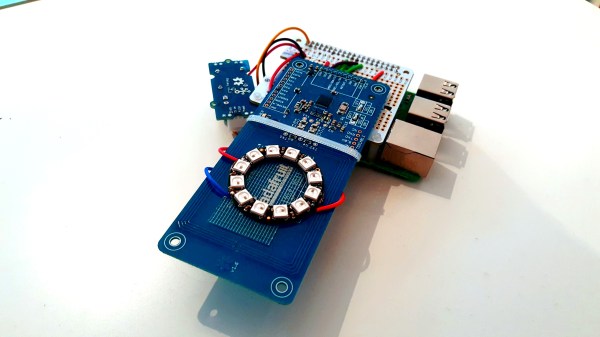
Group entry hacks are a favorite for hacker social groups. Why use old fashioned keys when you can use newfangled electronic keys? If you are looking to build a simple RFID-based security system to secure your important stuff, this project from Resin.io is a good place to start. In it, [Joe Roberts] outlines the process of building a simple RFID-triggered mechanism for their office door.
It’s a pretty simple setup that is composed of an RFID reader, a Rasperry Pi and a Neopixel ring. When someone places an RFID card against the reader hidden behind a poster by their front door, the reader grabs the code and the Pi compares it with a list of authorized users. If the card is on the list, the Pi triggers the door lock using a signal line originally designed to work with an intercom system. If the user isn’t on the list, a laser is triggered that vaporizes the interloper… well, that’s perhaps in the next version, along with an API that will allow someone to open the door from the company chat application.
At the moment, this is a clean, simple build that uses only a few cheap components, but which could be the basis for a more sophisticated security system in the future.
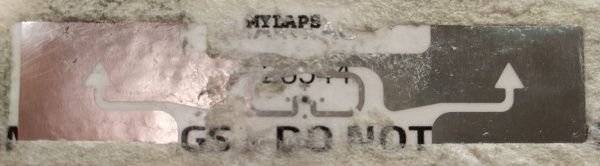
A mass participation sporting event such as a road race presents a significant problem for its record keepers. It would be impossible to have ten thousand timekeepers hovering over stopwatches at the finish line, so how do they record each runner’s time? The answer lies in an RFID chip attached to the inside of the bib each runner wears, which is read as the runner crosses the line to ensure that their time is recorded among the hundreds of other participants.
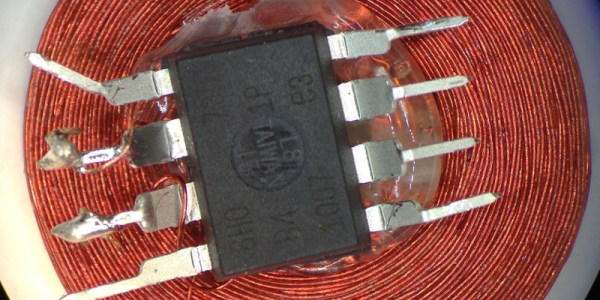
Stripping away the foam covering of the RFID assembly revealed a foil antenna for the 860-960MHz UHF band with the tiny RFID chip at its centre. The antenna is interesting, it’s a rather simple wideband dipole folded over with what looks like a matching stub arrangement and an arrow device incorporated into the fold that is probably for aesthetic rather than practical purposes. He identified the chip as an Impinj Monza 4, whose data sheet contains reference designs for antennas we’d expect to deliver a better performance.
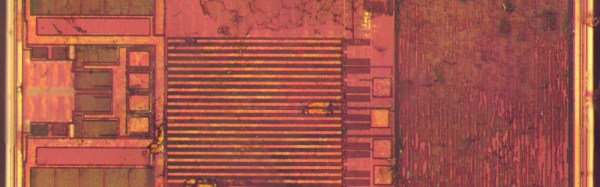
After some trial-by-fire epoxy removal the tiny chip was revealed and photographed. It’s a device of three parts, the power scavenging and analog radio section, the non-volatile memory that carries the payload, and a finite-state logic machine to do the work. This isn’t a proper processor, instead it contains only the logic required to do the one task of returning the payload.
He finishes off with a comparison photograph of the chip — which is about the size of a grain of salt — atop a 1980s 8051-series microcontroller to show both its tiny size and the density advancements achieved over those intervening decades.
Since RFID devices are becoming a ubiquitous part of everyday life it is interesting to learn more about them through teardowns like this one. The chip here is a bit different to those you’ll find in more mundane applications in that it uses a much higher frequency, we’d be interested to know the RF field strength required at the finish line to activate it. It would also be interesting to know how the system handles collisions, with many runners passing the reader at once there must be a lot of RFID chatter on the airwaves.
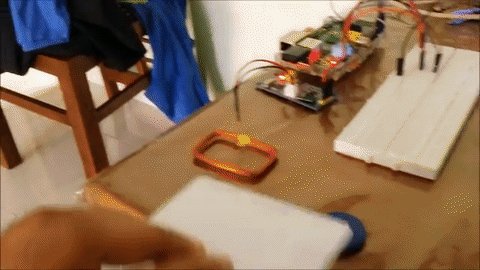
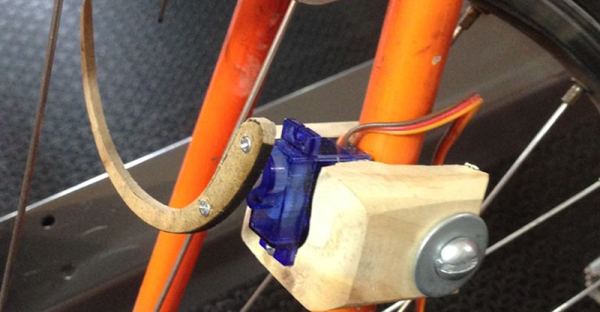
What do you do with an RFID chip implanted in your body? If you are [gmendez3], you build a bike lock that responds to your chip. The prototype uses MDF to create a rear wheel immobilizer. However, [gmendez3] plans on building a version using aluminum.
For the electronics, of course, there’s an Arduino. There’s also an RC522 RFID reader. We couldn’t help but think of the Keyduino for this application. When the system is locked, the Arduino drives a servo to engage the immobilizer. To free your rear wheel, simply read your implanted chip. The Arduino then commands the servo to disengage the immobilizer. You can see the system in operation in the video below.