A stroke is caused when poor blood flow to the brain causes cell damage, causing that part of the brain to stop functioning. Common causes are either blood vessel blockage or internal bleeding, and effects depend on the part of the brain that is affected. In most cases, spasticity (muscle contraction), poor motor control and the inability to move and feel are common after effects. Recovery is often a long, slow process and involves re-learning the affected lost skills. This is where physical therapy using assistive technologies becomes important. Rehabilitation must start as early as possible since the first few weeks are critical for good recovery. [Sergei V. Bogdanov] is building a cheap and simple Post-Stroke Spasticity Rehab Helper to address this problem.
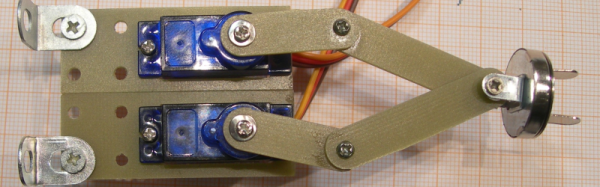
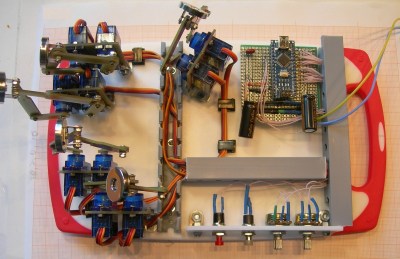 He’s using ten hobby micro servos connected to an Arduino Nano, all mounted on a kitchen chopping board, with a few other bits thrown in to round out the build. There’s one pair of servos for each finger. A five bar linkage converts the servo rotations to two-dimensional motion. The end of the linkage has a swiveling metallic disk. Patient fingers are attached to these discs via magnetic metal pads that are attached to the end of the fingers using adhesive plaster tape. Two push buttons cycle through a large number of exercise modes and two potentiometer’s help adjust the speed and smoothness (the number of points calculated for the desired motion). Two 7-segment LED display modules connected to the Arduino provides a visual interface showing program modes, speed, number of cycles and other relevant information. Replicating the project ought to be very straightforward since the device uses off-the-shelf parts which are easy to put together using the detailed build instructions, photos and code posted on [Sergei]’s project page. Check out the videos below to see the rehab helper in action.
Continue reading “Hackaday Prize Entry: Post Stroke Spasticity Rehab Helper”