A wristwatch similar to the Berlin Uhr, with the actual Berlin Urh in the background

Tiny Berlin Clock Replica Also Counts Seconds

If you’re a clock aficionado and have ever visited Berlin, you’re probably familiar with the Berlin Clock on Budapester Straße: a minimalist design of yellow and orange lights that displays the time in a base-5 number system. This clock has been telling the time to the few that can read it since 1975, and is but one of several unusual clocks that can be found in the city.

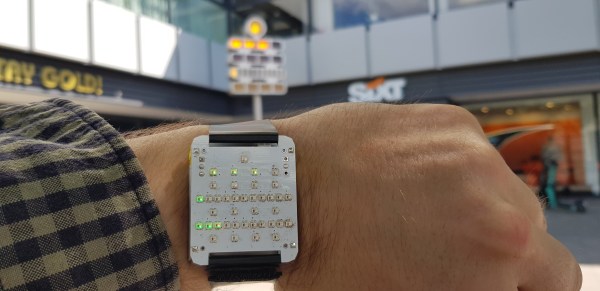
Berlin resident [jjoeff] decided to make a miniature replica, appropriately called the Berlin Uhr Nano, in order to watch the unusual display at any time of day. Built around a Wemos D1 Mini, it connects to WiFi in order to synchronize its internal clock to an NTP time server. It then drives a custom PCB that holds 39 WS2812 LEDs to display the time in its proper format. Unlike the original though, it also includes a full counter to tell the number of seconds; the bigger clock just flashes a single lamp to show the seconds passing.

Powered by a 500 mAh lithium battery, it can be converted into a wristwatch by simply threading a strap through slots in the PCB. With no buttons for adjustment or any functionality other than displaying the time, it serves the same purpose as the original, just in a portable format. We’ve seen a slightly larger Berlin Clock replica made of wood before, as well as a round one that uses the same base-5 encoding scheme. Continue reading “Tiny Berlin Clock Replica Also Counts Seconds”

A brick mailbox with a LIDAR sensor mounted inside

Using A LIDAR Sensor To Monitor Your Mailbox

The inconvenience of having to walk to your mailbox to check for mail has inspired many hackers to install automated systems that let them know when the mail has been delivered. Mailbox monitors have been made based on several different mechanisms: some measure the weight of the items inside, some use cameras and machine vision, while others simply trigger whenever the mailbox’s door or flap is moved. When [Gary Watts] wanted to install a notification system for his 1940s brick letterbox, his options were limited: with no flap or door to monitor, and limited space to install mechanical contraptions, he decided to use a LIDAR sensor instead.

Probably best-known for their emerging application in self-driving cars, LIDAR systems send out a laser pulse and measure the time it takes for it to be reflected off a surface. In the case of [Gary]’s mailbox, that surface is either the brick wall or a letter leaning against it. Since letters are inserted through a vertical slot, they will usually be leaning upright against the wall, providing a clear target for the laser.

The LIDAR module, a VL53L0X made by ST, is hooked up to a Wemos D1 Mini Pro. The D1 communicates with [Gary]’s home WiFi through an external antenna, and is powered by an 18650 lithium battery charged through a solar panel. The whole system is housed inside a waterproof plastic case, with the LIDAR sensor attached to the inside of the mailbox through a 3D-printed mounting bracket. On the software side, the mailbox notifier is powered by Home Assistant and MQTT. The D1 spends most of its time in deep-sleep mode, only waking up every 25 seconds to read out the sensor and send a notification if needed.

We’ve seen quite a few fancy mailbox monitors over the years: some are extremely power efficient, some use multiple sensors to allow for different use-cases, and some others are simply beautifully designed.

Engineering Vs Pigeons

We’ve all been there. Pigeons are generally pretty innocuous, but they do leave a mess. If you have a convertible or a bicycle or even just a clean car, you probably don’t want them hanging around. [Max] was tired of a messy balcony, so like you might approach any engineering problem, he worked his way through several possible solutions. Starting with plastic crows, and naturally ending with an automated water gun.

The resulting robotic water gun that targets pigeons with openCV is a dandy project and while we don’t usually advocate shooting at neighborhood animals, we don’t think a little water will be any worse than the rain for the pigeons. The build started with a cheap electric water pistol. A Wemos D1 Mini ESP8266 development board provides the brainpower. The water pistol wouldn’t easily take rechargeable batteries, plus it is a good idea to separate the logic supply and the pump motors, so the D1 gets power from a USB power bank separate from the gun’s batteries.

That leaves the camera. An old iPhone 6S with a 3D printed bracket feeds video to a Python script that uses openCV. If looks for changes using a very particular algorithm to detect that something is moving and fires the gun. It doesn’t appear that it actually tracks the pigeons, so maybe that’s a thought for version 2.

Was it successful? Maybe, but it does seem like the pigeons learned to avoid it. We still think azimuth and elevation on the gun would help.

Most of the time when we see pigeon hacking it is to use them for nefarious purposes. [Max] should be glad he doesn’t have to deal with lions.

A 3D-printed Portal Turret

3D Printed Portal Turret Moves And Talks Like The Real Thing

Thanks to its innovative gameplay and quirky humor, Portal became an instant hit when it was released in 2007. Characters became cultural icons, quotes became memes and the game became a classic along with its 2011 sequel. Even today, more than a decade later, we regularly see hackers applying their skills in recreating some of the game’s elements. One beautiful example is [Joran de Raaff]’s physical rendition of a Portal Turret.

A 3D CAD drawing of a Portal Turret
Inside the Turret it’s full of moving parts.

[Joran] decided to use his 3D printer to create a Turret that can move and speak exactly as it does in the game. The result, as you can see in the video embedded below, was a triumph. We’re making a note here, “huge success”. The outer shell is a beautiful shiny white, an effect achieved through patient sanding, priming, and spraying with high-gloss paint. The internals are even more impressive with servos, microswitches, and a whole array of 3D-printed gears, cams, and levers.

A motion sensor activates the Turret whenever a human moves nearby. It will then open its wings and fire its guns while playing the corresponding sounds from the game. Its brains are formed by a Wemos D1 which drives the various LEDs and servos, while an MP3 player board holds a library of sound bites and plays them through a speaker hidden inside the Turret’s shell.

After posting his creation on YouTube [Joran] got many requests for the 3D files, so he made them available and wrote a comprehensive build guide. This should enable anyone with a 3D printer to build this neat gun, without getting too much science done. If this model is too small for you, then perhaps this life-sized model is more to your liking. If you prefer your Turret small and cute, check out this plushie version.

Continue reading “3D Printed Portal Turret Moves And Talks Like The Real Thing”

Remote MQTT Temperature Sensor Shows How It’s Done

First of all, there are definitely simpler ways to monitor remote temperatures, but [Mike]’s remote MQTT temperature sensor and display project is useful in a few ways. Not only does it lay out how to roll such a system from scratch, but it also showcases system features like solar power.

After all, if one simply wants to monitor temperature that’s easily done, but once one wishes to log those temperatures and use them to trigger other things, then rolling one’s own solution starts to get more attractive. That’s where using someone else’s project as a design reference can come in handy.

[Mike’s] solution uses two Wemos D1 boards: one with a DS18B20 temperature sensor for outdoors, and one with a small OLED screen for an interior display. The external sensor relies on a rechargeable 18650 cell and a solar panel for a hassle-free power supply, and the internal sensor (of which there can be many) has a cute enclosure and is powered by USB. On the back end, a Raspberry Pi running an MQTT gateway and Node Red takes care of the operational side of things. The whole system has been happily running for over two years.

What is MQTT? It is essentially a messaging protocol, and takes care of the whole business of reliably communicating data back and forth between IoT devices. It scales very well and doesn’t need to be hard or intimidating; our own [Elliot Williams] can tell you all about implementing it.

You Can Build Your Own Sushi Train

According to [Garage Avenger], in Norwegian culture it’s considered impolite to ask for things to be passed across a dinner table, so much standing and reaching is the course of the day. To assist in reducing the effort required, he set about building his own sushi train device to solve the problem, giving equal condiment access to all!

The system is capable of taking plenty of weight from heavy dinner bowls, altogether quite different than relatively-light sushi dishes on plastic plates.

The system is actually relatively simple, relying on a Wemos D1 Mini controlled by a Blynk app to run the show. Mechanically, a large drive gears is turned by a stepper motor to drive the wooden conveyor chain that actually makes up the “sushi train.” The chain links ride on a bed of Norwegian one krone coins acting as rollers.

The result is a working table-sized sushi train that really does carry plates around well. It didn’t stop people leaning over [Garage Avenger] at the dinner table, but it makes a great centerpiece on the dinner table for sharing dishes like tacos.

We’ve seen similar table technology, the Lazy Susan, around these parts before. Video after the break.
Continue reading “You Can Build Your Own Sushi Train”

Improved Thermochromic Clock Uses PCB Heaters For Better Contrast

We love timepiece projects round these parts, so here we are with another unusual 7-segment clock design. Hackaday’s own [Moritz Sivers] wasn’t completely satisfied with his last thermochromic clock, so has gone away and built another one, solved a few of the issues, and this time designed it to be wall mounted. The original design had a single heater PCB using discrete resistors as heating elements. This meant that the heat from active elements spread out to adjacent areas, reducing the contrast and little making it a bit hard to read, but it did look really cool nonetheless.

This new version dispenses with the resistors, using individual segment-shaped PCBs with heater traces, which gives the segment a more even heat and limited bleeding of heat into neighbouring inactive air-gapped segments.  Control is via the same Wemos D1 Mini ESP8266 module, driving a chain of 74HC595 shift registers and a pile of dual NMOS transistors. A DS18B20 thermometer allows the firmware to adjust for ambient temperature, giving more consistency to the colour change effect. All this is wrapped up in an aluminium frame, and the results look pretty nice if you ask us.

Both PCB designs and the Arduino firmware can be found on the project GitHub, so reproducing this should be straightforward enough for those so inclined, just make sure your power supply can handle at least 3 amps, as these heaters sure are power hungry!

Got a perfectly good clock, but desperately need a thermochromic temperature/humidity display? [Moritz] has you covered. And if this digital clock is just too simple, how about a mad 1024-element analog thermochromic clock instead?

Continue reading “Improved Thermochromic Clock Uses PCB Heaters For Better Contrast”