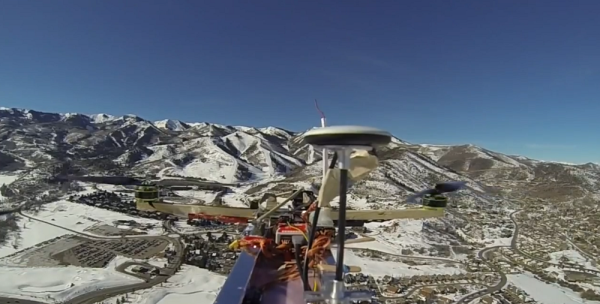
Particle System Busy Box Keeps Baby Occupied

Busybox

Any child born today has a bright future ahead of them—mostly consisting of watching glowing rectangles for 80 or 90 years. To give his progeny a jump-start on a lifetime of watching LEDs flicker, [Dan] created a busy box. It’s really just an Arduino, RGB LED matrix, and a programmed particle system, but if we’re fascinated by it, it will probably blow an infant’s mind.

The idea for this busy box originated with an earlier Hackaday post that used an 8×8 matrix of RGB LEDs to create a moving color cloud. [Dan] took this project as a jumping off point and created an infant’s busy box with four modes that are sure to be entertaining.

Inside the is a Rainboduino: an Arduino compatible board capable of driving an 8×8 RGB LED matrix. Also stuffed inside the busy box is a 9V battery, rocker switch for the power, and four arcade buttons that cycle through each mode. The first mode is some sort of ‘plasma cloud’ simulation, the next is a ‘painter’ light display. The final two modes spell out [Dan]’s spawn’s name, and all the numbers and letters of the alphabet.

Continue reading “Particle System Busy Box Keeps Baby Occupied”

Stylish OLED Watch Uses Accelerometer Instead Of Buttons

A few days ago [Andrew] contacted us to offer his help for the design of the mooltipass project case. While introducing himself, he casually mentioned his OLED watch that you can see above.

The watch is based on the low-power MSP430F microcontroller from Texas Instruments. It can consume as little as 1.5uA while maintaining a real-time clock and monitoring interrupts. It also uses ferroelectric RAM, which doesn’t need any power to retain its memory contents. That means there’s no need to set the time again if you remove the CR2016 battery that powers the watch.

[Andrew] chose an 0.96″ OLED display that only consumes up to 7mA. He also included an accelerometer that allows him to interact with the watch through its single and double tap detecting feature. He modeled his PCB using EagleCAD and the whole assembly using Sketchup. Most of the components were soldered in his reflow (toaster) oven. The final result is a mere 8.8mm thick and looks very professional in our opinion.

Shopping Trolley Is Wired For Camp

[James] needed some cool transportation for the upcoming Easter Camp in New Zealand, so he created a custom motorized shopping trolley that is sure to turn heads. The base of this project is a standard mobility scooter, which conveniently has a modular design. All of the electronics have connectors for quick service and the entire rear axle and motor assembly pop off with the pull of a lever.

[James] had to do a bit of welding and chassis rework to achieve his goal of mounting a shopping cart top to the scooter’s frame. Once finished, though, the setup looked great. It was actually comfortable to sit in, as [James] made a cutout for the driver’s feet to pass through. The real fun came with the electronics. The trolley is the most wired mobility scooter mod we’ve ever seen. Most of the electronics are contained in a project box under the seat, with several Arduinos that control the various systems: interfacing with the original scooter electronics, a GPS receiver, and a GSM radio. [James] also went as far as to add RGB LED headlights, a horn, and a multi-tone siren from Jaycar.

Driving the trolley is simple. An arcade joystick selects the speed, and the scooter’s standard hand controls are used for forward, reverse, and steering. One of the more interesting mods [James] made was a custom Windows app to control the trolley via a USB radio module. The entire system can be secured, with the security code stored in NVRAM to prevent a power cycle from unlocking the system. [James] can even command the trolley to go forward or reverse from his touch screen. We’d love to see him add a steering servo to make it a completely remote-controlled solution, though this step would require some sort of clutch for manual control.

The final design works very well.  [James] may not win any drag races by keeping scooter’s original speed controls and associated electronics, but he did extend the range with larger batteries, so we’re sure the trolley will be a hit all over the camp. Similar projects have been built using the base of an electric wheelchair. If you have one that you want to control without invasive changes to the hardware, check out this accessibility hack which interfaces using a connector.

Continue reading “Shopping Trolley Is Wired For Camp”

Hacking A Heating Pad

HeatingPadBreadboardS

[Bob] and his wife use a bed heating pad. In the winter, they typically turn it on about an hour before bedtime so the bed is nice and warm. The problem is, if they accidentally leave it on, they’ll wake up a few hours later: overheated. What they needed was an advanced timer system.

A normal outlet timer wouldn’t fit his needs: most of the year the pad should shut off after a slight delay, but in the winter they prefer to leave the heating pad on at a much lower temperature. [Bob] decided to create a custom timer with a microcontroller to provide adjustable duration and heating levels.

The circuit is simple. It consists of a microcontroller, a 2-digit LED display, two buttons, and two wires that connect to the heating pad’s original controller. The final build allows you to set the time the pad turns on, turns off, and/or down a few levels. It’s a fantastic hack, and you can see how the interface works in the video following the break.

Continue reading “Hacking A Heating Pad”

Attacknid Becomes Laser Death Drone

Laser Drone

[styroPyro] liked his Attacknid, but decided it needed just a bit more blue death ray laser. We’ve seen [styroPyro’s] high-powered laser hacks before, but this time he’s taken to hacking one of [Jaimie Mantzel’s] Attacknid robots. According to one of the top comments on [styroPyro’s] video—a comment by Attacknid inventor [Jaimie] himself—the robots were meant to be hacked, and [Jamie] is ecstatic.

[styropyro] removed the disk shooter from his Attacknid and used the fire control circuit to activate a 2 watt blue laser. A low powered, red laser pointer serves as a laser sight, allowing you to aim at your target before unleashing the beefy blue laser. As the video shows, 2 watts is a heck of a lot of power. The Attacknid easily pops balloons and sets fire to flash paper. As usual, we urge you to use caution when handling 2 watt lasers, which fall under Class 4: aka the most dangerous class of lasers. Goggles, skin protection, and safety interlocks are the order of the day. [styroPyro] has been working with high power lasers for a few years, and seems to know what he’s doing. That said, we’ll leave the burning lasers to the professionals.

Continue reading “Attacknid Becomes Laser Death Drone”

Tricked-out Arduino-controlled Time-Lapse Is More Than Just A Timer

arduinoPhotoRig

[Hlesliebole] wanted a finer degree of remote control over his time-lapse shots, so he decided to build an Arduino-driven infrared shutter. He ended up creating this killer Arduino-controlled photography rig that does a whole lot more.

This hack was built for [Hlesliebole]’s Nikon D3100, but he says it should work with any DSLR and remote shutter. This initial build uses an LED as a stand-in for the remote shutter that he ordered.  He intends to update the post once it arrives and he integrates it.

[Hlesliebole] wired a 7-segment display to show the current time delay between photos. This can be set on the fly with a potentiometer, so there’s no need to stop and reprogram the Arduino. And while you’re grabbing a beer and watching the sun slowly sink, the rig can better capture that sunset because of a photoresistor. It detects the ambient light level and minimizes the number of throwaway dark shots.

If that weren’t enough, he’s built servo functionality into the code to support remote control over the camera’s physical position, allowing for panning or rotation over a scene. [Hlesliebole] doesn’t go into detail, but he assures us that there are many tutorials out there.  If you think you’re man enough, you could always work in this outstanding versatile motion dolly hack.

Continue reading “Tricked-out Arduino-controlled Time-Lapse Is More Than Just A Timer”

Fubarino Contest: Battery Capacity Tester

fubarino-contest-battery-capacity-tester

Here’s a project that we sadly let slip through the cracks a couple of years ago. Luckily [Brian] dusted it off and added an Easter Egg to the firmware in order to include it in the Fubarino Contest. The device is a rechargeable battery capacity tester. It discharges NiMH or NiCad batteries through a load resistor at about 1 Watt. [Brian] includes a discussion in his write-up about the hardware’s inability to work with 14500 Li-Ion cells. He includes enough info for you to figure out how to make changes to the circuit if you want to enable this option.

There is a MOSFET for switching each of the three battery positions. The ATmega168 takes readings from the cells once per second. It displays status information on a Nokia 5510 cellphone screen. This is where he chose to inject the Hackaday URL. When a cell’s discharge is complete, the image above scrolls onto the screen and remains there for a short time. See for yourself after the break.

Continue reading “Fubarino Contest: Battery Capacity Tester”