A Rotary Axis CNC Machine

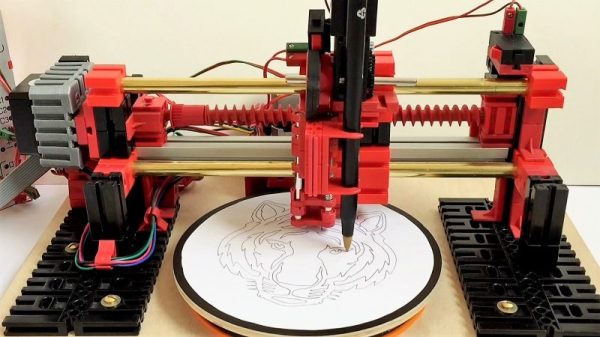
There’s a certain class of parts that just can’t be made on a standard 3-axis mill, nor with a 3D printer or a lathe. These parts — weird screws, camshafts, strange gears, or simply a shaft with a keyway (or two) — can really only be made with a rotary axis on a CNC machine. Sure, you could buy a rotary axis for a Haas or Tormach for thousands of dollars, or you could build your own. That’s exactly what [Adam Zeloof] and [Matt Martone] did with their project at this year’s World Maker Faire in New York. It’s the Rotomill, a simple three-axis CNC machine, with a rotary axis, that just about anyone can build.

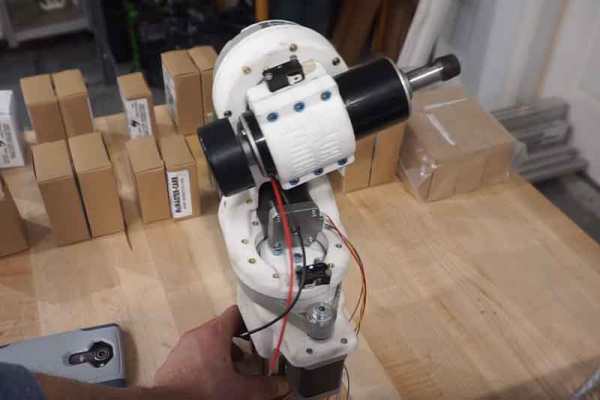
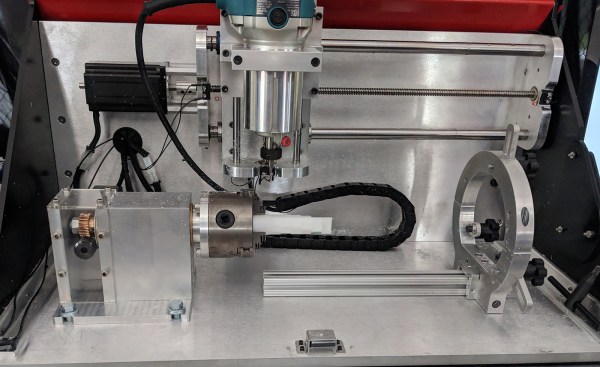
The design of the Rotomill uses a standard, off-the-shelf Makita rotary tool for the spindle, and uses leadscrews to move the X and Z axes around with NEMA 24 stepper motors. The A axis — the rotary bit — is driven through a worm gear, also powered by a NEMA 24. Right now this provides more than enough power to cut foam, plastic, and wood, and should be enough to cut aluminum. That last feat is as yet untested, but the design is open enough that a much more powerful spindle could be attached.

The software for this machine is a bit weird. For most CNC machines with a rotary axis, the A axis is treated as such — a rotary axis. For the Rotomill, [Adam] and [Matt] are generating G Code like it’s a normal Cartesian machine, only with one axis ‘wrapped’ around itself. This is all done through Autodesk HSM, and a properly configured Arduino running GRBL makes sense of all this arcane geometry.

It’s a great looking machine, and the guys behind it say it’s significantly less expensive than any other machine with a rotary axis. That’s to be expected, as it’s basically a five axis mill with two axes removed. Still, this entire project was built for about $2000, and some enterprising salvage and hacking could bring that price down a bit.

DrawBot Badge Represents The CNC World In Badge Design

Badges come in all shapes and sizes, but a badge that draws on a stack of Post-It notes is definitely a new one. The design uses three of the smallest, cheapest hobby servos reasonably available and has a drawing quality that creator [Bart Dring] describes as “adorably wiggly”. It all started when he decided that the CNC and mechanical design world needed to be better represented in the grassroots demo scene that is the badge world, and a small drawing machine that could be cheaply made from readily available components seemed just the ticket.

Two arms control the position of a pen, and a third motor lifts the assembly in order to raise or lower the pen to the drawing surface. Gravity does most of the work for pen pressure, so the badge needs to be hanging on a lanyard or on a tabletop in order to work. An ESP32 using [Bart]’s own port of Grbl does the work of motion control, and a small stack of Post-It notes serves as a writing surface. Without the 3D printed parts, [Bart] says the bill of materials clocks in somewhere under $12.

We’ve seen similar designs doing things like writing out the time with a UV LED, but a compact DrawBot on a badge is definitely a new twist and the fact that it creates a physical drawing that can be peeled off the stack also sets it apart from others in the badgelife scene.

Soundproofing A CNC Mill Conversion

The Proxxon MF70 is a nice desktop sized milling machine with a lot of useful add-on accessories available for it, making it very desirable for a hacker to have one in his or her home workshop. But its 20000 rpm spindle can cause quite the racket and invite red-faced neighbors. Also, how do you use a milling machine in your home-workshop without covering the whole area in metal chips and sawdust? To solve these issues, [Tim Lebacq] is working on Soundproofing his CNC mill conversion.

To meet his soundproof goal, he obviously had to first convert the manual MF70 to a CNC version. This is fairly straightforward and has been done on this, and similar machines, in many different ways over the years. [Tim] stuck with using the tried-and-tested controller solution consisting of a Raspberry Pi, an Arduino Uno and a grbl shield sandwich, with stepper motor drivers for the three NEMA17 motors. The electronics are housed inside the reclaimed metal box of an old power supply. Since the Proxxon MF70 is already designed to accept a CNC conversion package, mounting the motors and limit switches is pretty straightforward making it easy for [Tim] to make the upgrade.

Soundproofing the box is where he faced unknown territory. The box itself is made from wooden frames lined with particle board. A pair of drawer slides with bolt-action locks is used for the front door which opens vertically up. He’s also thrown in some RGB strips controlled via the Raspberry-Pi for ambient lighting and status indications. But making it soundproof had him experimenting with various materials and techniques. Eventually, he settled on a lining of foam sheets topped up with a layer of — “bubble wrap” ! It seems the uneven surface of the bubble wrap is quite effective in reducing sound – at least to his ears. Time, and neighbours, will tell.

Maybe high density “acoustic foam” sheets would be more effective (the ones similar to “egg crate” style foam sheets, only more dense)? Cleaning the inside of the box could be a big challenge when using such acoustic foam, though. What would be your choice of material for building such a sound proof box? Let us know in the comments below. Going back many years, we’ve posted about this “Portable CNC Mill” and a “Mill to CNC Conversion” for the Proxxon MF70. Seems like a popular machine among hackers.

We Couldn’t Resist This CNC Batik Bot

Batik is an ancient form of dyeing textiles in which hot wax is applied to a piece of cloth in some design. When the cloth is submerged in a dye bath, the parts covered with wax resist the pigment. After dyeing, the wax is either boiled or scraped away to reveal the design.

[Eugenia Morpurgo] has created a portable, open-source batik bot that rolls along the floor and draws with wax, CNC-style, on a potentially infinite expanse of cloth. The hardware should be familiar: an Arduino Mega and a RAMPS 1.4 board driving NEMA 17 steppers up and down extruded aluminium.

Traditionally, batik wax is applied with a canting, a pen-like object that holds a small amount of hot wax and distributes it through a small opening. The batik bot’s pen combines parts from an electric canting tool with the thermistor, heater block, and heater cartridge from an E3D V6 hot end. [Eugenia] built the Z-axis from scrap and re-used the mechanical endstops from an old plotter. Check out the GitHub for step-by-step instructions with a ton of clear pictures and the project’s site for even more pictures and information. Oh, and don’t resist the chance to see it in action after the break.

We love a good art bot around here, even if the work disappears with the tide.

Continue reading “We Couldn’t Resist This CNC Batik Bot”

Home Made 5-Axis CNC Head Is A Project To Watch

[Reiner Schmidt] was tired of renting an expensive 5-axis CNC head for projects, so he decided to build his own. It’s still a work in progress, but he’s made remarkable progress so far. The project is called Bridge Boy, and it is designed to use a cheap DC rotary mill to cut soft materials like plastic, wood and the like. Most of it is 3D printed, and he has released the Autodesk 360 plans that would allow you to start building your own. His initial version uses an Arduino with stepper drivers, and is designed to fit onto the end of a 60mm arm of a standard 3-axis CNC,  so technically it’s a 3+2 axis CNC. With the appropriate software, it should be able to work as a full 5-axis machine, though, and it should be possible to integrate it with a CNC that has a 5-axis driver board without too much effort.

Continue reading “Home Made 5-Axis CNC Head Is A Project To Watch”

A Polar Coordinate CNC Plotter Even Descartes Could Love

Take apart a few old DVD drives, stitch them together with cable ties, add a pen and paper, and you’ve got a simple CNC plotter. They’re quick and easy projects that are fun, but they do tend to be a little on the “plug and chug” side. But a CNC plotter that uses polar coordinates? That takes a little more effort.

The vast majority of CNC projects, from simple two-axis plotters to big CNC routers, all tend to use Cartesian coordinate systems, where points on a plane are described by their distances from an origin point on two perpendicular axes. Everything is nice and square, measurements are straightforward, and the math is easy. [davidatfsg] decided to level up his CNC plotter a bit by choosing a polar coordinate system, with points described as a vector extending a certain distance from the origin at a specified angle. Most of the plotter is built from FischerTechnik parts, with a single linear axis intersecting the center point of a rotary drawing platform. Standard G-code is translated to polar coordinates by a Java applet before being sent to a custom Arduino controller to execute the moves. Check out the video below; it’s pretty mesmerizing to watch, and we can’t help but wonder how a polar 3D-printer would work out.

Have polar coordinates got you stumped? It can be a bit of an adjustment from Cartesian space for sure. It can be worth it, though, showing up in everything from cable plotters to POV fidget spinners and even to color space models.

Continue reading “A Polar Coordinate CNC Plotter Even Descartes Could Love”

DIY CNC Sandblaster Writes Large

CNC machinery, once a piece of workshop exotica, has become such a staple of projects within our sphere as to have become relatively unremarkable. A decent 3D printer can be had without mortgaging a small country, and the honor roll of CNC router builders is long and distinguished. But there is still plenty to surprise us in CNC, and [Fabien Chouteau]’s project shows us this with surprising simplicity. He’s eschewed a router or extruder, and instead fit an off-the-shelf CNC machine kit with a sandblaster.

If you are used to a sandblaster as a means for removing rust from pieces of your motor vehicle, then it’s fair to say that this one isn’t of that ilk. Instead, it’s used in the manner of an engraver, to sandblast a pattern or text onto a surface. This is something he shows us in the video below the break, with a piece of metal and a sheet of glass.The sandblaster itself features a 1.5-litre soda bottle and is driven by an airline.

On the electronic side, he replaced the controller that came with the kit with an STM32F469 discovery board and an Arduino CNC shield. He has a G-code controller from a previous project, to which he’s added a board with a touch screen to create a simple control interface.

This is by no means the only sandblaster we’ve featured, if your interests lie in that direction we can show you everything from the simple to the extreme.

Continue reading “DIY CNC Sandblaster Writes Large”