Self-Solving Rubik’s Cube

Rubik’s Cube has been around for what seems like forever now, and has spawned an entire subculture devoted to solving the puzzle with automation. Most Rubik robots put the cube in a specially designed cradle bristling with actuators and sensors, and while those rigs are impressive, they don’t come close to this robotic Rubik solver built into the cube itself.

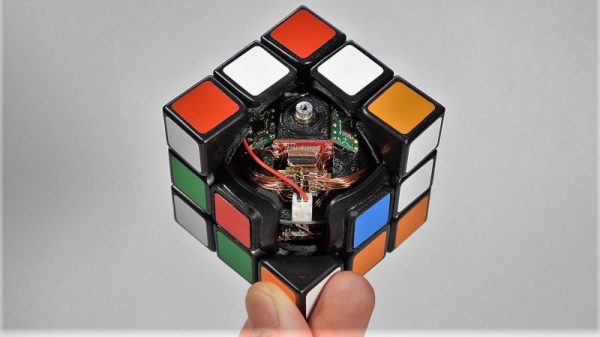
Fair warning that [Human Controller] doesn’t provide much detail on this build other than pictures; even translating the Japanese web page doesn’t offer much more information. But there are pictures, plus the video below, which reveal the engineering masterpiece encased within the standard sized Rubik’s cube. The internal mechanism of the original cube had been replaced by a spherical assembly around which the cube’s faces rotate. The sphere, which appears to be 3D-printed, houses six motors and gear trains, along with a microcontroller board and what appear to be Hall sensor boards to detect the position of each face. Everything is wired up with magnet wire to keep bundles to a minimum size, and buried deep inside is a LiPo battery pack. A disassembly video offers further clues to this ingenious device’s inner workings.

Once the cube senses that it has been scrambled, it sets to work on the solution, walking all over the table in the process. It’s clearly not just recording the scrambling steps and playing them back in reverse; the video below shows far more moves to solve the cube than the 15 it took to scramble it.

While we’re always impressed by marvels of speed like this robot with a 637 millisecond solve time, putting everything needed to solve the cube inside it is a feat worth celebrating. Here’s hoping that a build log shows up soon to satisfy our need for details.

Continue reading “Self-Solving Rubik’s Cube”

Infection? Your Smartphone Will See You Now

When Mr. Spock beams down to a planet, he’s carrying a tricorder, a communicator, and a phaser. We just have our cell phones. The University of California Santa Barbara published a paper showing how an inexpensive kit can allow your cell phone to identify pathogens in about an hour. That’s quite a feat compared to the 18-28 hours required by traditional methods. The kit can be produced for under $100, according to the University.

Identifying bacteria type is crucial to prescribing the right antibiotic, although your family doctor probably just guesses because of the amount of time it takes to get an identification through a culture. The system works by taking some — ahem — body fluid and breaking it down using some simple chemicals. Another batch of chemicals known as a LAMP reaction mixture multiplies DNA and will cause fluorescence in the case of a positive result.

Continue reading “Infection? Your Smartphone Will See You Now”

Cheating The Perfect Wheelie With Sensors And Servos

Everyone remembers popping their first wheelie on a bike. It’s an exhilarating moment when you figure out just the right mechanics to get balanced over the rear axle for a few glorious seconds of being the coolest kid on the block. Then gravity takes over, and you either learn how to dismount the bike over the rear wheel, or more likely end up looking at the sky wondering how you got on the ground.

Had only this wheelie cheating device been available way back when, many of us could have avoided that ignominious fate. [Tom Stanton]’s quest for the perfect wheelie led him to the design, which is actually pretty simple. The basic idea is to apply the brakes automatically when the bike reaches the critical angle beyond which one dares not go. The brakes slow the bike, the front wheel comes down, and the brakes release to allow you to continue pumping along with the wheelie. The angle is read by an accelerometer hooked to an Arduino, and the rear brake lever is pulled by a hobby servo. We honestly thought the servo would have nowhere near the torque needed, but in fact it did a fine job. As with most of [Tom]’s build his design process had a lot of fits and starts, but that’s all part of the learning. Was it worth it? We’ll let [Tom] discuss that in the video, but suffice it to say that he never hit the pavement in his field testing, although he appeared to be wheelie-proficient going into the project.

Still, it was an interesting build, and begs the question of how the system could be improved. Might there be some clues in this self-balancing motorized unicycle?

Continue reading “Cheating The Perfect Wheelie With Sensors And Servos”

A Three Axis Mill For The End Of The World

A mill is one of those things that many hackers want, but unfortunately few get their hands on. Even a low-end mill that can barely rattle its way through a straight cut in a piece of aluminum is likely to cost more than all the other gear on your bench. A good one? Don’t even ask. So if something halfway decent is out of your price range, you might as well throw caution to the wind and build one.

That’s more or less the goal behind this extremely basic three axis mill built by [Michael Langeder]. Designed around a cheap rotary tool, it’s hard to imagine a more simplistic mill. Almost all the components are stuff you could pick up from the local hardware store, or probably even the junk pile if you were really in a pinch. It won’t be the best looking piece of gear in your shop, but it’s good enough to learn the basics on and just might be able to bootstrap a second-generation mill RepRap-style.

Made out of scrap blocks of aluminum and some threaded rod, the Z axis itself represents the bulk of the work on this project. It gives the user fine control over the height of the rotary tool by way of a large knob on the top. It’s held over the work piece with some flat steel bars and corner brackets rather hastily cut out of aluminum sheet.

While the tool holder is 3D printed, you could probably hack something up out of a block of wood if you didn’t have access to a printer. The only part of the mill that’s really “cheating” is the cross slide table, but at least they can be had for relatively cheap. If you really wanted to do this with junk bin finds, you could always replicate the Z axis design for X and Y.

If you’re not looking for something quite so austere, we’ve covered slightly more advanced DIY mills in the past. You could always go in the opposite direction and put a cross slide vise on your drill press, but do so at your own risk.

Chordata motion capture dancer and 3D model

A Motion Capture System For Everyone

[Chordata] is making a motion capture system for everyone to build and so far the results are impressive, enough to have been a finalist in the Hackaday Human Computer Interface ChallengeIt started a few years ago as one person’s desire to capture a digital performance of a dancer on a stage and has grown into a community of contributors. The board files and software have just been released as alpha along with some instructions for making it work, though more detailed documentation is on the way.

Chordata motion capture dancer and Blender
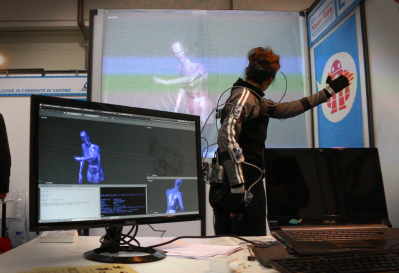
Fifteen sensor boards, called K-Ceptors, are attached to various points on the body, each containing an LSM9DS1 IMU (Inertial Measurement Unit). The K-Ceptors are wired together while still allowing plenty of freedom to move around. Communication is via I2C to a Raspberry Pi. The Pi then sends the collected data over WiFi to a desktop machine. As you move around, a 3D model of a human figure follows in realtime, displayed on the desktop’s screen using Blender, a popular, free 3D modeling software. Of course, you can do something else with the data if you want, perhaps make a robot move? Check out the overview and the performance by a clearly experienced dancer putting the system through its paces in the video below.

As a side note, the latest log entry on their Hackaday.io page points out that whenever changes are made to the K-Ceptor board, fifteen of them need to be made in order to try it out. To help with that, they show the testbed they made for troubleshooting boards as soon as they come out of the oven.

Continue reading “A Motion Capture System For Everyone”

Box Forts For Adults: Best Practices And Design Strategies

Many a grown up can reminisce about building various architectural wonders in their youth. Forts, whether based on boxes or blankets, were the order of the day, and an excellent way to spend a rainy Sunday afternoon.

It just so happens that there is no law against scaling up such activities once one has reached the age of majority. However, to build a structure at this level takes some careful planning and consideration, and that is the purpose of our article here today.

Location, Location, Location

To avoid an awkward conflict, be sure to warn your housemates of impending construction well ahead of time.

The first major consideration when starting your build should be the area in which you wish to do it. Building inside has the advantage of avoiding the weather, however hard floors can lead to sore knees when crawling around. Additionally, you’re a grown up now, so it’s less likely your peers will be impressed to hear you sat inside a box in your living room.

No, if you’re going to do this right, you’ll want to go outside. A nice flat lawn is best, providing soft ground and plenty of space. The challenges of the elements will guide your work – sitting inside your cardboard home feels all the more satisfying when you’re cosy and dry as you listen to the patter of rain on the roof. There’s a real sense of accomplishment when you’ve built something that can survive the harsh outdoors, and besides, the views are better, too. Continue reading “Box Forts For Adults: Best Practices And Design Strategies”

A Rotary Axis CNC Machine

There’s a certain class of parts that just can’t be made on a standard 3-axis mill, nor with a 3D printer or a lathe. These parts — weird screws, camshafts, strange gears, or simply a shaft with a keyway (or two) — can really only be made with a rotary axis on a CNC machine. Sure, you could buy a rotary axis for a Haas or Tormach for thousands of dollars, or you could build your own. That’s exactly what [Adam Zeloof] and [Matt Martone] did with their project at this year’s World Maker Faire in New York. It’s the Rotomill, a simple three-axis CNC machine, with a rotary axis, that just about anyone can build.

The design of the Rotomill uses a standard, off-the-shelf Makita rotary tool for the spindle, and uses leadscrews to move the X and Z axes around with NEMA 24 stepper motors. The A axis — the rotary bit — is driven through a worm gear, also powered by a NEMA 24. Right now this provides more than enough power to cut foam, plastic, and wood, and should be enough to cut aluminum. That last feat is as yet untested, but the design is open enough that a much more powerful spindle could be attached.

The software for this machine is a bit weird. For most CNC machines with a rotary axis, the A axis is treated as such — a rotary axis. For the Rotomill, [Adam] and [Matt] are generating G Code like it’s a normal Cartesian machine, only with one axis ‘wrapped’ around itself. This is all done through Autodesk HSM, and a properly configured Arduino running GRBL makes sense of all this arcane geometry.

It’s a great looking machine, and the guys behind it say it’s significantly less expensive than any other machine with a rotary axis. That’s to be expected, as it’s basically a five axis mill with two axes removed. Still, this entire project was built for about $2000, and some enterprising salvage and hacking could bring that price down a bit.