Dermal Implants Means Strapless Watch

dermal

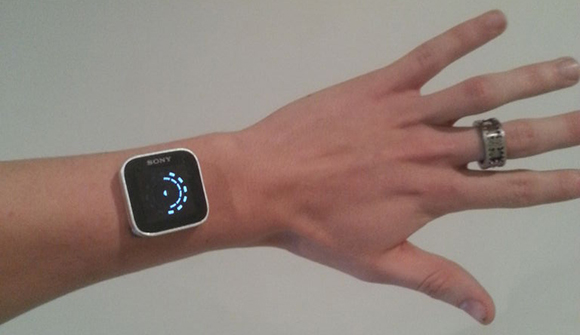
Google Glass is a year or so out, and even after that we’re still looking at about five years until we’re all upgraded at the behest of our robotic overlords. [justurn] simply can’t wait, so he decided to submit to the cybermen early with his Android-controlled wristwatch attached with dermal implants.

[justurn]’s got the inspiration for his project from this earlier Hackaday post involving dermal implants and an iPod nano. The iPod nano doesn’t have a whole lot of functionality, though, but the Sony SmartWatch does, and without the inevitable accusations of fanboyism.

To prep his arm for the hardware upgrade, [justurn] had four titanium dermal anchors placed in his wrist. After letting his anchors heal for a few months, [justurn] installed very strong neo magnets in the bases for his anchors and the clip for the SmartWatch’s strap.

The result is a magnetically mounted, Android-controlled watch semi-permanently attached to [justurn] at the wrist. We love it too.

Filming Light Reflecting Off Objects

light

With high-speed cameras you’re able to see bullets passing through objects, explosions in process, and other high-speed phenomena. Rarely, though, are you able to see what happens when light shines on an object without hundreds of thousands of dollars worth of equipment. A group of researchers at The University of British Columbia are doing just that with hardware that is well within the range of any home tinkerer.

Making videos of light passing through and around objects has been done before (great animated gifs of that here), but the equipment required of previous similar projects cost $300,000 and couldn’t be used outside the controlled environment of a lab. [Matthias] and his team put together a similar system for about $1,000. The only hardware required is an off-the-shelf 3D time of flight camera and a custom driver powering six red laser diodes.

Aside from having a much less expensive setup than the previous experiments in recording the flight of a pulse of light, [Matthias] and his team are also able to take their and record the flight of light in non-labratory settings. They’ll be doing just that at this year’s SIGGRAPH conference, producing videos of light reflecting off attendee-produced objects in just a few minutes. You can check out the video for the project below.

North Street Labs Try To Spice Up A Game Of Tic-Tac-Toe

tic-tac-toe-stomp-box

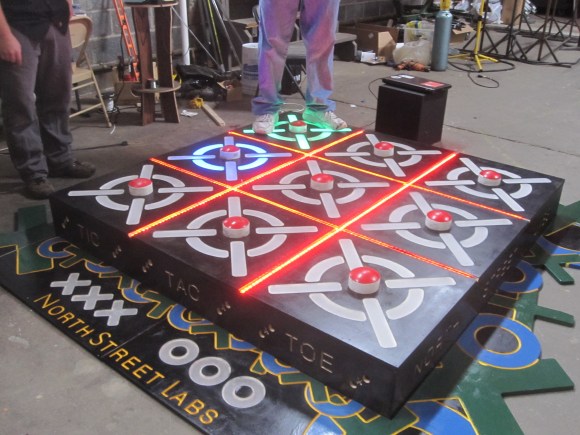
The team at North Street Labs really went all out with this Tic-Tack-Toe stomp box. At its most basic it’s a blinky version of the simple two-player game. But there’s always some added appeal when you make large manifestations of normally small items; the 10x Arduino is a good example of this.

The project is NSL’s qualifying entry for this year’s Red Bull Creation Contest (has it already been a year since the last contest?). A special Arduino shield was produced once again, this time it features hardware necessary to control LED strips… a lot of them. That led to the creation of this box, which houses a ton of strip sections inside to light the grid based on tapping one of the red buttons with your foot. We’d image the game would be seldom used at your hackerspace, but they take it to show off at the local children’s museum and it’s a huge hit with the kids!

Reading Game Boy Carts With I2C

rasgame

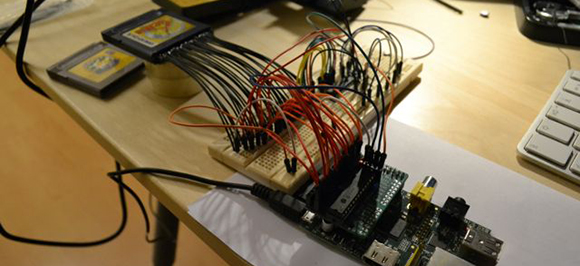
After seeing a Game Boy emulator for the first time, [Thijs] was amazed. A small box with just a handful of electronics that turns a Game Boy cartridge into a file able to be run on an emulator is simply magical. [Thijs] has learned a lot about GB and GBC cartridges in the mean time, but still thinks the only way to really learn something is to roll up your sleeves and get your hands dirty. Thus was born [Thijs]’ Game Boy cartridge dumper, powered by a pair of I2C port expanders and a Raspberry Pi.

Inspired by a build to dump ROMs off Super Nintendo games with the help of a Raspberry Pi, [Thijs] grabbed all the hardware necessary to create his own GB cart dumper. A DS Lite cartridge adapter provided the physical connection and a pair of MCP23017 I/O expanders – one soldered to a Slice of PI/O board – provided the electrical connections.

In the end, [Thijs] managed to dump the ROMs off the Japanese editions of Pokemon Yellow and Gold in about 13 minutes. This is a much slower transfer rate of 26 minutes per SNES cart in the post that gave [Thijs] the inspiration for this build. Still, [Thijs] will probably be the first to say he’s learned a lot from this build, especially after some problems with dumping the right banks from the cartridge.

LED Retrofit For Vintage Edge-lit Numeric Display Modules

edge-lit-led-retrofit

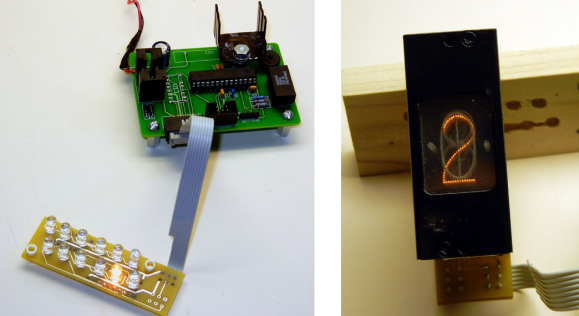
This single digit display is an old edge-lit module that [Ty_Eeberfest] has been working with. The modules were built for General Radio Company and have a really huge PCB to control just one digit. [Ty’s] modules didn’t come with that driver board, so he was left with the task of controlling an incandescent bulb for each digit. After a bit of thought he figured it would be much easier to just replace the edge-light bulbs with a set of LEDs.

We’ve seen these exact modules before, referenced in a project that created an edge-lit Nixie tube from scratch. Each digit in the display is made from a piece of acrylic with tiny drill holes which trace out the numerals. The acrylic is bent so that the edge exits out the back of the module where it picks up light from the bulb. [Ty] laid out his circuit board so that each LED was in the same position as the bulb it was replacing. As you can see, his retrofit works like a charm.

Continue reading “LED Retrofit For Vintage Edge-lit Numeric Display Modules”

Android Pen Plotter Snaps, Processes, And Prints Pictures

android-pen-plotter

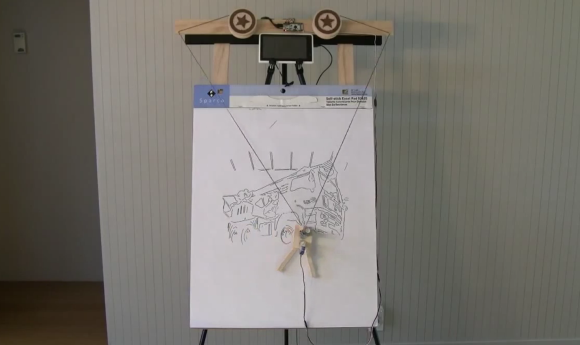
Here’s an Android powered pen plotter that does it all. It was built by [Ytai Ben-Tsvi] to take with him to Maker Faire. He’s the creator of IOIO, a hardware interface module designed to communicate with an Android device via USB (host or OTG are both supported).

The physical hardware is simple enough. He draws on a pad of white paper using a felt-tipped marker. Located at the top of the easel are two wheels with stars etched on them. They are reels which spool and dole-out string to control the pen’s movements. The pen tip can be lifted by a ball bearing mounted just below it.

But the project really takes off when you watch [Ytai’s] demonstration. The Android tablet controlling the device captures a picture of an object — in this case it’s a toy truck. The app then processes it using edge detection to establish how to plot the image.

Continue reading “Android Pen Plotter Snaps, Processes, And Prints Pictures”

Drinking Games And Digital Logic

Untitled-1

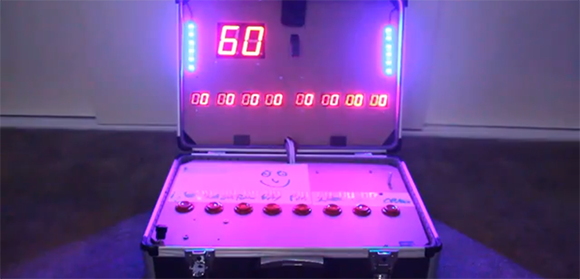
For those of you who might have forgotten, let’s go over the rules of Centurion. The object of the game is for every minute, for 100 minutes, drink a shot of beer. It doesn’t sound like a lot, but after completing the challenge you’ll have had 3 liters of beer (or about eight and a half 12 oz cans) in just under two hours. When [Peter] played Centurion, he found the biggest problem was – understandably – keeping track of the time and who drank what. For an upcoming weekend of drinking, [Peter] decided to solve this problem once and for all with shift registers and seven-segment displays.

[Peter]’s Centurion score box comes in two parts. The first and largest part of the build is the main board housing an ATMega8 microcontroller and a huge two digit seven-segment display to keep track of the countdown until the next shot. Two other boards house eight additional two digit seven-segment displays for each player, incremented every time a player presses a giant arcade button.

The entire build is designed around a small travel case that also holds a large battery for cordless drinking parties. Let’s just hope the project is reasonably water-resistant; we can see a lot of spills happening in the future. Check out the video demo below.

Continue reading “Drinking Games And Digital Logic”