Thin Client And Smartphone Step In For 3D Printer’s Raspberry Pi And Touchscreen

It’s no secret that Raspberry Pi’s are a little hard to come by these days. Unless you had the foresight to stock up before the supply dried up — and if you did, we want to talk to you — chances are good that you’ve got a fair number of projects that use the ubiquitous SBC on indefinite hold. And maybe that’s got you thinking about alternatives to the Pi.

That’s apparently what was on [Crimson Repair]’s mind lately, the result being the discovery that an old thin client PC makes a dandy stand-in for a Raspberry Pi, at least in some cases. The video below is on the long side, true, But it’s chock full of command-by-command instructions for getting a Dell Wyse 3040, a thin client that can be found on the secondary market for $25 or so, up and running as a Klipper alternative for a 3D printer. These machines, which usually see use in point-of-sale applications and the like, sport a 1.4-GHz Intel Atom processor and a couple of gigs of RAM, and the form factor is just right for tucking into the base of an Ender 3.

Getting one up and running is a matter of getting a Debian image onto a USB key and configuring the thin client to boot from USB. After that it’s a simple matter of installing Klipper and wiring up a buck converter to power the machine. It’s not exactly rocket surgery, but why muddle through the process when someone has already been down the path ahead of you? And if you want to take it further, the second video below walks you through all the steps needed to add a touchscreen using an old Android phone. With a 3D printed bracket, the whole thing is a nicely complete printer control solution.

Continue reading “Thin Client And Smartphone Step In For 3D Printer’s Raspberry Pi And Touchscreen”

3D Printer Slicing In The Manufacturing World

It is no secret that the way you build things in your garage is rarely how big companies build things at scale. But sometimes new techniques on the production floor leak over to the hobby builder and vice versa, so it pays to keep an eye on what the other side is doing. Maybe that was the idea behind [Carolyn Schwaar’s] post on All3DP entitled “Beyond Cura Slicer: 3D Printing Build Prep Software for Pros.” In it, she looks at a few programs that commercial-grade 3D printers use for slicing.

The differences in the software we typically use and those meant to work with a dedicated high-end machine are pretty marked, but maybe not in the way you would expect. While you might expect them to have tight integration with their target machine, you might not expect that they usually offer less control over parameters than a product like Cura. As a quote in the post points out, Cura has over 400 settings. Commercial 3D printers don’t have time to tweak those settings endlessly. So the emphasis is more on canned profiles that just work.

Not all of the programs are tied to machines, though. Commercial CAD offerings are becoming more capable with 3D printers and can sometimes slice and send jobs to printers directly. Regardless of software type, though, everyone needs certain functions: design, repair, simulation, build plate layout, and more.

If you are looking for a hobby-grade slicer other than Cura, we’ve been using SuperSlicer which is a fork of PrusaSlicer, which is a fork of Slic3r lately.

Build Your Own Concrete 3D Printer

We didn’t notice [Nikita]’s post about building a concrete 3D printer, a few months ago, but the idea seems sound: build a basic CNC XY axis and then add a mortar pump and hose to deposit concrete. The video, below, shows the machine in operation.

While it looks interesting, there is essentially no real Z-axis, so this would be limited to some sort of relatively thin forms unless you, perhaps, did a few layers and then further lifted the machine. We also assume wet concrete won’t bridge at all. Still, this might be an interesting project, especially if you have a spare CNC XY axis floating around.

If you buy everything, though, you are looking at an estimated cost of around $7,000 USD. We presume there is enough weight in the concrete that a conventional 3D printer probably isn’t going to cut it. We did wonder, though, if there would be any merit to connecting a conventional plastic-extruding nozzle to be able to lay down support for the concrete.

This might be a good jumping-off point for a more sophisticated machine. In particular, [Nikita] points out that a progressive cavity pump with a variable frequency drive is ideal, because it allows you to vary the extrusion rate and provides a steady flow of concrete. Armed with that knowledge, you could probably figure out the rest pretty easily if you’ve ever built a 3D printer or CNC machine.

Not the first concrete printer we’ve seen, of course. The one we saw before was capable of some pretty amazing things.

Continue reading “Build Your Own Concrete 3D Printer”

A 3D Printer With Quadruple The Output

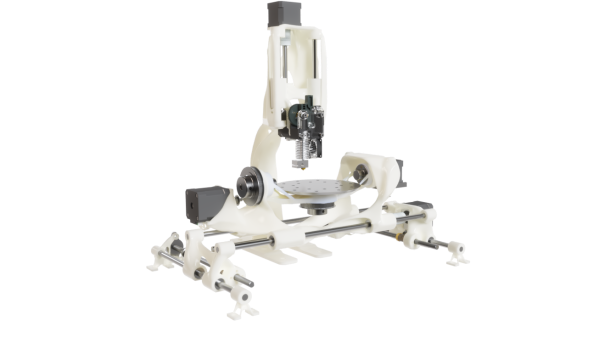
While the polygraph is colloquially associated with pseudoscientific lie detector tests, the actual invention of the first polygraph was designed to mechanically duplicate the pen strokes of someone writing. Famously, a polygraph was used by former US President Thomas Jefferson in his “modern office”, a replica of which still sits in the Smithsonian museum. Few of us have a need for a pen-based polygraph anymore, but inspiration from the centuries-old invention can still be gleaned from the machine, like in this 3D printer which can output four identical prints at once.

The printer is a Core XY design with four separate print heads, which are all locked together. The printer behaves as if there is a single print head which keeps it simpler than it otherwise could be. Some extra consideration needs to be paid to the print bed to ensure it’s level and flat, and it also includes a unique Z-axis designed to prevent Z-banding from poor quality leadscrews. It has a fairly wide print area, but a noticeable restriction is that it’s essentially quartered, so while it can produce many parts at once, it can’t produce a single part that uses the entire area of the print bed.

Every printed part used to make this printer was designed by [Rick] in OpenSCAD. He also built a custom electronics board with the printer drivers, and all other associated circuitry in KiCad. For anyone who prints large volumes of parts, this might be just the trick to increase output without having to manage more printers. If you already have more printers and need an easier way to manage them all, take a look at this dedicated Raspberry Pi set up to do just that.

Continue reading “A 3D Printer With Quadruple The Output”

Art of 3D printer in the middle of printing a Hackaday Jolly Wrencher logo

3D Printering: Managing Multiple Printing Profiles

I know people who have 3D printers that are little more than appliances. They buy it, they print with it, and they don’t change much of anything. That doesn’t describe me and, I’m guessing, it doesn’t describe you either. This does lead to a problem, though, when it comes to slicers. You have to keep changing profiles and modifying them. It can be hard to keep things straight. For example, if you have profiles for different nozzles, you get to make a choice: keep one profile and edit the parts that change, or keep multiple profiles and any common changes have to be propagated to the other profiles.

Part of the reason I want to manage multiple profiles has to do with this mystery object…

I’ve long wanted to create a system that lets me have baseline profiles and then just use specific profiles that change a few items in the baseline. Turns out, I didn’t need to do it. Prusa Slicer and its fork, SuperSlicer, have the capability already. Both of these, of course, are based on Slic3r, but the scripting languages are different and what I’m doing does require G-code scripting. The problem is, this capability is not documented very well and the GUI doesn’t really support it directly, which requires a little sidestepping. I’ll show you how I have things set up and where the limitations are. If you want to try your hand at it, I highly suggest you backup your configuration directory or switch to a new one.

Continue reading “3D Printering: Managing Multiple Printing Profiles”

Have 3D Printer, Will Travel

We keep hearing that the desktop computer is dying — everyone wants a mobile device like a laptop, a tablet, or a big horkin’ phone. We suppose [eponra] wants the same thing for 3D printers, since he’s provided plans for “flatpack” a portable 3D printer that can fit in a spool box.

As you might imagine, this isn’t going to give you maximum build volume. The printer’s folded down dimensions are 220x210x75mm. The build plate is fairly small at 120x114x144mm. However, it does have a heated bed and an LCD display. One note, though: you do need an external power supply that does not fit in the box. However, [eponra] notes that with an AC-powered bed, it would be possible to get everything in the box.

Continue reading “Have 3D Printer, Will Travel”

3D Printer Upcycles Computer Case To DAS

Storage technologies are a bit of an alphabet soup, with NAS, SAN, and DAS systems being offered. That’s Network Attached Storage, Storage Area Network, and Direct Attached Storage. The DAS is the simplest, just physical drives attached to a machine, usually in a separate box custom made for the purpose. That physical box can be expensive, particularly if you live on an island like [Nicholas Sherlock], where shipping costs can be prohibitively high. So what does a resourceful hacker do, particularly one who has a 3d printer? Naturally, he designs a conversion kit and turns an available computer case into a DAS.

There’s some clever work here, starting with the baseplate that re-uses the ATX screw pattern. Bolted to that plate are up to four drive racks, each holding up to four drives. So all told, you can squeeze 16 drives into a handy case. The next clever bit is the Voronoi pattern, an organic structure that maximizes airflow and structural strength with minimal filament. A pair of 140mm fans hold the drives at a steady 32C in testing, but that’s warm enough that ABS is the way to go for the build. Keep in mind that the use of a computer case also provides a handy place to put the power supply, which uses the pin-short trick to provide power.

Data is handled with 4 to 1 SATA to SAS breakout cables, internal to external SAS converters, and an external SAS cable to the host PC. Of course, you’ll need a SAS card in your host PC to handle the connections. Thankfully you can pick those up on ebay for $20 USD and up.

If this looks good, maybe check out some other takes on this concept!