Atari Gets Semi-Modern Video Output

The Atari 2600 is a historical enigma in many ways. On one hand, it was the most popular gaming console of its era, but it was also at the center of the video game crash of 1983 due to the poor quality of its games at the time. It is a fascinating system in many ways that are still relevant today, especially when it comes to pushing hardware much farther than it was designed to go. [nicole] brings us a project that overcomes some of the limitations in its hardware to provide a more modern video output.

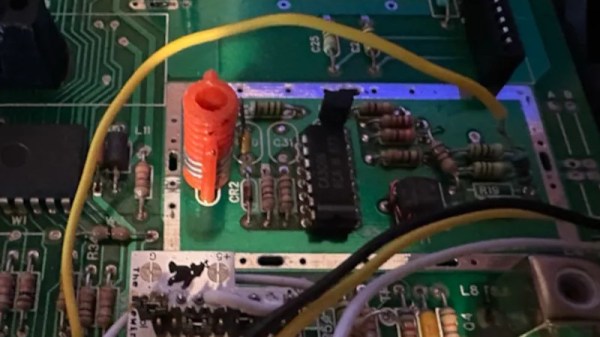
At the heart of the Atari is a custom chip called teh Television Interface Adapter (TIA) that generates the console’s video signal as well as handling controller information and a few other tasks. It was designed at a time where memory was expensive, and essentially trades programmer effort to reduce memory requirements. Interestingly, it separates luminance and chrominance information much like S-video does, so that’s where [nicole] focused their efforts. Thanks to some help from an adapter board, the video signals can be intercepted and reprocessed for the S-video standard instead of using RF modulation to send video data out, although this does involve some soldering and modifying of the original Atari hardware. In [nicole]’s case this was a little more involved due to the differences of the 2600jr compared to more standard versions of the console.

While S-video isn’t modern in the strictest sense, as a standard from 1987 it is a huge step forward compared to the available video output methods available in the 1970s when the 2600 was first produced. Plenty of older consoles and other hardware like VCRs and the like used S-video, so if you have a retro gaming setup complete with a CRT you might want to take a look at this 12-input A/V switch to keep everything managed.

Aluminum Battery Is Sustainable

If you think of metals in a battery, you probably think of lithium, mercury, lead, nickel, and cadmium. But researchers in Australia and China want you to think about aluminum. Unlike most battery metals, aluminum is abundant and not difficult to dispose of later.

Their battery design uses water-based electrolytes and is air-stable. It is also flame retardant. The battery can provide 1.25V at a capacity of 110 mAh/g over 800 charge cycles. The idea of using aluminum in a battery isn’t new. Aluminum is potentially more efficient since each aluminum ion is equivalent to three lithium ions. The batteries, in theory, have higher energy density compared to lithium-ion, but suffer from short shelf life and, so far, practical devices aren’t that close to the theoretical limits of the technology.

Continue reading “Aluminum Battery Is Sustainable”

Silencing A 3D Printer With Acoustic Foam Isn’t That Easy

3D printers are supremely useful tools, but their incessant whining and droning can be distracting and tiresome. [Handy Bear] decided to try some simple ways to quieten down their printer using acoustic foam, with mixed results.

The video starts by exploring two different acoustic foams; one black, one white. The latter was found to hold a flame when ignited, making it a poor choice for a 3D printer with many hot components. The black foam, advertised for use in automotive installations, was reluctant to burn at all, and so made a safer choice.

The UP Mini 3 printer is then disassembled to receive its soundproofing treatment. The printer’s various panels all got a healthy lashing of thick sticky insulating foam. This took some work, thanks to the need to cut around various ribs and screw bosses on the panels. Cut appropriately, though, the printed was able to be reassembled neatly with its foam hidden inside.

Unfortunately, the work didn’t have a great effect on the printer’s sound output. That’s perhaps unsurprising, given it still has uninsulated panels like the front window which are still free to radiate sound. The foam did help cut down on fan noise and high-pitch sounds from the printer, but the annoying medium and low pitched noises from the printer’s motors were still very audible.

Using an enclosure or a quieter stepper driver are probably more effective DIY methods to quiet a noisy printer; share your own ideas in the comments. Video after the break.

Continue reading “Silencing A 3D Printer With Acoustic Foam Isn’t That Easy”

Spooky Noise Box Plays War Drums

What do you have cooked up to scare trick-or-treaters this Halloween? We humbly suggest adding in some type of noise box, especially one like this offering from [Paisley Computer] that uses reverb and other effects to achieve chilling, thrilling sounds.

As you can see, this instrument is essentially a bunch of doodads affixed to and through a cigar box. And as you’ll hear in the first video after the break, the various rubber bands make great drum sounds. The springs are nice, too, but our personal favorite has to be the head massager thing. Shhhing!

Inside the box you’ll find a guitar jack and some piezos glued to the underside of the top surface, but you’ll also find springs mounted across the inside that add to the resonance of the cigar box.

You can use either an interface and DAW or an effects pedal chain to really make things freaky, and [Paisley Computer] does a showdown between Focusrite interface versus various stomp pedals in the second video. In the third video, we learn how to make one of our own.

Do you like the idea of a spring reverb? How about a really big one that sounds sort of Satanic?

Continue reading “Spooky Noise Box Plays War Drums”

Cold Metal Fusion For 3D Printing

When you see the term cold fusion, you probably think about energy generation, but the Cold Metal Fusion Alliance is an industry group all about 3D printing metal using Selective Laser Sintering (SLS) printers. The technology promoted by Headmade Materials typically involves using a mix of metal and plastic powder. The resulting part is tougher than you might expect, allowing you to perform mechanical operations on it before it is oven-sintered to remove the plastic.

The key appears to be the patented powder, where each metal particle has a thin polymer coating. The low temperature of the laser in the SLS machine melts the polymer, binding the metal particles together. After printing, a chemical debinding system prepares the part — which takes twelve hours. Then, you need another twelve hours in the oven to get the actual metal part.

You might wonder why we are interested in this. After all, SLS printers are unusual — but not unheard of — in home labs. But we were looking at the latest offerings from Nexa3D and realized that the lasers in their low-end machines are not far from the lasers we have in our shops today. The QLS230, for example, operates at 30 watts. There’s plenty of people reading this that have cutters in that range or beyond out in the garage or basement.

We aren’t sure what a hobby setup would look like for the debinding and the oven steps, but it can’t be that hard. Maybe it is time to look at homebrew SLS printers again. Of course, the powder isn’t cheap and is probably hard to replace. We saw a 20 kg tub of it for the low price of €5,000. On the other hand, that’s a lot of powder, and it looks like whatever doesn’t go into your part can be reused so the price isn’t as bad as it sounds. We’d love to see someone get some of this and try it with a hacked printer.

We have seen homebrew SLS printers. There’s also OpenSLS that, coincidentally, uses a laser cutter. It wouldn’t be cheap or easy, but being able to turn out metal parts in your garage would be quite the payoff. Be sure to keep us posted on your progress.

Button, Button, Who’s Got The (Pico) Button?

There is an episode of Ren and Stimpy with a big red “history eraser’ button that must not be pressed. Of course, who can resist the temptation of pressing the unpressable button? The same goes for development boards. If there is a button on there, you want to read it in your code, right? The Raspberry Pi Pico is a bit strange in that regard. The standard one lacks a reset button, but there is a big tantalizing button to reset in bootloader mode. You only use it when you power up, so why not read it in your code? Why not, indeed?

Turns out, that button isn’t what you think it is. It isn’t connected to a normal CPU pin at all. Instead, it connects to the flash memory chip. So does that mean you can’t read it at all? Not exactly. There’s good news, and then there’s bad news.

The Good News

The official Raspberry Pi examples show how to read the button (you have read all the examples, right?). You can convert the flash’s chip-select into an input temporarily and try to figure out if the pin is low, meaning that the button is pushed. Sounds easy, right?

Continue reading “Button, Button, Who’s Got The (Pico) Button?”

Salad Spinner Busts Some New Moves

Can you believe that [Tom Tilley]’s wife was just going to pawn off this perfectly good salad spinner on the thrift store when it’s so ripe for hacking? We couldn’t, either. Fortunately, he caught it just in time, right before dinner.

One of the coolest things a person can do that also tends to aid gameplay is to make a custom controller. [Tom] decided to make one for Bust-A-Move, a simple game where one shoots balls at bubbles in order to pop them. It looks like quite the fun little stress reducer. Anyway, a simple game deserves a simple controller, no? Yes.

As you’ll see in the build/demo video below, [Tom] started with a standard wireless mouse and hot-glued a cardboard origami creation to it. This goes upside-down inside the salad spinner and gets connected to the spinner part so that the entire origami moves in a circle. [Tom] then extended the left mouse button to a switch, which he affixed to the outside.

This controller re-uses a slightly modified mouse that [Tom] used in a previous Bust-A-Move controller. He is using a FreePIE script and vJoy in order to map mouse movements to the joystick inputs expected by the game. Watch [Tom] bust some moves after the break.

Continue reading “Salad Spinner Busts Some New Moves”