Meet The Pinguino – A Completely Open PIC-based Dev Platform

pinguino

[Phillip Torrone] from Make recently sat down with [Jean-Pierre Mandon] and [Tsvetan Usunov], creators of the Pinguino, to hear more about their product. While the name might not sound familiar, we’re pretty sure you’ll be seeing more of this development platform as time goes on.

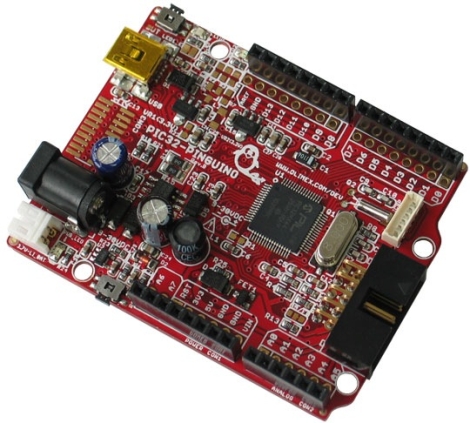
Essentially created by makers for makers, the Pinguino is a 32-bit PIC based Arduino-compatible prototyping platform, much like Microchip’s chipKIT. The Pinguino boasts 100% Arduino compatibility just as the chipKIT, though their tool chain has been built from scratch, meaning it is completely open source. The Pinguino even include an on-board microSD slot and a built-in Li-Po charger – two huge features that make this a solid chipKit competitor.

Phil discusses the history of the Pinguino with the pair, diving into technical differences between the two platforms, as well as where they plan on taking the platform in the future. It’s certainly an interesting read for anyone interested in open software and hardware that has been considering giving the chipKIT a try.

QR Code Key Fob Helps Your Lost Keys Find Their Way Home

qrcode_key_finder

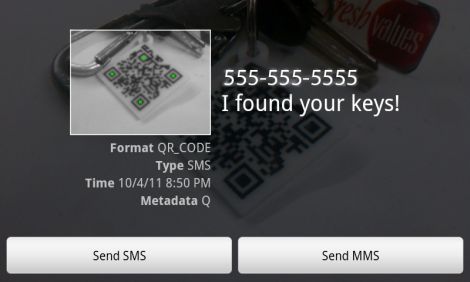
Don’t you hate that feeling, the one you get when you have just realized that you have no clue where you may have left your keys? If you are unlucky enough to have lost them in a public place, odds are they are as good as gone. Pumping Station One member [celtwolf] thought it would be great if your keys could help someone contact you instantly upon finding them, so he created a key fob that did just that.

SMS can use a similar URI scheme as the “mailto” protocol we are all familiar with, so [celtwolf] generated a URI that would send a text to his mobile phone with the message “I found your keys!”. He generated a QR code from the URI, then etched it on a piece of acrylic using a laser cutter. He filled in the recessed portions with a dark polymer clay, baked it, then coated it with a layer of nail polish for added durability.

Now, if anyone finds his keys and takes a picture of the QR code with their smartphone, he will immediately receive a text letting him know they are safe and sound. What a great idea!

Sustainability Hacks: Poop Power

Yes. That’s a motorized tricycle with a toilet. Let that sink in for a minute. Oh, that isn’t a concept sketch of something that will never be built. The Toilet Bike Neo is most assuredly a real thing.

Biogas, or methane produced from decaying plant or animal wastes, is a legitimate form of energy. Waste gasses from landfills make up about half a percent of U.S. natural gas consumption. The state of Vermont even has a Cow Power program of renewable energy. That being said, this is a toilet on a trike.

The bike was built for Japanese bathroom fixture manufacturer TOTO’s green initiative. Biogas is produced onboard the trike, so instead of going to the local gas station to fill up, you could just get a newspaper, coffee and bran muffin. There are tanks on the back of the trike containing “fuel”. This arrangement probably makes a rear end collision in the Toilet Bike Neo more terrifying than getting rear-ended in a Ford Pinto.

The Toilet Bike Neo is setting off on a trip across Japan on October 6th (today) to promote biogas. You can follow the updates on the Toilet Bike Neo’s Twitter.

A tip ‘o the hat to [jon] for sending this one in. You may now commence the jokes.

Open Source Makes This USB Arcade Controller Build A Breeze

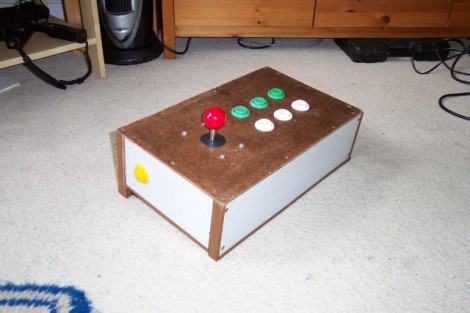
[Jamie] built his own USB connected arcade controller. We’ve been seeing a lot of these lately, and they usually involve soldering buttons to a keyboard PCB. But [Jamie] decided to go a different route and use his own microcontroller. This method always gets a bit hairy when it comes to deciding how to connect it to a computer. Dealing with the USB stack used to be quite tricky, but the LUFA project is slowly taking the pain out of the process.

The Lightweight USB Framework for AVRs is an open source project that handles the hard work associated with USB capable AVR microcontrollers. [Jamie] knew that they already had a sample implementation of a hardware joystick. He’s not using one of the supported boards and so wasn’t able to just compile and go. But porting the code to work with his minimus board was simple enough. With the code in place, the physical build was quite simple. The buttons and joystick were mounted on the surface of an overturned drawer. Each is connected to one pin of the controller board and to ground. LUFA makes sure that the device enumerates as a joystick, and [Jamie] was gaming in no time.

Tetris On A Building

Around a year ago, a bunch of blinkenlights were installed in the HCI-Building of ETH Zürich. These LED spots weren’t interactive and only showed hardcoded patterns. Of course a bunch of LEDs demand interactivity, so for the first-semester party this year a giant game of Tetris was built on the side of a building.

There’s no official build log, but from what we’ve learned, the LEDs are connected to a DMX controller that is in turn plugged into a computer and the University’s ethernet. For the command and control of the Tetris game, a USB joystick was connected to an old Dell that was pulled out of the junk pile.

The software for the project, LED side of the project was written in Visual C++ reusing old Tetris routines and example code from the DMX controller. For the controller portion, everything was written in C. The controller simply dumps chars into a TCP port on the second computer. While the Tetris board was only 3 pixels wide, there was a fairly massive queue of people wanting to play.

Student Built Robot Chassis Has Something You Can Learn From

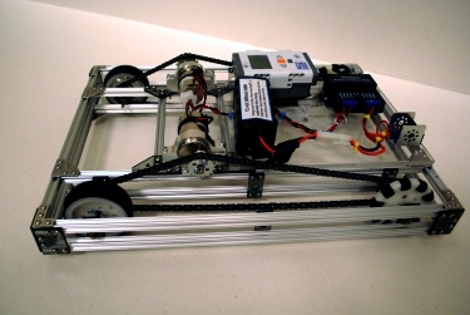
This is a four-wheeled robot chassis built by high school students over the summer. They were participating in workshops put on by xbot robotics in Seattle, Washington. The goal is to get them participating in events like FIRST Robotics and LEGO league, and eventually into science related careers.

At first glance we thought: oh, that’s a nice chassis build… on to the next tip. But then the difference in front and rear wheel types caught our eye. The problem with four-wheeled designs is that you need differential steering to overcome the skidding issue when turning. This usually means two independently powered rear wheels and one unpowered front wheel that can swivel. One way to overcome this is to use three omniwheels, each with their own motor. And more recently we have seen four-wheelers that use mechanum wheels to get around the issue… but that takes four motors.

The design seen above uses just two motors, each with a chain to drive both wheels on one side. The rear wheels have rubber grippers which give them great traction. The front wheels are omni-wheels which allow them to move side to side easily during turns while aiding in forward progress when not turning. This gives the robot enough grip to push object around, like you can see in the video after the break.

Continue reading “Student Built Robot Chassis Has Something You Can Learn From”

Portable Light Box For Photographers On-the-go

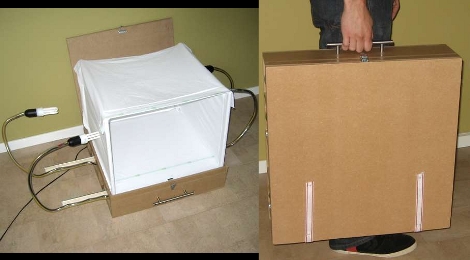
Looking to make a quality light box more portable, [Hharry] designed a collapsible version complete with adjustable side lighting.

Light tents are used by photographers as a stage for photographing small items. The use of multiple light sources, and a fabric that will diffuse them, means a reduction in shadows that might otherwise ruin a picture. This design starts with an MDF base in the form of a shallow box with a few baffles running left to right. Drawer slides connect the lamp poles to these baffles, making it easy to pull each of the four light sources out when setting up the tent.

The white fabric that makes up the stage has pockets sewn into the edges to accept dowel rods. These are not anchored permanently. They pull against the fabric when wedged in place to keep the tent taut, but easily fold down for storage in the cavities of the base. Finally, the top of the carrying case folds down and a drawer pull serves as the carrying handle.

A light tent isn’t the only way to battle shadows in your pictures. Check out this method that uses mirrors to adjust lighting conditions.

[Thanks David]