Eight-dollar Airplane For Really Bad Pilots

Have a habit of hitting the bottle before getting into the cockpit? Find that your mind wanders mid-flight? Lack the hand-eye coordination to keep that RC creation of yours in the air? Worry not, you can build this flyer and crash it with impunity.

[HammyDude] built the RC aircraft out of laminated foam board. He’s had it for years and it’s survived multiple crashes. You can see the one real injury suffered, a snapped fuselage at the leading edge of the wings. He repaired it with popsicle sticks and it’s been going strong ever since.

In addition to the wooden reinforcements he’s covered the fuselage with fibrous packing tape (you know, the stuff with the strings running in it). There’s also a carbon fiber tube at the leading edge of each wing. It’s light, strong, and robust (with the exception of the propeller of which he’s broken about 10).

Check out the video after the break for an explanation of the aircraft, list of materials, and HD images of the patterns you need to make them yourself. The only thing you won’t see is flight footage.

Continue reading “Eight-dollar Airplane For Really Bad Pilots” →
Printable Solar Cells That Can Be Folded Up When Not In Use

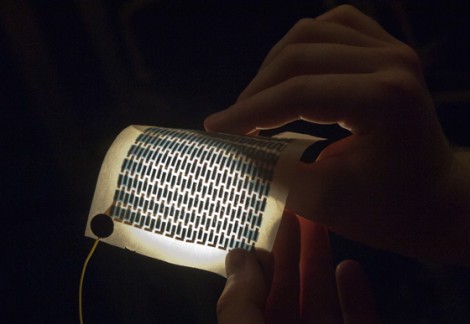
Here’s a photovoltaic cell that can be printed onto paper. The manufacturing technique is almost as simple as using an inkjet printer. The secret is in the ink itself. It takes five layers deposited on the paper in a vacuum chamber. But that’s a heck of a lot easier than current solar cell fabrication practices. In fact, is sounds like the printing process is very similar to how potato chip bags are made. This is significant, because it could mean a fast track to mass production for the technology.

It isn’t just the easy printing process that excites us. Check out the video after the break where a test cell is placed on top of a light source while being monitored by a multimeter. It’s been folded like a fan and you can see a researcher sinch up the cell into a small form for storage. It’s a little counter-intuitive; for instance, you wouldn’t want to make a window shade out of it because it would have to be down during the day to get power. Be we think there’s got to be some great use for these foldable properties. Continue reading “Printable Solar Cells That Can Be Folded Up When Not In Use” →

Cheap DIY Tilt Switches Are Great In A Pinch

diy-cheap-tilt-switch

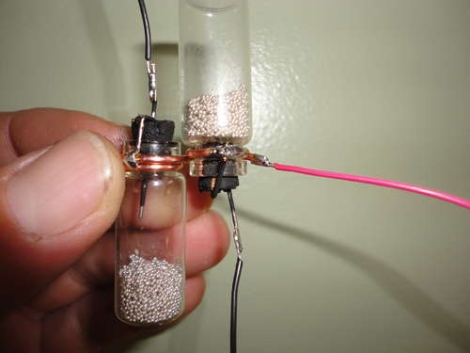
[fjordcarver] was looking for some mercury-free tilt switches that wouldn’t break the bank and that were easy to build. He also wanted something cheap, so instead of buying some tilt switches he devised his own that fit all of the criteria he set out. Now, these switches are not your typical fare, and they’re not small either. They are however, cheap, effective, and easy to manipulate/repair.

He picked up a package of metallic craft beads at the store and emptied out two bottles, saving one set of beads that happened to be conductive, i.e. not coated with paint or coloring. The beads were split between two jars, which were then sealed with corks that had a pair of straightened paperclips inserted through them. The bottles were oriented facing away from one another, then attached together with a piece of house wire. One of the leads from each jar was attached to this common wire, while the others were extended with hook up wire for use in the circuit he was building. Pictures definitely explain the mechanism far better than words can, so be sure to check out his tutorial to get a better look at them.

While they might look a bit rough, he says they work great, so give them a try if you have the need.

Children’s Light Up Toy Is An Easy Hand-made Gift

light-and-switch-toy

While this year’s Christmas lists are dominated by electronic gadgets and other mass-produced toys, it wasn’t always like that. We’re not trying to sound like the old man yelling at the neighborhood kids to get off his lawn, but many of today’s gifts lack the personal touch found in old, hand-made toys.

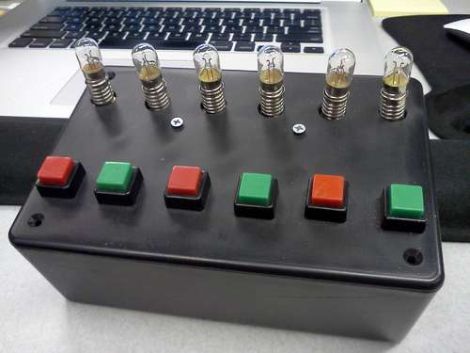
[henlij’s] son is a budding electronics geek who loves playing with switches and lights, so he was inspired to build him a fun toy to pass the time. He constructed a simple box full of lights and switches that his son could toggle on and off to his heart’s content.

While there’s not a ton going on inside the box, we think that the idea is fantastic. With just a few dollars worth of simple components, anyone who knows their way around a soldering station can build something that will keep a child fascinated for hours.

There’s no reason to stop at buttons and lights either. If we were to build one, we would swap the bulbs out for LEDs, then add a wide variety of switches and dials along with speakers and any other components we could get our hands on.

The options are pretty limitless, so if you happen to know a child that gets a kick out of playing with buttons and switches, why not make him or her something special this year, much like [henlij] did for his son?

Trying To Measure The Speed Of Light With An Arduino

We know that measuring the speed of light with an Arduino is possible. It’s just that the implementation is hard.

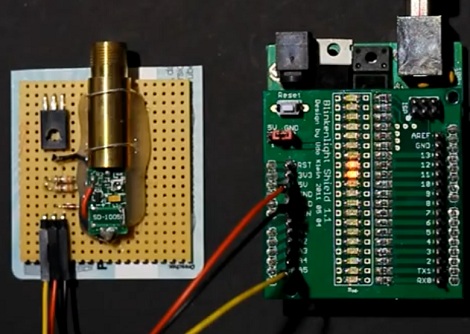
Last month we saw [Udo]’s blinkenlight shield that can be used as a line scan camera. It’s a neat piece of kit, but [Udo] really wants to submit something for the Buildlounge laser cutter giveaway, so he figured measuring the speed of light would be an easy project. If a kid and a chocolate bar can do it, surely it can’t be too hard.

[Udo] hit upon the idea of pulsing a laser pointer and measuring the time of the reflection. Because his blinkenlight shield can be used as a light sensor, all that’s needed is a mirror and a pretty long line of sight. There’s a few problems with the setup though: with the Arduino running at 16 MHz, a photon will travel 19 meters in one clock cycle.

Even with some very clever coding, we’re not really sure detecting an emitted photon is possible at such (relatively) slow clock speeds. We’re thinking [Udo] could source a few hundred meters of optic fiber so the entire experiment could fit on a desk, but feel free to drop a note in the comments if you’ve got a better idea. [Udo]’s demo of his blinkenlight/laser mashup is after the break.

Continue reading “Trying To Measure The Speed Of Light With An Arduino” →

diy-laser-scanner

Cheap DIY Laser Scanner Is Quite Impressive

With the introduction of the Kinect, obtaining a 3D representation of a room or object became a much easier task than it had been in the past. If you lack the necessary cash for one however, you have to get creative. Both the techniques and technologies behind 3D scanning are somewhat complicated, though certainly still within reach as maker [Shikai Chen] shows us. (Google Translation)

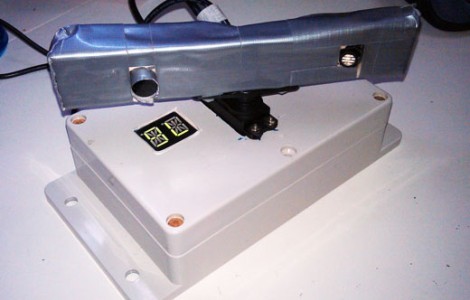
He wanted to create 3D scanned images, but he didn’t have the resources to purchase a Kinect. Instead, he built his own scanner for about 1/6th the cost. Interestingly enough, the scanner resembles what you might imagine a very early Kinect prototype looked like, though it functions just a little bit differently than Microsoft’s creation. The scanner lacks any sort of IR emitter/camera combo, opting to use a laser and a USB VGA camera instead. While scanning, the laser shines across the target surface, and the reflected light is then picked up by the camera.

So how does this $25 DIY laser scanner measure up? Great, to be honest. Check out the video below to see how well his scanner works, and be sure to take a look through his second writeup (Google Translation) as well for more details on the project.

[via Seeedstudio]

[youtube=http://www.youtube.com/watch?v=jLZ-s9KRzG8&feature=player_embedded&w=470]

Multivibrator In Theory And Practice

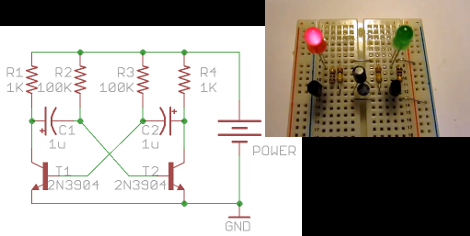
We must admit that we’ve been guilty of using a microcontroller to make two LEDs blink alternately in the past. It’s not the worst transgression, but it stems from our discomfort with analog circuits. Luckily, [Ray] published an illustrated guide on building multivibrator circuits. This is a simple method of assembling a two-output oscillator. All it takes is a pair of NPN transistors, which are then switched by on and off based on a resistor-capacitor (RC) timer.

[Ray] does a good job of walking us through how the circuit works at each stage of one complete cycle. You’ll need to read carefully, but the supplementary schematics he uses to water down snap shots of the various electrical states really helped us understand.

Of course, blinking LEDs isn’t the sole purpose of a multivibrator. It is a method of producing a clean square wave which can be used as a clock signal for TTL logic chips. Oh, who are we kidding, see the blinky goodness for yourself in the video after the break.

Continue reading “Multivibrator In Theory And Practice” →