
The Lego Synchro Drive

[M-byte] wrote in to tell us about the Lego Synchro Drive. Although not a new hack, this autonomous vehicle is quite amazing in it’s simplicity.  Using only one motor turning at a constant speed, this device is able to navigate obstacles by simply turning.

As [m-byte] was quick to point out, this is a simple task using modern electronics, but this drive is made using only Lego Technic parts. The machine’s motion is quite pleasing. When it hits an obstacle, the outer rotating ring stops, allowing the casters on the bottom to switch direction. One could see this invention coming out of Leonardo da Vinci’s notebook (minus the Legos).

Check out either of the embedded videos after the break to see this device in action. If you’d like to build one yourself, follow this link for very well illustrated directions. Continue reading “The Lego Synchro Drive”

Air Conditioner Regulation Using A Hobby Servo

automatic_mechanical_ac_control

For anyone that works in a large office building, odds are you know the pains of dealing with a poorly regulated HVAC system. [Robovergne] and his co-workers recently moved to a new location, and found that the air conditioning control was less than effective, leaving the office as hot as a sauna or as cold as a meat locker.

While they manually triggered the A/C on and off every half hour for a while, that grew tiring, so [Robovergne] decided to take things into his own hands. He had never used an Arduino before, and figured that regulating the air would be a great first project. He mounted a small hobby servo onto the front of the A/C remote, and wired a DS18B21 temperature probe to the Arduino. A small pot is used to adjust the temperature setpoints, which are displayed on the attached LCD screen. Now, when the temperature starts to rise, the Arduino triggers the servo to turn the air conditioning on without human interaction.

[Robovergne] says that while his solution is ugly, it works quite well. It definitely gets the job done, we can’t argue with that!

Continue reading to see a video of his automatic A/C controller in action.

Continue reading “Air Conditioner Regulation Using A Hobby Servo”

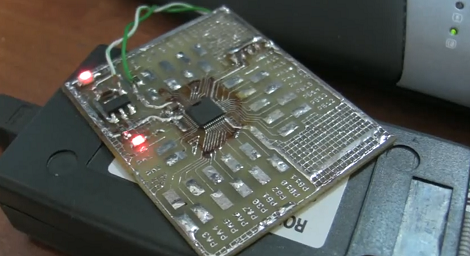
An ARM Dev Board You Can Make At Home


[BarsMonster] just challenged our conceptions of ARM development with his single-sided development board that’s loaded with an STM32F100 (PDF warning) ARM microcontroller. The board is remarkably simple – just a regulator, resistor and a few caps are necessary to get a $1 ARM μC up and running.

Continue reading “An ARM Dev Board You Can Make At Home”

DIY Propeller-based ECG

propeller_ecg

[Ray] likes to build all sorts of Propeller-based projects, but one of the more interesting items we came across was this DIY ECG. While we have covered other DIY electrocardiograms before, he left the breadboard behind and put together a nicely done PCB for his build.

The ECGs design should be pretty familiar to anyone that has seen our ECG coverage in the past. The user places his thumbs on the large built-in pads, which allow the circuit to sense the electrical signals produced by heart’s contractions. These small electrical impulses are then amplified using an AD627 instrument amplifier before being further amplified via a dual op-amp.

The amplified signal is filtered and then fed into the Propeller’s ADC, which displays the user’s heart rhythms via an LED. The data can also be fed into a computer via an optoisolated serial connection.

[Ray] lays out a litany of warnings and precautions that should be followed before downloading his schematics and firmware. We have to echo those warnings, as it doesn’t take a large well-placed shock to disrupt the heart.

Dedicated Hacker Adds USB Capabilities To His Commodore 64

usb_basic_commodore_64

To say that Commodore 64 aficionados are a dedicated group would be quite the understatement. There are still quite a few individuals that spend all sorts of time building and programming for the C64 in order to make using them enjoyable, and to keep up to date with current technologies.

[Luigi] is one of these people. He wanted a way to easily transfer files between his PC and his C64 that was fast but cheap. To [Luigi], this meant USB file transfers, which would take quite a bit of work to implement. He started out by rolling his own BASIC interpreter which could eventually be extended to support USB. Using his BASIC-Plus interpreter, he was able to implement a USB Kernel, which could transfer files at 1.2 KB/s via a USB to serial adapter. Wanting faster file transfers, he built a USB to parallel adapter, which resulted in a nearly 8-fold increase in speed.

So, if you have been dying to have USB capabilities on your C64, look no further, [Luigi] has just what you need!

Continue reading to see a quick video of USB-64 in action.

[Thanks, Matt]

Continue reading “Dedicated Hacker Adds USB Capabilities To His Commodore 64”

RepRap Voyeurism

Hey everybody, [Nbitwonder] is building his own RepRap 3D printer. What’s special about that? Well, not much and and lot all at the same time. The art of building a self-replicating 3d printer still has a lot to do with luck and forum-crawling to make all of the decisions that go into this complicated project.

Back in March [Nbitwonder] did a collaborative project over at Thingiverse and scored himself a set of printed parts from a guy who already has one of these printers. He then order a set of the non-printable hardware and has since been assembling it. If you’re interested but haven’t already taken the plunge, there’s enough pictures and information in this set of posts to satisfy your craving… for now.

We say this build is an art because it goes beyond just plunking the pieces together. Take the print head, for instance. Instead of going with the extruder that is considered the default for a Mendel build, [Nbitwonder] is working on a variation called Greg’s Hinged Accessible Extruder. We can’t wait until the hardware assembly is done, because it’s the calibration that really interests us.

Microsoft’s Attempt At An Arduino Killer — Feels Like A Gimmick

Microsoft has thrown its hat into the open source hardware hobby market. Their offering is called the Gadgeteer. We’d love to tell you all about it, but the big M didn’t make it very easy to find out about the device and it’s addons. When we set out to find what processor is running on the board we were happy to see that they do call it an Open Source Hardware project, but no schematic is posted. When we did finally navigate to the hardware documentation it’s a file that must be downloaded and you’ve got to agree to their licensing before grabbing it. So that’s as far as we went, and now we’ll go back to using more open tools.

For those of you who aren’t scared off by the lack of openness, the first thing you’ll notice about this board is that it’s full of connector headers. Instead of the small rows that Arduino uses, the Gadgeteer is meant to use ribbon cables to connect to various breakout boards. You can program for the platform in C# using the .NET framework. This means using Microsoft Visual Studio for those that are already acquainted with the platform. But regular readers will note that we’re always looking for Linux support in our IDEs and you won’t find that here.

[Thanks Hrasdt (and several others) via Slashdot]