Bubble Display

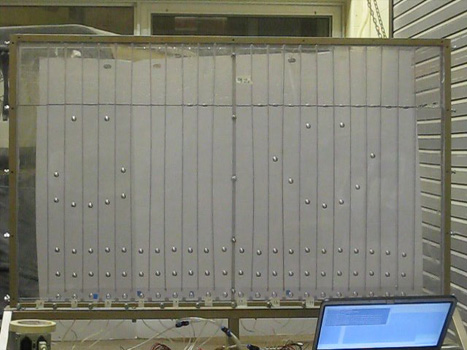
As hackers we have come up with some pretty wild and unique ways to display data, but that never stops us from creating even wilder ways such as this Bubble Display. Inspired by a Hackaday article called Liquid Display the bubble display started out as a one column lexan tank so the team could check out different liquids, and build methods, which gave them the opportunity to test out their wet/dry vacuum in the basement as well.

After the leaks were solved in the prototype, different fluids were tried out to see what would work best,  glycerine (though the most expensive out of the 3 items tested) gave the best performance in how the bubbles rose to the top, and the uniformity of each individual bubble.

The final tank design features (24?) channels to keep bubbles from interacting with each other and are fitted with some Parker A005-C23-2P pneumatic valves hooked up to a standard air compressor. Electrically it’s pretty standard, with the solinoid driver stuff all run by a PIC18F4455 clocked at 48MHz.

Software wise the device has 3 modes, one mode allows users to enter text or simple bitmaps from a computer using a homebrew GUI written in Visual Basic, there is also a demo loop for when you still want to show it off, but there is not someone there to constantly bang data into it, and finally a live keyboard mode which acts as a bubble music visualizer when there is a keyboard connected via MIDI. Check all 3 out in a short video after the break.

Continue reading “Bubble Display”

Interactive Dice Game Pits Man Against Machine

dice_game

While most dice games are based on luck and chance more than anything else, [Mike] decided he wanted to create a dice game that took a little more skill to play. He built a replica of a game found in Ian Stewart’s “The Cow Maze”, a book of mathematical stories and puzzles.

The theory behind the game is as follows:

A number is randomly drawn and is considered the “heap”. Players take turns reducing the heap, using the die to represent the number they would like to remove. The only restrictions placed on moves are that you cannot re-use the same number chosen by your opponent in the preceding move, nor can you use the number on the die face opposite that number. The winner of the game is the individual reducing the heap to exactly zero, though you can also lose the game automatically if you reduce the heap to a negative number.

The game operates using a magnet-loaded wooden die and hall sensors built into the playing surface. The sensors relay the value of the die’s face to the ATmega chip he used to run the game. His code provides the logic for your computer opponent as well as for keeping score.

The whole project is wrapped up in a nice-looking wooden box that gives it a bit of old time-y charm, micro controller and LCD aside.

Be sure to check out the video below to see a few rounds of the game being played, and swing by his site for more details.

[via SparkFun]

Continue reading “Interactive Dice Game Pits Man Against Machine”

Kinect + Minecraft Trifecta

Today we have a special treat, three projects combining the “fastest selling consumer electronics device”, Kinect, and the “fastest selling indie java game that once kept us from sleeping for an entire weekend”, Minecraft!

[Sean Oczkowski] writes in to tell us about his efforts to play Minecraft with Kinect using no more than the OpenKinect Java wrapper on Ubuntu.  The code was written in about 4 days with some help from Wikipedia.  Using  histograms to locate the player in the field of view, the script calculates the center mass of the body and defines interactions for the limb occupying that quadrant of the screen. [Sean] does an excellent job of running through the whole process as well as the decisions made along the way. The whole thing is a bit like running in place, and we can’t imagine the flailing that will occur during the inevitable creeper encounter.

Next we have  [Wade McGillis] with his award winning Minecraft Kinect Controller. [Wade] provides source code and executables at his site. This version of control uses skeletal tracking data to sense the user’s gestures. This still involves holding your hands out like a zombie but it is a bit more versatile as one can pass their arms in front of their own body.

Finally [Nathan Viniconis] has been doing some very interesting work using the Kinect to import giant three dimensional models into the game world. [Nathan] then goes the extra mile and animates the figures! Check out the video below for the really impressive results. We here at Hackaday feel that this is the most appropriate use of this technology, and may begin building gigantic statues of ourselves on public servers.

Check out the the tricrafta (minefecta?) of videos after the jump!

Continue reading “Kinect + Minecraft Trifecta”

Low-voltage Wind Turbine Lighting

led_wind_turbine

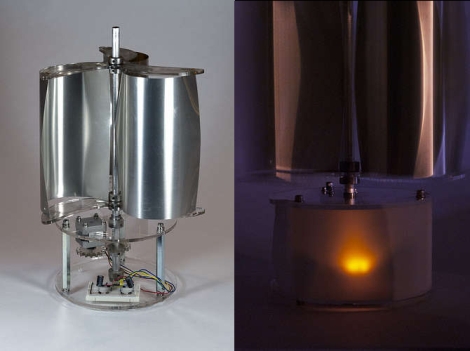
Instructables user [Dustyn] recently constructed a wind-based lantern to provide a bit of free, renewable light in urban settings. The project is based around a vertical-axis wind turbine, which she says are better suited to these environments since wind often comes from all different directions. Despite their lower efficiency compared their horizontal-axis brethren, this style of turbine seems to fit her needs quite well.

She provided a complete bill of materials, down to the last screw and washer you would need to replicate her work. The wind sails were constructed from thin aluminum flashing, and inserted between two acrylic sheets. These were then mounted to the central aluminum shaft of the turbine, which drives the stepper motor built into the base.

The current from the stepper motor is rectified and run through a pair of capacitors before being used to light the attached LED. This allows the bipolar motor to provide current regardless of the direction the turbine is turning, and the caps smooth things out so that the LEDs don’t flicker wildly under varying wind conditions. The turbine is not going to light up a full city block, but it is definitely a nice alternative to sun jars.

Stick around to see a video of the turbine mechanism in action.

Continue reading “Low-voltage Wind Turbine Lighting”

Lower Cost Arduino Cell Shield

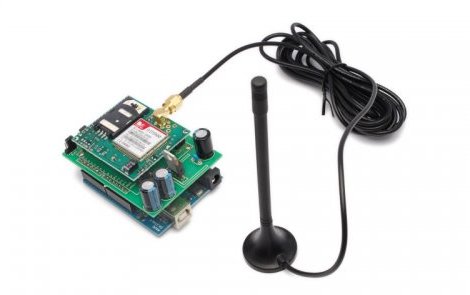
People love putting their Arduinos in interesting and remote places. while it may be possible, it may not be practical to run out and collect data from the devices. That is where this GSM / GPRS shield comes in handy.

Based around the SIMCom SIM900 that puts this device on the lower end of the price scale, (49 Euro for the module, ~60 Euro for the module mounted on a breakout board, or around 85 greenbacks) makes this module an interesting target for anyone wanting to add cell phone connectivity to a project.

To take this a step further [Boris] whipped up a nice shield PCB for the Arduino and Arduino like footprint users to make connections between the 900’s breakout board and the Arduino layout a snap. Electrically its just wires, and a LM317.

Laptop Touchpad-based LED Lighting Control

touchpad_lighting

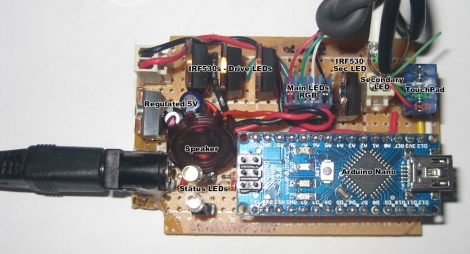
[Dave] needed some extra light above his desk/workbench area and decided to wire up some RGB LED light strips to brighten the place up a bit. He wasn’t content with using a standard switch to toggle them on and off, and after some brainstorming, he decided to build a capacitive touch circuit using a pair of copper tubes mounted in a project box. Just as he was putting the finishing touches on his switch, he saw a project online where a Synaptics touchpad was used in conjunction with an Arduino for lighting control. The copper tube switch was pitched, and he got busy working with his Arduino.

When connected to an Arduino, the touchpads can be used in two modes – relative and absolute. Relative mode is familiar to most people because it is used to guide the mouse cursor around on a laptop’s screen. Absolute mode however, relays coordinate information back to the Arduino, allowing the user to map specific areas of the pad to specific functions. [Dave] enabled his touchpad to use absolute mode, and mapped a handful of different functions on the Arduino. He can now fade his lights on and off or light the room on a timer, as well as use a sliding function to tweak the LEDs’ brightness.

It’s a neat, yet simple hack and a great way to repurpose old laptop touchpads.

Continue reading for a quick demo video he put together, and swing by his site if you want to take a look at the source code he used to get this working.

Continue reading “Laptop Touchpad-based LED Lighting Control”

More High Voltage Experimentation With A Flyback Inverter

[Electorials] actually makes working with a flyback inverter sound rather easy. This comes hot on the heals of the huge high voltage collection we saw the other day, but slows way down in the presentation of information. This makes the project very approachable for the newbie, especially considering that the majority of the testing is done with low voltages.

He’s using a flyback transform for this project, which can be pulled from an old CRT monitor. Once you have one in hand, all that’s required to figure out how to use it is a voltometer, a 9V battery, a MOSFET (also salvaged in this case), and miscellaneous components. Once he establishes what each external connection does electronically, [Electorials] builds his circuit on a breadboard, then uses it to create plasma in the bulb above as well as to light up a CCFL.