Redbull Sends Marketing Doodad To Hackerspace Using An Open Source Product

Posts

Looks like Redbull is harnessing the power of open source hardware to market their product to hackers everywhere. We’d say that it worked because here we are, posting up some free advertising for them. It seems that a rep for the company dropped off a package at a hackerspace in LA called Null Space Labs. It came in what is obviously a laser cut wooden box, a material that tends to make hackers salivate. Inside they found the board you see above. It took a bit of time to look over the hardware was eventually identified as an Uzebox. Sure enough, then plugged in an original NES controller to the controller port on the back of the board and were playing a version of  Pac-man in no time.

Marketing and advertising have their place in our lives which can be annoying and intrusive at times. But we have no problem with it when done creatively and targeted to our interests. Good job Redbull, and might we add, that’s a heck of a routing path for your PCB outline!


Hackaday Is Looking For A Full Time Project Builder/ Video Host!

Hackaday.com is looking for an experienced hacker/writer to join our team doing original hacking and modding projects on video. Are you energetic, outgoing, and passionate about hacking/modding? Can you solder AND explain what you’re doing and why? Come join our team and modify/hack/create things daily with a professional film crew to be aired on HackADay, then post a writeup detailing how you did your hack. Let your mind run wild, combine Mythbusters with Ben Heck, can you do it?

To be able to do this job successfully you need to be energetic, passionate and knowledgeable about hacking. The person who is perfect for this job will have experience with computer modding, hobby robotics, basic electronics, microcontroller programming, as well as some larger manufacturing skills like running a CNC mill and welding. Take a look at Hackaday.com to see the kinds of projects we would like to see created. Writing/blogging experience is a plus.

Job duties will include:
-following trends to see what the latest awesome hack would be
-brainstorming your own original hacks and mods
-executing those hacks
-breaking down the hacks to educate the viewers

This is a full-time, in-house position at our Santa Monica office. Pay is $30-$40k a year based on experience and includes benefits. To apply, please submit a cover letter and resume to our online job board (http://mhlo.co/ed886g). In your cover letter tell us why you’d be the best fit for the job, and please feel free to include any links to personal hacks/projects, or any future hack ideas you’d bring to HackADay.

Video Experimenter Shield

People always want to do more with less and the Video Experimenter Shield is no exception. Consisting of an LM1881 video sync separator, a handful of passive components, and a stylish PCB in the standard Arduino shield footprint.

The board features simple but useful controls and features, a removable jumper allows you to select a sync source, either from incoming video or the Arduino, a potentiometer to adjust the analog threshold, and there is a convenient signal breakout header.

Software is an enhanced version of the popular TV out library and allows you to start off with video graphics overlay, closed caption decoding, a simple gun game, and basic, but still effective frame capture, and computer vision. Of course, there are all sorts of other fun and amusing experiments that start to pop in mind once you check out a quick demo video after the break.

Continue reading “Video Experimenter Shield”

Virtual Serial Bridge

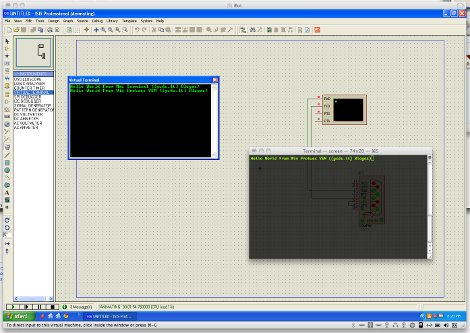
When you are running emulators or virtual machines it may be sometimes handy to be able to connect a serial port from the guest machine to the host machine. [Aurimas] had that issue, and also had a fun fix for that using 2 USB <> Serial adapters, but as you can imagine that is not a ideal solution, enter the Virtual Serial Bridge.

Digging around Vmware it was found that the support for what he needed was there, but not really used. A little addition of a few lines to the guest OS vmx file and configuring the socat multipurpose relay package. Though the instructions revolve around the Mac platform as the host and Windows as the guest socat and Vmware you can probably mix it up with any software that uses the serial port and a *x or windows host.

Portable NES Console Gets It Oh So Right

nes_portable

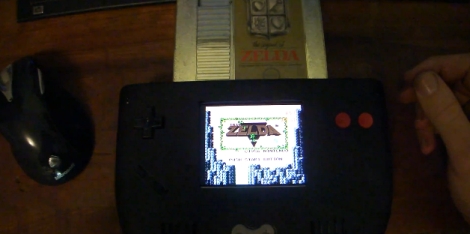
[Doug] over at the moddedbybacteria forums has been working hard on a fantastic looking portable NES console and wrote in to let us know it was complete.

The console started as a simple idea to use a Nintendo on a chip (NOAC) board in order to create a portable console that played original NES cartridges. Once a plastic case and some batteries were sourced, along with the NOAC board, the project was well on its way.

[Doug] eventually decided that he would rather use a real Nintendo motherboard in the project, so the NOAC was scrapped…temporarily. He accidentally fried the Nintendo board, so it was back to the NOAC, but with upgraded wiring to take care of some interference problems he was having earlier in the build. An original NES controller was disassembled for use in the console, which gives the portable an authentic feel. Getting the case to look just right was a long process, but we think he did a great job with it.

If you want to take a look at his entire build log, be aware that it is 23 pages long. If you’re impatient and want to jump straight to the unveiling, that happens on page 22.

Keep reading to see a pair of videos [Doug] put together both during the production and after his build was completed.

If you are interested in seeing some other portable NES consoles we have featured in the past, look no further than here, here, and here.

Continue reading “Portable NES Console Gets It Oh So Right”

Mini Arcade Cabinet Looks As Good As The Real Thing

mame_cab

[Ed] had a netbook he no longer needed and decided to make it into a mini MAME cabinet for some of his family members. MAME cabinets are pretty plentiful, but this one was so nicely done, we wanted to share it.

He removed the monitor from an EeePC 901 in order to get some precise measurements, then went about crafting a mini cabinet from MDF. The whole thing was wrapped in sticky label paper adorned with old-school Galaga graphics, then covered in plexiglass for a nice sleek look that also protects the artwork.

He used an iPac 2 controller board to wire up all of the buttons and joystick to the netbook, opting to solder the controller’s wires directly to the USB header on the eeePC’s motherboard. A power switch was added up on top for easy operation, and the cabinet was sealed shut, though the back does open easily in the event that maintenance is required. The system is managed using the Maximus Arcade front end for MAME, which [Ed] claims is incredibly easy.

If you are interested in making your own MAME cabinet, check out some of the other MAME-based projects we have featured in the past, and don’t miss the video below of [Ed’s] cabinet in action.

Continue reading “Mini Arcade Cabinet Looks As Good As The Real Thing”

DIY Scanning Electron Microscope

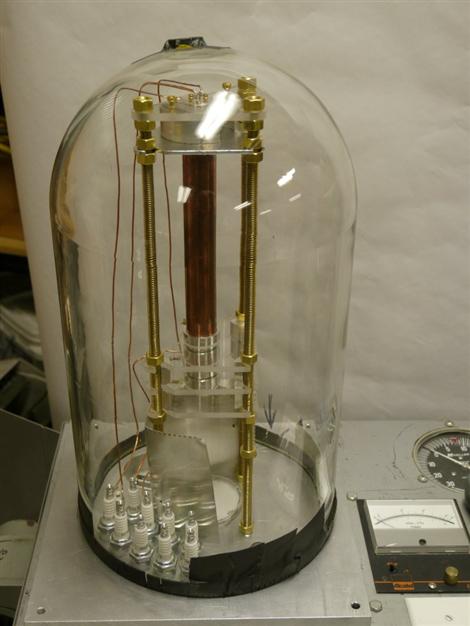
[Ben Krasnow]  has recently completed a home-built scanning electron microscope and has posted a video of it in action on his blog.

The build itself was done quite creatively using many off-the shelf components. We particularly like how long threaded brass rods were used not only for the supports, but also to maintain column alignment and fine-tune the spacing between the various beam focusing components.  A large glass “bell jar” covers the entire apparatus and is sealed to the bottom plate when the air is removed from within by a mechanical vacuum pump.

In order to produce an image, an electron gun similar to one found in a conventional CRT television tube accelerates the electrons with a 5kV potential from the top of the microscope downwards through a long copper column. Along the way the beam is focused and manipulated by electronic lenses in much the same way that light would be handled by conventional optical lenses. Near the base of the main column there are electrostatic deflection plates placed orthogonally in the X and Y directions that allow for precise scanning of the beam across the sample’s surface. When this high-energy electron beam is scanned across the sample, scattering surface electrons are then picked up by a nearby detector consisting of a phosphor screen and photomultiplier – a system that supposedly allows for higher sensitivity than trying to measure the small numbers of electrons directly.

Although the resolution of the first few scans is only around 50uM, this early success clearly shows that the device functions as intended and will provide a great starting point for future refinement with the final goal being resolutions down to the 1uM range.

Despite Ben’s reassurance that the x-rays produced at this energy level  won’t even penetrate the glass chamber, you can be sure that if we ever visit his garage we will definitely be donning some tin foil protection like these guys.

[Thanks kyle]

Continue reading “DIY Scanning Electron Microscope”