Raspberry Pi Reveals A Little About Their RP1 Peripheral

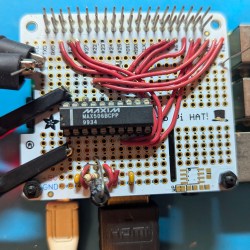
The Raspberry Pi 5 is the new hotness from the Cambridge-based single board computer vendor, thanks in part to its new wonder-chip peripheral that speeds up much of its interfacing with the world. The RP1 hangs of the CPU’s PCIe bus and takes on many functions previously in the SoC, and those curious about it now have a little bit of information. Eben Upton has posted an article about the chip, and there’s a partial datasheet and a video in which the engineers talk about the chip as well.

The datasheet is intended to help anyone wishing to write a hardware driver for a Pi 5, and they admit that it doesn’t reveal everything on the silicon. We don’t expect them to put this chip up for sale on its own because doing so would enable their competitors to produce something much closer to a Pi 5 clone. It does reveal a few nuggets, though; there are a couple of Cortex M3 cores for housekeeping, and alongside all the interfaces we know from earlier boards it has, perhaps most interestingly for Hackaday readers, a 12-bit analogue-to-digital converter. This has always been on our Pi wishlist and is a welcome addition.

So, if you read the datasheet and watch the video below, you’ll learn a lot about the interfaces and how to talk to them, but not quite so much about the full workings of the chip itself. They hint that there’s more to be released, but since the Pi people have a history of not letting go of the family silver, we won’t expect the keys to the kingdom.

Have a read of our Pi 5 launch coverage.

Continue reading “Raspberry Pi Reveals A Little About Their RP1 Peripheral”

Implant Fights Diabetes By Making Insulin And Oxygen

Type 1 diabetes remains a problem despite having an apparently simple solution: since T1D patients have lost the cells that produce insulin, it should be possible to transplant those cells into their bodies and restore normal function. Unfortunately, it’s not actually that simple, and it’s all thanks to the immune system, which would attack and destroy transplanted pancreas cells, whether from a donor or grown from the patient’s own stem cells.

That may be changing, though, at least if this implantable insulin-producing bioreactor proves successful.  The device comes from MIT’s Department of Chemical Engineering, and like earlier implants, it relies on encapsulating islet cells, which are the insulin-producing cells within the pancreas, inside a semipermeable membrane. This allows the insulin they produce to diffuse out into the blood, and for glucose, which controls insulin production in islet cells, to diffuse in. The problem with this arrangement is that the resource-intensive islet cells are starved of oxygen inside their capsule, which is obviously a problem for the viability of the implant.

The solution: electrolysis. The O2-Macrodevice, as the implant is called, uses a tiny power-harvesting circuit to generate oxygen for the islet cells directly from the patient’s own interstitial water. The circuit applies a current across a proton-exchange membrane, which breaks water molecules into molecular oxygen for the islet cells. The hydrogen is said to diffuse harmlessly away; it seems like that might cause an acid-base imbalance locally, but there are plenty of metabolic pathways to take care of that sort of thing.

The implant looks promising; it kept the blood glucose levels of diabetic mice under control, while mice who received an implant with the oxygen-generating cell disabled started getting hyperglycemic after two weeks. What’s really intriguing is that the study authors seem to be thinking ahead to commercial production, since they show various methods for mass production of the cell chamber from standard 150-mm silicon wafers using photolithography.

Type 1 diabetics have been down the “artificial pancreas” road before, so a wait-and-see approach is clearly wise here. But it looks like treating diabetes less like a medical problem and more like an engineering problem might just pay dividends.

Giant LED Matrix Fills Blank Space In The Kitchen

We’ve all got one: a blank space somewhere in our home that we don’t know what to do with. [James Miller] had one above his kitchen cabinets, so he filled it with a giant LED matrix. The result is a large but surprisingly attractive LED screen that can send messages, provide illumination, or while away the idle hours of the night playing Conway’s Game of Life.

[James] built the matrix using the usual suspect for these builds: several strings of WS2812 lights . He initially ran this from a Raspberry Pi, but realized that there was no need for such a dizzying amount of computing power, so he switched to an ESP32 instead. The frame is built from wood and foam board.

The first version he built used a fabric diffuser, but after a close encounter with a flaming steak, he switched over to commercial ceiling light diffusers cut down to size. We might have been tempted to keep going and try an “egg crate” style ceiling light panel for a the smaller pixel size, but [James] thinks he has reached the “good enough” point of this project. It’s certainly a fun build, and it looks very cool with minimal materials.

Continue reading “Giant LED Matrix Fills Blank Space In The Kitchen”

Decoding The 8088

There is a lot to like about open software, and in some areas, a well-thought-out piece of software can really make a huge impact. A great example of this is the Sigrok project. Creating simple devices that act like a logic analyzer is relatively easy. What’s hard is writing nice software for such a setup including protocol decoders. Sigrok has done it and since it is open, you can add your device and decode your protocol. [GloriousCow] had done the hardware part of interfacing to the 8088 in an IBM PC using an off-the-shelf logic analyzer that uses a customized version of Sigrok. But the output was a CSV file you had to process in a spreadsheet program. The next step: write a decoder for Sigrok to understand 8088 bus cycles.

The post covers the details of writing such a plug-in for Pulseview, the Sigrok GUI. It will also work for the command line interface if you prefer that. The code is in Python.

Continue reading “Decoding The 8088”

E-Bikes Turned Solar Car

There is something to be said for a vehicle that gains range just by standing outside in the sun. In the video after the break, [Drew Builds Stuff] demonstrates how he turned a pair of bicycles into a solar-powered vehicle.

The inspiration for this build started with a pair of 20″ steel framed fat tire bikes [Drew] picked up in a liquidation sale. He welded up a simple steel chassis, and attached the partial bicycle frame and forks to the chassis, using them as steerable front wheels. A short arm was welded to each of the fork, linking them together with threaded rods and rod ends that connect to centrally mounted handlebars. The rear driving wheels are from a 20″ e-bike conversion kit, with the disk brake assembly from the cannibalized bikes.

The solar part of this build comes in the form of three 175W flexible solar panels mounted on cedar frames, coming in at 10 lbs per mounted panel. [Drew] considered using conventional rigid solar panels, but they would have been 4-6 times heavier. The two panels mounted to the rear of the vehicle are on a hinged frame to allow easy access to the electronics below. Battery storage is made up of two 24V 100Ah batteries wired in series, connected to a 60A solar charge controller and the e-bike motor controllers.

The vehicle has a top speed of about 45km/h and 100km range on batteries alone. It might not be fast or engineered for maximum efficiency, but it looks like a ton of fun and relatively simple to build. As [Drew] says, it’s not a how-to for building a perfect solar-powered vehicle, it’s how he built one.

Continue reading “E-Bikes Turned Solar Car”

Learning About Ferroresonant Transformers While Fixing A 1970s Power Supply

Ferroresonant (constant voltage) transformer diagram. Secondary side is kept in full saturation with the tank, keeping voltage constant. (Credit: Usagi Electric)

While troubleshooting the power supply of a 1970s Centurion system, [Usagi Electrics] came across a fascinating feature of these units: the ferroresonant, or constant voltage transformer (CVT). The main difference between a regular transformer and a CVT is that the former has a quite direct correlation between the input and output voltage, as the magnetic flux induced on the primary side is directly translated to the secondary (output) side.

A CVT adds a second element on the secondary side in the form of a tank circuit (LC circuit) – essentially a large capacitor – along with a magnetic shunt that ‘short circuits’ part of the magnetic flux between the primary and secondary side. The result of this is that even as the primary side is kept well below the saturation point where efficiency plummets, the secondary side is kept within this saturation region, enabling a very constant output voltage across a wide range of input voltages. For the Centurion’s power supply this input range goes from 90 to 130 VAC.

Continue reading “Learning About Ferroresonant Transformers While Fixing A 1970s Power Supply”

An observatory atop a hill

The Ultimate US Astronomy Roadtrip

Have 73 hours to kill and fancy a 4,609-mile road trip? Then you can check out some of the best observatories in the US (although we would probably recommend taking a couple of weeks rather than cramming the trip into three days, so you can spend at least one night stargazing at each).

Matador Network compiled a list of what they call the top ten US observatories, and published the daunting map you see above. Even if your trip is plagued by cloudy skies, rest assured the destinations will still be worth a visit. From Arizona’s Lowell Observatory, where the evidence Edwin Hubble used to formulate the Big Bang Theory was collected, to the Green Bank National Radio Observatory in West Virginia, home of Earth’s largest fully-steerable radio telescope, each site has incredibly rich history.

All of the observatories are open to the public in some way or another, but some are only accessible a few days per month, so make sure you plan your trip carefully! You may even want to travel with your own homemade telescope, Game Boy astrphotography rig, or, if you’re really dedicated, portable radio telescope.

Continue reading “The Ultimate US Astronomy Roadtrip”