Hackaday Prize 2023: Ubo Project: Building For Builders

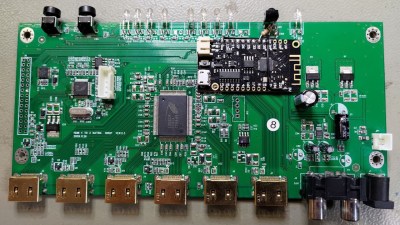
The Ubo Pod by [Mehrdad Majzoobi] is a very highly polished extension pack and enclosure for the Raspberry Pi 4, which shows you how far you can go to turn a bare PCB into something that rivals the hardware offerings from Google and others. Gadgets like the Sonos speakers and Amazon or Google’s covert listening devices (aka Echo, Alexa, or whatever they’re branded as) are fun to play with. Still, the difficulty of hacking custom applications into them and god-forbid adding one’s own extension hardware, makes them fairly closed ecosystems. Add in the concerns of privacy and data security; they look less and less attractive the closer you look. Luckily the Raspberry Pi and its friends have improved the accessibility to the point where it’s positively easy to create whatever you want with whatever hardware you need, and to that end we think [Mehrdad] has done a splendid job.

The custom top PCB sits below the wooden top surface, hosting a central LCD display with push buttons located around it. Also sitting atop are some IR transmitters and receivers as well as RGB LEDs for the ring lighting. This top PCB acts as a RPi hat, and plugs into an RPi4 below, which then attaches to a side board via some PCB-mounted connectors, matching up with the USB and audio connectors. This board seems to act purely as an interconnect and form-factor adaptor allowing interfaces to be presented more conveniently without needing wires. This makes for a very clean construction. Extensive use of resin printing is shown, with lots of nice details of how to solve problems such as LED diffusion and bleeding. Overall, a very slick and well-executed project, that is giving us a few ideas for our own projects.

This type of project is commonplace on these fair pages, like this DIY smart speaker for example. With the supply of pi being still a little difficult to deal with, could you roll your own or get an alternative? What about just using your old mobile phone?

Impossible WiFi On An Ancient Mac Portable

The Macintosh Portable was possibly one of the coolest computing devices to be seen with back at the end of the 1980s, providing as it did a Mac in a slightly nicer version of the hefty luggable portables of the day than the PC world could offer. Inside was a mere 68000, but it ran Mac OS system 6 and looked light years ahead of any comparable PC in doing so.

Back in 1989 it wasn’t even the norm for a computer to have built-in Ethernet, and WiFi was still a gleam in the eye of some Dutch engineers, so how has [Joshua Stein] managed to get his Mac Portable on a wireless network here in 2023? The answer contains a few surprises.

When seeing a WiFi upgrade for a classic retrocomputer the usual expectation is that it’s done by emulating a modem connection to the Internet over a serial port. But this wireless network card is a bit different, it’s a real network card capable of being used for much more than just connecting to the Internet.

We have to admit to not knowing that there were SCSI Ethernet interfaces back in the day, and it’s one of these that he’s created. He’s building on a decade’s work in producing disk emulators for the SCSI bus, and he’s taken the code for a Raspberry Pi Pico version and adapted the SCSI driver part to interface with the onboard WiFi on a Pico W. Altogether it’s a beautiful piece of work, and you can color us impressed.

Making Electricity At The South Pole

In case you’ve ever wondered how the South Pole research stations are powered, then a recent blog post, South Pole Electrical Infrastructure by anonymous IT engineer [brr] is for you. Among the many issues covered, let’s look at how the electricity is made and, spoiler alert, how the specially formulated AN8 fuel blend is transported to the generators.

The main source of power is a trio of Caterpillar 3512B diesel generator sets, de-rated to 750 kW each due to the high altitude and the special fuel mixture. Unsurprisingly, all the fuel must be imported to Antarctica, a horribly inefficient endeavor. Fuel arrives initially at McMurdo Station harbor by tanker ship. From there, it can be sent to the Amundsen-Scott South Pole Station in one of two ways. The Lockheed LC-130 is a modified C-130 Hercules cargo plane developed in the 1950s specifically to support polar operations. It is the least efficient method, consuming 1.33 kg to transport 1 kg of fuel. Alternatively, fuel can be dragged by tractors via the South Pole Overland Traverse (SPoT), a 1600 km highway over compacted snow and ice. The trek takes about 40 days and only consumes 0.56 kg of fuel for every 1 kg, which is much better than air.

Continue reading “Making Electricity At The South Pole”

Smart Garbage Trucks Help With Street Maintenance

If you’ve ever had trouble with a footpath, bus stop, or other piece of urban infrastructure, you probably know the hassles of dealing with a local council. It can be incredibly difficult just to track down the right avenue to report issues, let alone get them sorted in a timely fashion.

In the suburban streets of one Australian city, though, that’s changing somewhat. New smart garbage trucks are becoming instruments of infrastructure surveillance, serving a dual purpose that could reshape urban management. Naturally, though, this new technology raises issues around ethics and privacy.

Continue reading “Smart Garbage Trucks Help With Street Maintenance”

An Open Source Mobile Phone Based On The ESP32

As microcontrollers become ever faster and cheaper, something we’ve been expecting has been an open source smartphone based not upon a high-end chip, but on a cheap commodity one. In the electronic badge arena we’ve come pretty close, but perhaps it’s left to [Gabriel Rochet] to deliver the first one that brings everything together. His Paxo phone is now on version 4, and while the French-language website link stubbornly resists translation with Google translate, English speakers can find a description of its capabilities along with the software in a GitHub repository.

The hardware is surprisingly straightforward, with a resistive touch screen and a PCB featuring power management, an ESP32 main processor, and a GSM module. The 2G connectivity may not be the fastest, or even available in your country, but otherwise the feature set looks more than reasonable for a basic mobile phone.

We like this project a lot, because as we said it starts to deliver on the promise of the 2018 EMF badge and the 2022 MCH badge. We think the former badge’s designers might find something of interest in it.

India Makes History With Chandrayaan-3 Landing

Yesterday, the Indian Space Research Organization’s (ISRO) Chandrayaan-3 spacecraft performed a powered soft-landing on the Moon, officially making India the fourth country to achieve a controlled descent to the lunar surface. Up to this point, only the United States, China, and the Soviet Union could boast successful landings on our nearest celestial neighbor.

Chandrayaan-3 Packed for Launch

What’s more, Chandrayaan-3 has positioned itself closer to the Moon’s south pole than any other mission in history. This area is of great interest to scientists, as there is evidence that deep craters in the polar region contain considerable deposits of frozen water. At the same time, the polar highlands receive almost constant sunlight, making it the perfect location to install solar arrays. These factors make the Moon’s south pole an ideal candidate for a future human outpost, and Chandrayaan-3 is just one of several robotic craft that will explore this area in the coming years.

But as is usually the case with space exploration, the success of Chandrayaan-3 didn’t come easy, or quickly. The ISRO started the Chandrayaan program in 2003, and launched the Chandrayaan-1 mission in 2008. The craft successfully entered lunar orbit and surveyed the surface using a wide array of instruments, many of which were provided by foreign space agencies such as NASA and the ESA. In 2019 the far more ambitious Chandrayaan-2 mission was launched, which included a lander and small rover. While the orbiter component of Chandrayaan-2 was a complete success, the lander crashed into the Moon’s surface and was destroyed.

With Chandrayaan-3 now safely on the surface of the Moon, there’s much work to be done in the coming days. The planned mission lifetime for both the lander and rover is a single lunar day, which equals just about two weeks here on Earth. After that, the vehicles will be plunged into a long stretch of frigid darkness which they likely won’t survive.

Continue reading “India Makes History With Chandrayaan-3 Landing”

A wooden frame with 64 green LEDs running a Game of Life simulation

Wooden CNC Sculpture Displays Conway’s Game Of Life

Conway’s Game of Life has been the object of fascination for computer hobbyists for decades. Watching the generations tick by is mesmerizing to watch, but programming the data structure and implementing the rules is also a rewarding experience, especially if you’re just getting acquainted with a new computing platform. Just as rewarding can be creating a nice piece of hardware to run the game on, as [SandwichRising] has just done: check out his beautiful wooden Game of Life implementation.

A set of PCBs implementing an 8x8 LED displayThe main part of his Game is a piece of poplar wood that was CNC routed to produce an 8×8 display adorned with neat chain-like shapes. The display consists of standard 5 mm green LEDs, but they’re not the things you see poking out the front of the wooden frame. Instead, what you’re seeing are 64 lenses made out of epoxy. [SandwichRising] first covered the holes with tape, then poured green epoxy into each one and waited for it to harden. He then took off the tape and applied a drop of UV-cured epoxy on top to create a lens.

All the LEDs are mounted on PCB strips that are hooked up to a central bus going to the main ATmega328P  microcontroller sitting on a separate piece of PCB. Whenever the system is powered on, the game is set to a random state determined by noise, after which the simulation begins. On such a small field it’s pretty common for the game to end up in a stable state or a regular oscillation, which is why the ATmega keeps track of the last few dozen states to determine if this has happened, and if so, reset the game to a random state again.

The source code, as well as .STL files for the PCBs and the frame, are available in the project’s GitHub repository. If woodworking isn’t your thing, there’s plenty of other ways to make neat Game of Life displays, such as inside an alarm clock, with lots of LEDS under a coffee table, or even with a giant flip-dot display.