Simple Breadboard SDR For Shortwave

One of the best ways to learn about radios is to build your own, even in the age of cheap SDR dongles. [Aniss Oulhaci] demonstrates this with a simple HF SDR receiver built on a breadboard.

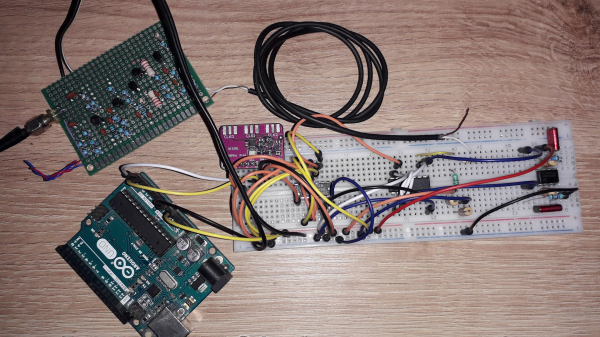
The receiver takes the form of a simplified Tayloe detector. An RF preamp circuit amplifies the signal from a shortwave antenna and feeds it into a 74HC4066D analog switch, which acts as a switching mixer. It mixes the input signal with the local oscillator’s I and Q signals to produce the intermediate frequency signals. The local oscillator consists of a SI5351 clock generator with a 74HC74D flip-flop to generate the I and Q pair. The signals pass through a low pass filter stage and get amplified by an LM358 op amp, resulting in the IQ signal pair being fed to a computer’s stereo sound card.

An Arduino is used to control the SI5351 clock generator, which in turn is controlled by the same program created for the SDR Shield. With the audio signal fed to HDSDR, [Aniss] was able to pick up a shortwave radio broadcaster.

While this is by no means a high-performance receiver, building an SDR on a breadboard is still a great weekend project, with plenty of potential for further experimentation.

Continue reading “Simple Breadboard SDR For Shortwave”

This Simple Media Player Will Inspire Beginners And Invite Experimentation

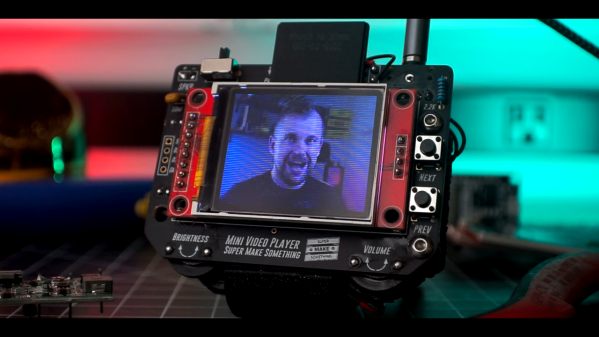
While it would have been considered science-fiction just a few decades ago, the ability to watch virtually any movie or TV show on a little slab that fits in your pocket is today no big deal. But for an electronics beginner, being able to put together a pocketable video player like this one would be quite exciting, and might even serve as a gateway into the larger world of electronics design.

For inspiration, [Alex] from Super Make Something on YouTube looked to the Rickrolling keychain media players we featured back in January. His player is quite a bit larger and more capable, with a PCB design that allows the player to be built in multiple configurations, from audio-only to full video and a LiPo battery. The guts of the player center around an ESP32 module, with an audio amp and speakers plus a 1.8″ LCD screen with SD card reader for storing media files. Add in a few controls and switches and a little code, and you’ll be playing back media files in a snap. Build info and demo in the video below.

It may be a simple design, but we feel like that’s the whole point. [Alex] has taken pains to make this as approachable a build as possible. All the parts are cheap and easily available, and the skills needed to put it together are minimal — with the possible exception of soldering down the ESP32 module, which lacks castellated edge terminals. For a beginner, getting a usable media player by mixing together just a few modules would be magical, and the fact that it’s still pretty hackable afterward is just icing on the cake.

Continue reading “This Simple Media Player Will Inspire Beginners And Invite Experimentation”

TVout Library Brings Cardboard Arcade To Life

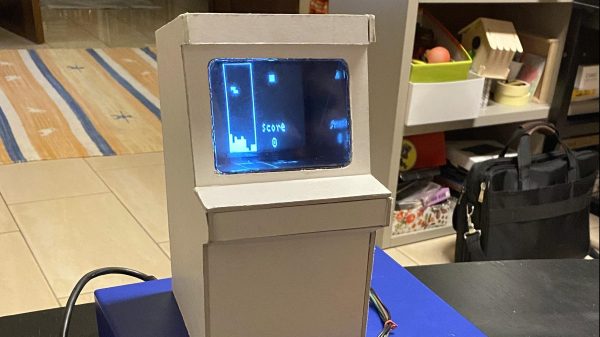
Recycling old CRTs is a true Hackaday tradition, and [Rob’s] mini arcade is sure to grab your attention.

First of all, you’ll probably appreciate [Rob] circumventing the supply shortage by getting all his components from recycled material. That’s probably the only way to get anything these days. He salvaged a small CRT from an old-school video intercom system and snagged the buttons, speakers, and switches from other unused devices laying around. Not all is lost, however, as [Rob] was able to purchase an Arduino Nano and a few resistors online. So maybe things are turning around in that category, who knows?

You’ll probably also appreciate how remarkably simple this hack is. No need for a Raspberry Pi as your standard 8-bit microcontroller will do the trick. And, fortunately, [Rob] found a nice library to help him generate the composite video signal, doing most of the work for him. All that was left to do was to build the arcade cabinet. Recreating the classic design was a pretty easy step, but you might opt for something a little nicer than cardboard though. But, hey, if it does the trick, then why not?

Cool project, [Rob]! We’re definitely happy to add this project to our retro collection here at Hackaday.

Continue reading “TVout Library Brings Cardboard Arcade To Life”

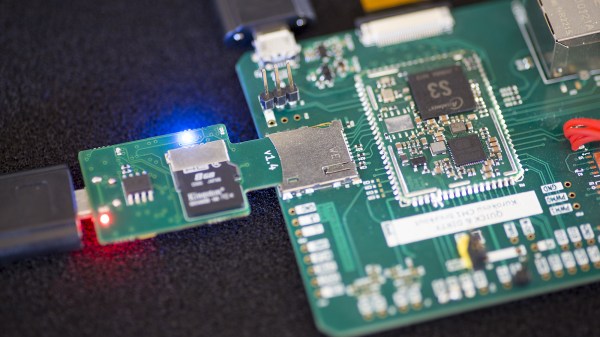
The SDWire board plugged into some SoM's breakout board's MicroSD socket

Automated MicroSD Card Swapping Helps In Embedded Shenanigans

[Saulius Lukse] has been working on some single board computer, seemingly, running Linux. Naturally, that boots from a microSD card – and as development goes on, that card has to be reimaged all the time. Sick of constantly plugging and unplugging the microSD card between the SBC and an SD card reader, [Saulius] started looking for a more automated solution – and it wasn’t long before he found out about the SDWire project, a hardware tool that lets you swap a card between a DUT (Device Under Test) and your personal computer with no moving parts involved.

SDWire is an offshoot from the Tizen project, evidently, designed to be of help in device development, be it single-board computers or smartphones. The idea is simple – you plug your MicroSD card into the SDWire board, plug the SDWire into a MicroSD slot of your embedded device, and then connect a USB cable from the SDWire to your development computer. This way, if you need to reflash the firmware on the SBC you’re tinkering with, you only need to issue a command to the SDWire board over the USB cable, and the MicroSD card appears as a storage drive on your computer. SDWire is a fully open source project, both in hardware and in software, and you can also buy preassembled boards online.

Such shortening of development time helps in things like automated testing, but it also speeds your development up quite a bit, saving you time between iterations, freeing you from all the tiny SD card fiddling, and letting you have more fun as you hack. There’s a clear need for a project like SDWire, as we’ve already seen a hacker assemble such a device using breakouts.

Raspberry Pi Pico Replaces PlayStation Memory Card

It’s almost hard to believe these days, what with modern game consoles packing terabytes of internal storage, but there was a time when the totality of your gaming career would be stored on an external memory card that held just a few megabytes of save data. Of course, before that you had to write down a sequence of random letters and numbers to pick up where you left off, but that’s a story for another day.

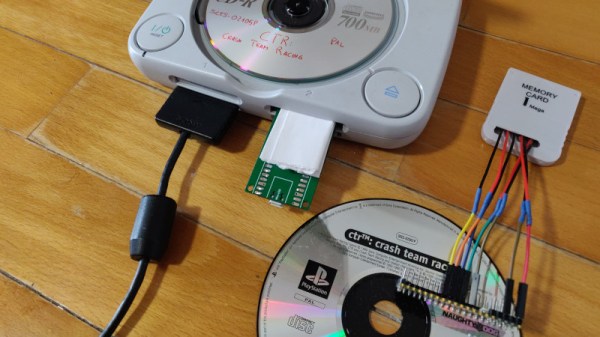
While the memory card concept might be quaint to the modern gamer, its modular nature does provide the hacker with some interesting avenues to explore. For example, take a look at the very impressive PicoMemcard project from [Daniele Giuliani]. Hardware wise, it doesn’t get much simpler than this. You just take the PCB from a cheap (or dead) PlayStation memory card, and solder seven jumpers to the edge connector contacts so you can plug them into the Pico. Then you’ve just got to upload the firmware to the Pico, and you’re done. Continue reading “Raspberry Pi Pico Replaces PlayStation Memory Card”

Odd Inputs And Peculiar Peripherals: The Simplest Of Pi 400 Cyberdecks

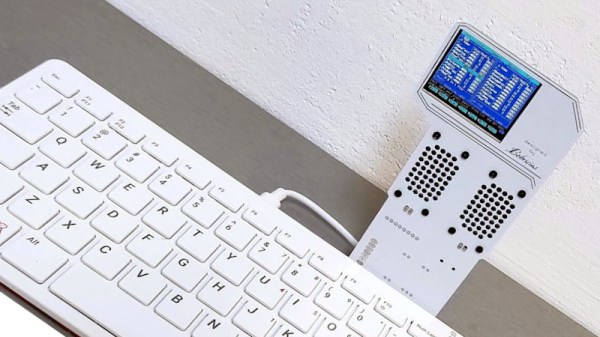
The trend for making cyberdecks has seen the Raspberry Pi emerge as a favourite for these home-made computer workstations, with the all-in-one Raspberry Pi 400 providing a particularly handy shortcut to integrating the computer and keyboard components. There’s still the question of the cyberdeck chassis and screen though, and it’s one that [bobricius] has answered in what may be the simplest manner possible, by means of a riser PCB from the expansion port holding a 320×240 SPI display.

If this is starting to look familiar, then you’d be right to recognise it as a slightly higher-quality version of those cheap LCD screens that have been available for the Pi for quite a few years. Alongside the screen is a pair of speakers, and the whole thing extends upwards from the back of the Pi 400. We’d question how much load can be taken by the expansion connector, but in practice it seems not to be taking too much.

The device in use can be seen in the video below the break. It’s definitely not the largest of displays, and when used as a desktop, it’s rather cramped, but it seems adequate for a terminal. It has the advantage over many cyberdecks that when the novelty has waned, it can be removed, and the Pi 400 used with a conventional display.

The Pi 400 has been with us for nearly a couple of years now, and perhaps hasn’t had the recognition it deserves. If you’ve never tried one, take a look at our review from when it came out.

Continue reading “Odd Inputs And Peculiar Peripherals: The Simplest Of Pi 400 Cyberdecks”

The STM32 Makes For A Cheap DIY USB Soundcard

Soundcards used to be giant long 8-bit ISA things that would take up a huge amount of real estate inside a desktop computer. These days, for most of us, they’re baked into the motherboard and we barely give them a second thought. [Samsonov Dima] decided to whip up a cheap little sound card of their own, however, built around the STM32.

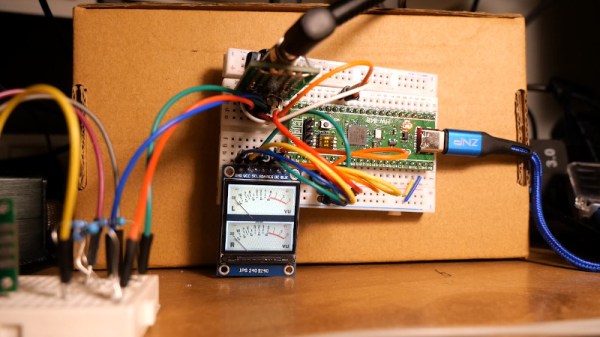
The soundcard is based specifically on the STM32F401. readily available on the “Green Pill” devboards. A digital-to-analog converter is implemented on the board based on two PWM timers providing high-quality output. There’s also a simulated software sigma delta ADC implemented between the audio streaming in via USB and the actual PWM output, with some fancy tricks used to improve the sound output. [Samsonov] even found time to add a display with twin VU meters that shows the audio pumping through the left and right channels.

Without test gear on hand, we can’t readily quantify the performance of the sound card. However, as per the Youtube videos posted, it appears more than capable of recreating music with good fidelity and plenty of fine detail.

If you need a cheap, simple USB sound card that you can hack away on, this might be the one for you. If you need something more suitable for a vintage PC, however, consider this instead. Video after the break.

Continue reading “The STM32 Makes For A Cheap DIY USB Soundcard”