A multimeter connected to the EEPROM chip with crocodile clips, showing that there's a 0.652V diode drop between GND and one of the IO pins

Dead EPROM Dumped With Help Of Body Diodes

[Jason P], evidently an enjoyer of old reliable laser printing tech, spilled a drink (nitter) onto his Panasonic KX-P5400 SideWriter. After cleanup, everything worked fine — except that the PSU’s 5 V became 6.5 V during the accident, and the EPROM with LocalTalk interface firmware died, connection between VCC and GND seemingly interrupted inside the chip. Understandably, [Jason] went on Twitter, admitted the error of his ways, and sheepishly asked around for EPROM dumps.

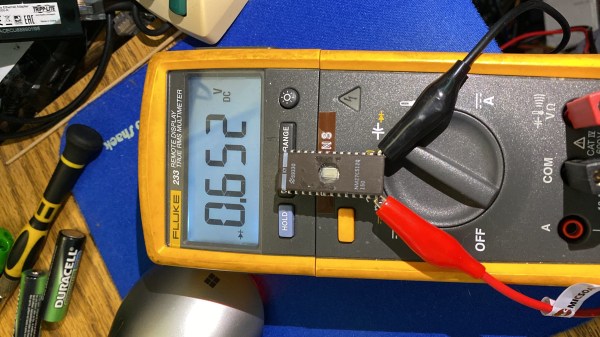
Instead, [Manawyrm] wondered — would the chip have anti-ESD body diodes from GND to IO pins, by any chance? A diode mode multimeter check confirmed, yes! It was time for an outlandish attempt to recover the firmware. [Manawyrm] proposed that [Jason] connect all output pins but one to 5 V, powering the EPROM through the internal VCC-connected body diodes – reading the contents one bit at a time and then, combining eight dumps into a single image.

After preparing a TL866 setup, one hour of work and some PHP scripting later, the operation was a success. Apparently, in certain kinds of cases, dead ROM chips might still tell their tales! It’s not quite clear what happened here. The bond wires looked fine, so who knows where the connection got interrupted – but we can’t deny the success of the recovery operation! Need a primer on dumping EPROMs that are not dead? Here you go.

Continue reading “Dead EPROM Dumped With Help Of Body Diodes”

Make Your Own Vinegar

Making fermentation work for us is one of the original hacks that allowed humans to make food last longer, and festivities more interesting. [Mike G] has been experimenting with making his own vinegar, and found the end product to be a delicious addition to his cooking.

The first step is similar to making alcoholic beverages. Take something that contains sugar, like fruit, mix it with water and let stand. Wild yeast will feed on the sugar and create alcohol. Once the alcohol content reaches the 6-12% range, the resulting liquid can be separated from the solids and left exposed to the air. This allows Acetobacter bacteria to convert the alcohol into acetic acid, producing vinegar. The entire process takes around 30 days.

[Mike]’s first round of experiments was mainly with fresh fruit, with the addition of raisins. To prevent white mold from forming the mixtures should be stirred daily, but life got in the way and mold got out of control on all the fruits, except for the raisins. This gave [Mike] the to try another round with dried fruit, which was significantly less prone to mold, and produced deliciously flavored vinegar. [Mike] also demonstrated their use in a couple of mouth-watering dishes.

The DIY vinegar production process is just begging for some fermentation monitoring and automation tech. We’ve seen plenty of sourdough and beer production projects, which we suspect could also be applied to vinegar production with some minor changes.

Continue reading “Make Your Own Vinegar”

Water Monitor Measures The Cost Of Your Shower Thinking Time

The shower is one of the top thinking places for many of us, but can get a bit out of hand with water wastage and utility bills if you go down a deep rabbit hole. To be more mindful of his water usage in the shower, [GreatScott!] created a power sipping water monitor that lives there.

The device is built around a cheap 1/2″ brass water flow rate sensor connected to his shower hose, which outputs pulses as a small wheel passes an internal hall effect sensor. The datasheet didn’t contain any spec for pulses/volume, so [GreatScott!] had to experimentally determine this by filling a one-liter container with water and counting the pulses. He found that the pulse count per liter was dependent on the flow rate, so he narrowed down the variables and just determined the average count at his shower’s pressure and flow rate.

The sensor is connected to a battery-powered ESP8266 housed inside a sealed 3D-printed enclosure in the shower. To reduce power usage to a minimum, a flow switch was added in series with the flow meter, which only switches on the ESP8266 when water starts flowing. A latching circuit keeps the ESP powered after the water stops, giving it enough time to transmit the data before shutting down. This type of circuit is very handy for any battery-powered project connected to an external switch or sensor.

It is programmed with ESPHome and outputs the data to a local Home Assistant server, so no data is saved on someone else’s server.

Continue reading “Water Monitor Measures The Cost Of Your Shower Thinking Time”

A Guide To 3D Printing Model Aircraft Wings

The exact airfoil shape of a wing has a massive effect on the performance and efficiency of an aircraft and will be selected based on the intended flight envelope. If you’re moving beyond foam board wings, 3D printing is an excellent way to create an accurate airfoil, and [Tom Stanton] provides us with an excellent guide to modeling wing sections for easy printing.

[Tom] used the process demonstrated in the video after the break to create the wing for his latest VTOL RC aircraft. It was printed with lightweight PLA, which can ooze badly when it stops extruding. To get around this, he designed the wings and their internal ribs to be printed in one continuously extruded line.

He wanted a wing that would allow a smooth transition from hover to forward flight, and used the Airfoil Tools website to find and download the appropriate airfoil profile. After importing the profile into Fusion 360, he created internal ribs in a diagonal grid pattern, with lightening holes running along the length of the wing. A cylinder runs along the core of the wing to fit a carbon fiber wing spar. The ribs are first treated as a separate body in CAD and split into four quadrants. When these quadrants combine with the outer shell, it allows the slicer to treat the entire print as a continuous external perimeter line using “vase mode“.

These steps might seem simple, but it took about 3 weeks of experimentation to find a process that works. It’s primarily intended for straight wings with a continuous profile, but it should be adaptable to tapered/swept wings too. A well-designed airframe is essential when pushing aircraft to the edge of efficiency, like solar-powered plane to fly overnight.

Continue reading “A Guide To 3D Printing Model Aircraft Wings”

Bit-Banged Ethernet On The Raspberry Pi Pico

Whilst the Raspberry Pi RP2040 is quite a capable little chip, on the whole it’s nothing really special compared to the big brand offerings. But, the PIO peripheral is a bit special, and its inclusion was clearly a masterstroke of foresight, because it has bestowed the platform all kinds of capabilities that would be really hard to do any other way, especially for the price.

Our focus this time is on Ethernet, utilizing the PIO as a simple serialiser to push out a pre-formatted bitstream. [kingyo] so far has managed to implement the Pico-10BASE-T providing the bare minimum of UDP transmission (GitHub project) using only a handful of resistors as a proof of concept. For a safer implementation it is more usual to couple such a thing magnetically, and [kingyo] does show construction of a rudimentary pulse transformer, although off the shelf parts are obviously available for this. For the sake of completeness, it is also possible to capacitively couple Ethernet hardware (checkout this Micrel app note for starters) but it isn’t done all that much in practice.

Inside the expedient pulse transformer.

UDP is a simple Ethernet protocol for transferring application data. Being connection-less, payload data are simply formatted into a packet buffer up front. This is all fine, until you realize that the packets are pretty long and the bitrate can be quite high for a low-cost uC, which is why devices with dedicated Ethernet MAC functionality have a specific hardware serialiser-deserialiser (SERDES) block just for this function.

Like many small uC devices, the RP2040 does not have a MAC function built in, but it does have the PIO, and that can easily be programmed to perform the SERDES function in only a handful of lines of code, albeit only currently operating at 10 MBit/sec. This will cause some connectivity problems for modern switch hardware, as they will likely no longer support this low speed, but that’s easily solved by snagging some older switch hardware off eBay.

As for the UDP receive, that is promised for the future, but for getting data out of a remote device over a wired network, Pico-10BASE-T is a pretty good starting point. We’ve seen a few projects before that utilize the PIO to generate high speed signals, such as DVI, albeit with a heavy dose of overclocking needed. If you want a bit more of an intro to all things Pico, you could do worse than check out this video series we highlighted a while back.

Hackaday Podcast 183: Stowaway Science, Cold Basements, And Warm Beers

This week, Editor-in-Chief Elliot Williams and Assignments Editor Kristina Panos met up on a secret server to discuss the cream of this week’s crop of hacks. After gushing about the first-ever Kansas City Keyboard Meetup coming up tomorrow — Saturday the 27th, we start off by considering the considerable engineering challenge of building a knife-throwing machine, the logistics of live-streaming on the go, and the thermodynamics of split-level homes.

This week, Kristina came up with the What’s-That-Sound and managed to stump Elliot for a while, though he did eventually guess correctly after the tape stopped rolling. Think you know what it is? Then fill out the form and you’ll earn the chance to win a genuine Hackaday Podcast t-shirt!

Later in the show, we look at a macro pad that breaks the mold, an ASCII terminal like it’s 1974, and a Z80 that never was (but definitely could have been). Stick around as we root for the CubeSats hitching a ride aboard Artemis I, and at last call on the ‘cast, it’s lagers vs. ales (vs. ciders).

Direct download.

Check out the links below if you want to follow along, and as always, tell us what you think about this episode in the comments!

Continue reading “Hackaday Podcast 183: Stowaway Science, Cold Basements, And Warm Beers”

Machine Learning Gives Cats One More Way To Control Their Humans

For those who choose to let their cats live a more or less free-range life, there are usually two choices. One, you can adopt the role of servant and run for the door whenever the cat wants to get back inside from their latest bird-murdering jaunt. Or two, install a cat door and let them come and go as they please, sometimes with a “present” for you in their mouth. Heads you win, tails you lose.

There’s another way, though: just let the cat ask to be let back in. That’s the approach that [Tennis Smith] took with this machine-learning kitty doorbell. It’s based on a Raspberry Pi 4, which lives inside the house, and a USB microphone that’s outside the front door. The Pi uses Tensorflow Lite to classify the sounds it picks up outside, and when one of those sounds fits the model of a cat’s meow, a message is dispatched to AWS Lambda. From there a text message is sent to alert [Tennis] that the cat is ready to come back in.

There’s a ton of useful information included in the repo for this project, including step-by-step instructions for getting Amazon Web Services working on the Pi. If you’re a dog person, fear not: changing from meows to barks is as simple as tweaking a single line of code. And if you’d rather not be at the beck and call of a cat but still want to avoid the evidence of a prey event on your carpet, machine learning can help with that too.

[via Tom’s Hardware]