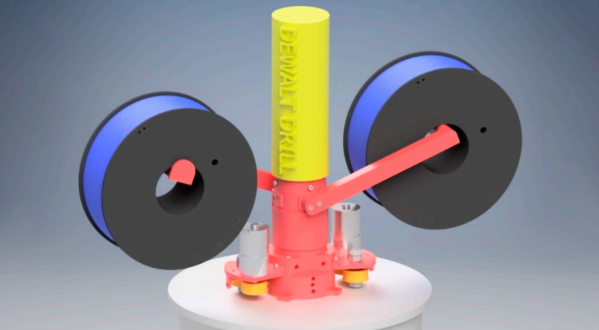
3D Printed Antenna Is Broadband

Antennas are a tricky thing, most of them have a fairly narrow range of frequencies where they work well. But there are a few designs that can be very broadband, such as the discone antenna. If you haven’t seen one before, the antenna looks like — well — a disk and a cone. There are lots of ways to make one, but [mkarliner] used a 3D printer and some aluminum tape to create one and was nice enough to share the plans with the Internet.

As built, the antenna works from 400 MHz and up, so it can cover some ham bands and ADS-B frequencies. The plastic parts act as an anchor and allow for coax routing. In addition, the printed parts can hold a one-inch mast for mounting.

Continue reading “3D Printed Antenna Is Broadband”

Laser Cut Your 3D Printed Trash

If you have a 3D printer, you’re surrounded by plastic trash. I’m speaking, of course, of failed prints, brims, and support material that builds up in the trash can near your printer. Although machines that turn that trash into filament exist, they’re not exactly common. But there’s another way to turn that waste into new building materials. [flowalistic], 3D designer extraordinaire, is using that trash to create panels of plastic and throwing that into a laser cutter. It’s a plastic smoothie, and if you can sort your scrap by color, the results look fantastic.

The first step in turning garbage plastic into a plastic sheet is throwing everything into a blender. Only PLA was used for this experiment because using ABS will release chlorine gas. These plastic fragments were placed in the oven, on a cookie sheet with a sheet of parchment paper. After about a half an hour of baking at 200 °C, the sheet was pressed between sheets of wood and left to cool. From there, the PLA sheet was sent to the laser cutter where it can be fabricated into rings, models, coasters, spirographs, and toys.

While this is an interesting application of trash using parts and equipment [flowalistic] had sitting around — therefore, a hack — it must be noted this should never be replicated by anyone. That big bag of scrap plastic could contain ABS, and you should never put ABS in a laser cutter unless you want your workspace to smell awful. And/or be sure to crack a window.

Unbricking A 3D Printer The Hard Way: By Writing A Bootloader

There’s a sinking feeling when a firmware upgrade to a piece of equipment goes wrong. We’ve all likely had this happen and  bricked a device or two. If we are lucky we can simply reapply the upgrade or revert to a previous version, and if we’re unlucky we have to dive into a serial debug port to save the device from the junk pile. But what happens when both those routes fail? If you are [Arko], you reverse-engineer the device and write your own bootloader for it.

The offending bricked object was a Monoprice MP Mini Delta 3D printer to which he was foolhardy enough to apply new firmware after seeing a friend’s machine taking it without issue. Finding the relevant debug interface on its main PCB he applied the firmware upgrade again, only to realise that in doing so he had overwritten its bootloader. The machine seemed doomed, but he wasn’t ready to give up.

What follows in his write-up is a detailed examination of the boot mechanism and memory map of an ARM Cortex M0 processor as found in the Monoprice’s STM32F070CB. We learn about vector tables for mapping important addresses of interrupts and execution points, and the mechanics of a bootloader in setting up the application it launches. This section is well worth a read on its own, even for those with no interest in bricked 3D printers.

In the end he had a working bootloader to which he appended the application firmware, but sadly when he powered up the printer there was still no joy. The problem was traced to the serial connection between the ARM doing the printer’s business and the ESP8266 running its display. After a brainstorm suggestion with a friend, a piece of code was found which would set the relevant registers to allow it to run at the correct speed.

So after a lot of work that resulted in this fascinating write-up, there was a working 3D printer. He suggests that mere mortals try asking Monoprice for a replacement model if it happens to their printers, but we’re extremely glad he persevered. Without it we would never have had this fascinating write-up, and would be the poorer without the learning experience.

This isn’t the first time we’ve brought you 3D printer bootloader trickery.

3D Printed Transmission Invented Again; This Time Continuously Variable

We shouldn’t laugh, but we know the feeling very well. [Gear Down for What] invented a revolutionary transmission and fabricated it from scrap material when he was 16. Except he later found out the same design was the subject of a patent filed 14 years earlier. Dismayed he destroyed his prototype, but fast forward to today and he’s made a 3D model of a ratcheting continuously variable transmission. You can see a video of him explaining how it works below and put your own spin on the idea by grabbing the model from Thingiverse.

The model is just for demonstration purposes. We doubt it would wear well enough to use in practice but it’s great to get your hands on for a really intuitive understanding of the mechanism. Some modern automobiles use a continuously variable transmissions (CVT) and many recreational vehicles and motorcycles use them. Like any transmission, their job is to match the motor’s rotation to needed output torque and speed by offering different gearing ratios. Whereas a normal transmission provides a few fixed gears, a CVT changes seamlessly through a range of ratios.

Some of the design of the transmission is pretty tricky, like the cam adjustment. The video shows the rationale for how the design works and how it relates to tank steering (tank as in an Army tank; not like a gas tank). The model isn’t just plastic. It uses some screws and BBs, as well. However, if you have a 3D printer and wanted a good classroom demonstration, this is the ticket.

We’ve seen other geared variable transmissions for robots before. The planetary gears in the cam adjustment of this design are well understood. If you want to brush up your planetary knowledge, there’s no time like the present.

Continue reading “3D Printed Transmission Invented Again; This Time Continuously Variable”

Print, Rinse, Wear. Nanowire Circuits For Your Microfibre Clothing.

While our bodies are pretty amazing, their dynamic nature makes integrating circuits into our clothing a frustrating process.  Squaring up against this challenge, a team of researchers from North Carolina State University have hit upon a potential boon for wearable electronics: silver nanowires capable of being printed on flexible, stretchy substrates.

It helps that the properties of silver nanowires lend themselves to the needs of wearable circuits — flexible and springy in their own right — but are not without complications. Silver nanowires tend to clog print nozzles during printing, so the research team enlarged the nozzle and suspended the nanowires in a water-soluble solvent, dramatically cutting the chance of clogging. Normally this would have a negative impact on precision, but the team employed electrostatic force to draw the ink to the desired location and maintain print resolution. Once printed, the solvent is rinsed away and the wearable circuit is ready for use.

By controlling print parameters — such as ink viscosity and concentration — the team are able to print on a wide variety of materials. Successful prototypes thus far include a glove with an integrated heating circuit and an electrocardiograph electrode, but otherwise the size of the printer is the only factor limiting the scale of the print. Until this technique becomes more widely available, interested parties might have to put their stock into more homebrew methods.

[Thanks for the tip, Qes!]

Gramazon Gives Your Echo Dot A 1920’s Makeover

Unless you’re particularly fond of hockey pucks, you probably aren’t really keen on the aesthetics of the NSA’s Amazon’s diminutive listening device, the Echo Dot. It’s not exactly ugly, but if anyone at Amazon spent more than ten minutes considering the visual design of the thing when it was being developed, we’d be shocked.

Luckily for us, there are hackers and makers who not only have the artistic chops to come up with visually appealing designs, but are kind enough to share them with those of us who are a few crayons short of a full box in that department. Such is the case with the jaw-dropping Gramazon by [Bård Fleistad], a 3D printed acoustic amplifier for the Echo Dot that converts the ho-hum looking device into a classic 1920’s style “horn” speaker.

[Bård] has wanted a horn speaker for awhile, but the prices on a real one in decent condition are getting pretty high. If he couldn’t have the real deal he figured the next best thing would be to 3D print his own version, but he’d still need electronics to put into it. Since the Echo is readily available and works as a Bluetooth speaker (not to mention plays audio from various online sources), it made sense to use it as the heart of his faux-horn.

The design he came up with is very slick, but the finish work on the printed parts is really what puts this project over the edge. [Bård] used Bondo and multiple primer coats to smooth the outside of the horn, and XTC-3D for the hard-to-reach internal curves. Plus sanding. Lots, and lots, of sanding.

If you’re looking for more information on putting high quality finishes on your 3D printed parts like this, check out our Visual 3D Print Finishing Guide. Or if you’d rather just find a swanky home for your always-listening hockey puck, we’ve got plenty of inspiration for you there as well.

Continue reading “Gramazon Gives Your Echo Dot A 1920’s Makeover”

Comic Boxes Reflect Owner’s Skills

We are the culmination of our experiences. We build with the tools we’re familiar. We design with the decorations we like. Sometimes this thinking leads to a project that looks like a kindergartener who has dressed in a pink tutu and a camo shirt. Sometimes our experience leads us to make something functional and elegant. [jordanlund] combined his work experience in a library, 3D modeling skills, and love of comic books to turn a hodgepodge pile of scribbled-upon boxes into an orderly collection of comic books in boxes adorned with brass drawer pulls.

3D printing bridged the gap between the brass card catalog drawer pulls he knew well from the library and the crates of comics he kept at home. Custom brackets allowed the drawer pulls, which were meant to be screwed into wooden drawer faces, to work with cardboard boxes. The drawer pulls have a slot for labels so there will be no need to rip off sticky labels later or scrawl with a permanent marker. Perhaps [jordanlund] is merely a bibliophile with a 3D printer but if we didn’t know better, we might think those boxes were meant to have the drawer pulls installed.

Engage your own love of literature with this wordplay riddled appeal for libraries. or make your home library a little more fantasical with a secret door.