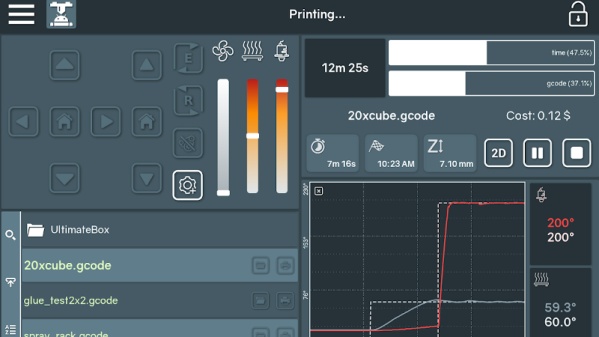
Locally Sourced: PLA Adhesive

When I first started getting into 3D printed projects that would require final assembly from multiple parts, I wanted to make sure I had an adhesive that would really hold up. I couldn’t imagine anything worse than spending 10’s of hours printing and assembling something, only to have it fall apart because my adhesive wasn’t up to the task. So I spent a lot of time trolling 3D printing message boards and communities trying to find the best way of gluing PLA. It should come as no surprise that, like everything else in the world, there are a ridiculous number of opinions on the subject.

If you’re printing with ABS, the general wisdom is that solvent welding with acetone is the best bet. You put some acetone on the printed parts, rub them together, and the plastic fuses together. This happens because the ABS melts slightly when exposed to the acetone, so they end up essentially melding into one piece. This sounded like exactly what I wanted, but unfortunately, acetone doesn’t have this same effect on PLA.

After some more research I found people suggesting Weld-On #16, an acrylic adhesive that will actually melt PLA. A little of this applied to the parts, they said, and you can solvent weld PLA just like acetone on ABS. Sure enough, the stuff works great and I’ve used it to put together nearly everything I’ve printed in PLA over the last few years. Only problem is, this stuff is a bit nasty, takes 24 hours to fully cure, and nobody has it locally.

So as an experiment I thought I’d take a look at a few adhesives sold at the local big box retailer and see if I couldn’t find something comparable. Do I need to keep ordering this nasty goop online every time, or can I pick something up off the shelf? More to the point, is solvent welding PLA really any better than just gluing it?

Continue reading “Locally Sourced: PLA Adhesive”

Printed Adapter Teaches An Old Ninja New Tricks

Do you like change for the sake of change? Are you incapable of leaving something in a known and working state, and would rather fiddle endlessly with it? Are you unconcerned about introducing arbitrary compatibility issues into your seemingly straight-forward product line? If you answered “Yes” to any of those questions, have we got the job for you! You can become a product engineer, and spend your days confounding customers who labor under the unrealistic expectation that a product they purchased in the past would still work with seemingly identical accessories offered by the same company a few years down the line. If interested please report to the recruitment office, located in the darkest depths of Hell.

A 2D representation of the adapter in Fusion 360

Until the world is rid of arbitrary limitations in consumer hardware, we’ll keep chronicling the exploits of brave warriors like [Alex Whittemore], who take such matters into their own hands. When he realized that the blades for his newer model Ninja food processor didn’t work on the older motor simply because the spline was a different size, he set out to design and print an adapter to re-unify the Ninja product line.

[Alex] tried taking a picture of the spline and importing that into Fusion 360, but in the end found it was more trouble than it was worth. As is the case with many printed part success stories, he ended up spending some intimate time with a pair of calipers to get the design where he wanted it. Once broken down into its core geometric components (a group of cylinders interconnected with arches), it didn’t take as long as he feared. In the end the adapter may come out a bit tighter than necessary depending on the printer, but that’s nothing a few swift whacks with a rubber mallet can’t fix.

This project is a perfect example of a hack that would be much harder (but not impossible) without having access to a 3D printer. While you could create this spline adapter by other means, we certainly wouldn’t want to. Especially if you’re trying to make more than one of them. Small runs of highly-specialized objects is where 3D printing really shines.


This is an entry in Hackaday’s

Repairs You Can Print contest

The twenty best projects will receive $100 in Tindie credit, and for the best projects by a Student or Organization, we’ve got two brand-new Prusa i3 MK3 printers. With a printer like that, you’ll be breaking stuff around the house just to have an excuse to make replacement parts.


Water Cooling A 3D Printer

It may seem like a paradox, but one of the most important things you have to do to a 3D printer’s hot end is to keep it cool. That seems funny, because the idea is to heat up plastic, but you really only want to heat it up just before it extrudes. If you heat it up too early, you’ll get jams. That’s why nearly all hot ends have some sort of fan cooling. However, lately we have seen announcements and crowd-funding campaigns that make it look like water cooling will be more popular than ever this year. Don’t want to buy a new hot end? [Dui ni shuo de dui] will show you how to easily convert an E3D-style hot end to water cooling with a quick reversible hack.

That popular style of hot end has a heat sink with circular fins. The mod puts two O-rings on the fins and uses them to seal a piece of silicone tubing. The tubing has holes for fittings and then it is nothing to pump water through the fittings and around the heat sink. The whole thing cost about $14 (exclusive of the hot end) and you could probably get by for less if you wanted to.

Continue reading “Water Cooling A 3D Printer”

CPAP Hacked Into Super Charged 3D Printer Cooler

Of all the parts on your average desktop 3D printer, the nozzle itself is arguably where the real magic happens. Above the nozzle, plastic is being heated to the precise temperature required to get it flowing smoothly. Immediately below the nozzle there’s a fan blowing to get the plastic cooled back down again. This carefully balanced arrangement of heating and cooling is the secret that makes high quality fused deposition modeling (FDM) printing possible.

But as it turns out, getting the plastic hot ends up being easier than cooling it back down again. The harsh reality is that most of the fans small enough to hang on the side of a 3D printer nozzle are pretty weak. They lack the power to push the volume of air necessary to get the plastic cooled down fast enough. But with his latest project, [Mark Rehorst] hopes to change that. Rather than using some anemic little fan that would be better suited blowing on the heatsink of a Raspberry Pi, he’s using a hacked CPAP machine to deliver some serious airflow.

The brilliance of using a CPAP machine for this hack is two-fold. For one, the machine uses a powerful centrifugal fan rather than the wimpy axial “muffin” fans we usually see on 3D printers. Second, the CPAP pushes air down a lightweight and flexible hose, which means the device itself doesn’t have to be physically mounted to the printer head. All you need is manifold around the printer’s nozzle that connects up to the CPAP hose. This “remote” fan setup means the print head is lighter, which translates (potentially) into higher speed and acceleration.

[Mark] was able to connect the fan MOSFET on his printer’s SmoothieBoard controller up to the brushless motor driver from the CPAP motor, which lets the printer control this monster new fan. As far as the software is concerned, nothing has changed.

He hasn’t come up with a manifold design that’s really optimized yet, but initial tests look promising. But even without a highly optimized outlet for the air, this setup is already superior to the traditional part cooler designs since it’s got more power and gets the fan motor off of the print head.

Getting your 3D printed parts to cool down is serious business, and it’s only going to get harder as printers get faster. We wouldn’t be surprised if fan setups like this start becoming more common on higher-end printers.

Repairs You Can Print: Fixing A Rat-Attacked Mic Cord

We’ve all been there — a steamy night in the rainforest of Papua New Guinea, sweaty slumber disturbed by the unmistakable sounds of gnawing. In the morning we discover that a rodent of unusual tastes has chewed the microphone cable of our transceiver right half in two, leaving us out of touch with base camp. If we had a nickel for every time that’s happened.

It may sound improbable, but that’s the backstory behind [Marius Taciuc]’s 3D-printed mic cord repair. Even with more mundane failure modes, the retractile cords on microphones are notoriously difficult to fix. Pretty much any of the usual suspects, like heat-shrink tubing or electrical tape, are going to do very little to restore the mechanical stability lost once that tough outer jacket is breached. [Marius]’s solution was to print as small an enclosure as possible to mechanically support the splice. The fit is tight, but there was just enough room to solder the wires and stuff everything back in place. Cable ties provide strain relief where the cord exits the splice, and a liberal squirt of hot glue pots the joint. It’s not perfect — we’ll bet the splice acts as a catch point and gets a little annoying after a while — but if it gets you back on the air fast and cheap, it probably makes sense.

[Marius] entered this rat-race beating hack into the Repairs You Can Print contest. Do you have an epic repair that was made possible by a 3D printer? Let the world know about it and you might just win a prize.

Continue reading “Repairs You Can Print: Fixing A Rat-Attacked Mic Cord”

Repairs You Can Print: Model Coal Car Fix

Model railways are a deep and rewarding hobby, and the mechanisms involved can be both surprisingly intricate and delightful. A great example that may surprise the unfamiliar is that of model train carriages, such as coal cars, that are capable of both receiving and dumping a load at various points on a model layout. This adds realism and, if we’re honest, just plain old fun.

When [Phil]’s father received his Lincoln coal car from eBay, it was unfortunately damaged, and incapable of dumping properly. Instead of throwing it away, a replacement part was developed and 3D printed. The part was iterated on until the coal hopper could dump and retract smoothly.

This is the perfect example of a tidy repair executed through 3D printing. The broken part was extremely detailed and would be difficult and expensive to repair or fabricate through other measures. However, through the power of 3D printing, all that’s required is a 3D modelling job and a few hours to print it.

It’s a great entry into our Repairs You Can Print challenge, and covers the fundamentals of modelling and iterative design well. Got a neat repair you’ve done yourself? Document it on Hackaday.io and enter yourself!

Repairs You Can Print: A Little Love For The Glove Box

A few years ago, [Brieuc]’s car blew a fuse. He went to replace it, which unfortunately means removing the entire glove box. In his haste to get his baby back on the road, he accidentally broke one of the clips that holds the glove box on the dashboard.

[Brieuc] tried to just glue the thing back together, but it didn’t hold because the part has to flex a little bit for people who need to get into the fuse box. No one seems to offer a replacement for this small but vital hunk of plastic, though he did find someone offering total glove box replacements at highway robbery prices. Since there was still one good clip, he used it to design and print a strong ABS replacement.

This is a great example of the one-off utility of 3D printers. [Brieuc] didn’t need an exact copy, and since he was replacing an injection-molded part with additive manufacturing, he had the freedom to start with a bare-bones design, make adjustments as needed, and iterate until he got it right. It didn’t take long. The layer orientation of the first print made the legs too weak, but that’s a simple fix. The second version has lasted for three years and counting.

We get it. You don’t have the same car as [Brieuc], so this particular fix doesn’t sway you. But someday in the future when your zipper breaks or your dishwasher detergent cup won’t latch, 3D printing will be there to help.