Playing With The Power Of Full G-Code Control

Slicing software needs to maintain a balance between ease-of-use and control, while handling handle any STL file you throw at it. If you eliminate the need to convert an existing 3D model, and create G-Code directly, you gain a lot of design freedom, at the cost of increased design effort. By taking advantage of this freedom and making it more accessible, [Andrew Gleadall] and [Dirk Leas] created the FullControl Design Library.

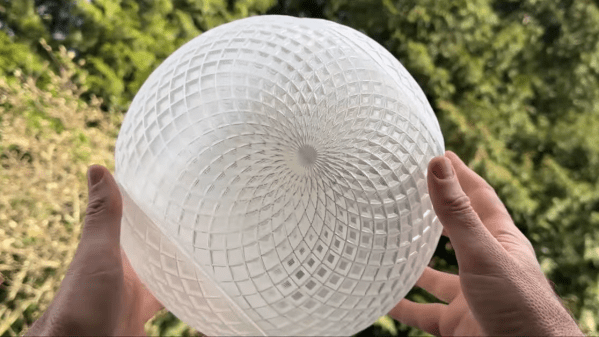
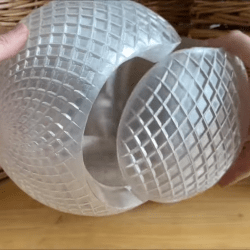
Each model is a mathematically generated extrusion path with a host of adjustable design parameters and print settings. This allows you to print things like a single-layer non-planar part, or 90° overhangs without any support (video after the break). The website was built using the python version of the original Excel-based FullControl Designer (unreleased at the time of writing), and threejs for the 3D visualization.

Go browse the library, play with some parameters and see what strikes your fancy. For ideas, help and updates, keep an eye on the FullControl Subreddit.

Continue reading “Playing With The Power Of Full G-Code Control”

3D Printer Slicing In The Manufacturing World

It is no secret that the way you build things in your garage is rarely how big companies build things at scale. But sometimes new techniques on the production floor leak over to the hobby builder and vice versa, so it pays to keep an eye on what the other side is doing. Maybe that was the idea behind [Carolyn Schwaar’s] post on All3DP entitled “Beyond Cura Slicer: 3D Printing Build Prep Software for Pros.” In it, she looks at a few programs that commercial-grade 3D printers use for slicing.

The differences in the software we typically use and those meant to work with a dedicated high-end machine are pretty marked, but maybe not in the way you would expect. While you might expect them to have tight integration with their target machine, you might not expect that they usually offer less control over parameters than a product like Cura. As a quote in the post points out, Cura has over 400 settings. Commercial 3D printers don’t have time to tweak those settings endlessly. So the emphasis is more on canned profiles that just work.

Not all of the programs are tied to machines, though. Commercial CAD offerings are becoming more capable with 3D printers and can sometimes slice and send jobs to printers directly. Regardless of software type, though, everyone needs certain functions: design, repair, simulation, build plate layout, and more.

If you are looking for a hobby-grade slicer other than Cura, we’ve been using SuperSlicer which is a fork of PrusaSlicer, which is a fork of Slic3r lately.

3D Printing Gets Small In A Big Way

If you have a 3D printer in your workshop, you probably fret more about how to get bigger objects out of it. However, the University of Amsterdam has a new technique that allows for fast large-scale printing with sub-micron resolution. The technique is a hybrid of photolithography and stereolithography.

One of the problems with printing with fine detail is that print times become very long. However, the new technique claims to have “acceptable production time.” Apparently, bioprinting applications are very much of interest to the technology’s first licensee. There is talk of printing, for example, a kidney scaffold in several hours or a full-sized heart scaffold in less than a day.

Another example application is the production of a chromatography instrument with 200 micron channels and 20 micron restrictions. This requires a printer capable of very fine detail. There are also applications in semiconductors and mechanical metamaterials. Of course, we always take note of photolithography processes because we use them to make PC boards and even integrated circuits. A desktop printer that could do photolithography might open up new ideas for producing electronic circuitry.

If you want to play with photolithography today, [Ben Krasnow] has some advice. Of course, there are several ways to produce PC boards, even with a garden-variety 3D printer.

The $300,000 3D Printed Car

We’ve noticed an uptick in cars–especially pricey ones–using 3D-printed parts. However, these are usually small and nonstructural parts with a few exceptions. This isn’t the case with the 2024 Cadillac Celestiq. The $300,000 luxury electric vehicle boasts 115 3D-printed parts, according to a post on [TheDrive].

It appears part of the drive–no pun intended–is to allow ultra customizations for people who need more than a car that costs more than a quarter of a million dollars. For example, if you buy an Escalade — another Cadilac vehicle — you have to tolerate that the switches that operate the window are the same as Joe Sixpack has in his Tahoe. Not so, the Celestiq since it has 3D printed switches that could even be customized for a specific owner. The post mentions that the large steering wheel trim is all printed so having, for example, your name, family crest, or company logo embedded in it would be feasible.

Continue reading “The $300,000 3D Printed Car”

Build Your Own Concrete 3D Printer

We didn’t notice [Nikita]’s post about building a concrete 3D printer, a few months ago, but the idea seems sound: build a basic CNC XY axis and then add a mortar pump and hose to deposit concrete. The video, below, shows the machine in operation.

While it looks interesting, there is essentially no real Z-axis, so this would be limited to some sort of relatively thin forms unless you, perhaps, did a few layers and then further lifted the machine. We also assume wet concrete won’t bridge at all. Still, this might be an interesting project, especially if you have a spare CNC XY axis floating around.

If you buy everything, though, you are looking at an estimated cost of around $7,000 USD. We presume there is enough weight in the concrete that a conventional 3D printer probably isn’t going to cut it. We did wonder, though, if there would be any merit to connecting a conventional plastic-extruding nozzle to be able to lay down support for the concrete.

This might be a good jumping-off point for a more sophisticated machine. In particular, [Nikita] points out that a progressive cavity pump with a variable frequency drive is ideal, because it allows you to vary the extrusion rate and provides a steady flow of concrete. Armed with that knowledge, you could probably figure out the rest pretty easily if you’ve ever built a 3D printer or CNC machine.

Not the first concrete printer we’ve seen, of course. The one we saw before was capable of some pretty amazing things.

Continue reading “Build Your Own Concrete 3D Printer”

DIY Heat-Set Insert Press Says Complicated = Comfort

Heat-set inserts are a great way to embed mechanically-strong, threaded parts into a 3D print. For installation, all that is required is an economical soldering iron; something most of us already have.

The carriage and counterweight use a v-wheel gantry, GT2 belt, and other common hardware.

That’s fine for a handful of occasional inserts, but when a large number need to be inserted reliably and cleanly, something a little more refined is called for. That’s where [virchow]’s threaded insert press design comes in. It adds 3D-printed parts to an aluminum extrusion frame to create a press that smoothly lowers a soldering iron directly up and down, with minimal effort by the user.

The holder for the soldering iron is mounted to a small v-wheel gantry that rides along the vertical extrusion. The gantry features a counterweight to take care of resetting the position of the iron. [Virchow] admits that the design could be considered unnecessarily complicated (hence the “UC” in the name) but on the other hand, there’s nothing like doing a hundred or so inserts to make one appreciate every bit of comfort and stability.

Heat-set inserts aren’t difficult to use, but a little technique goes a long way. Spend a few minutes reading Joshua Vasquez’s guide on the optimal way to use them in 3D-printed parts to make sure yours not only go in straight but end up looking great as well.

ERRF 22: Baby Belt Promises Infinite Z For Under $200

Hackaday has been reporting on belt printers for around a decade now, since MakerBot released (and then quickly pulled) an automated build platform for their very first Cupcake printer. Turns out that not only has the concept been difficult to pull off from a technical perspective, but a murky patent situation made it tricky for anyone who wanted to bring their own versions to market. For a long time they seemed like the fusion reactors of desktop 3D printing — a technology that remains perennially just outside of our grasp.

But finally, things have changed. The software has matured, and there are now several commercial belt printers on the market. The trick now, as it once was for traditional desktop 3D printing, is to bring the costs down. Enter the Baby Belt, created by [Rob Mink]. This open-source belt printer relies on light-duty components and a largely 3D printed structure to get the price point down, though some will find its diminutive dimensions a bit too limiting…even if one of its axes is technically infinite.

If you’ve already got a printer and filament to burn, [Rob] is selling the part kit for just $130 USD. But even if you opt for the full ready-to-build kit, it will only set you back $180. Considering even the cheapest belt printers on the market now have a sticker price of more than $500, that’s an impressive accomplishment.

Of course, it’s hard to compare the Baby Belt with anything else on the market. For one thing, save for a few metal rods, its frame is made almost entirely from 3D-printed parts. Rather than the NEMA 17 stepper motors that are standard on even the cheapest of traditional desktop 3D printers, this little fellow is running on the dinky 28BYJ-48 steppers that you’d expect to find in a cheap toy. Then again, considering the printer only offers 85 x 86 mm in the X and Y axis, the structure and motors don’t exactly need to be top of the line.

What really sets this machine apart is the belt — while we’ve seen other makers go all out with their belt material, [Rob] has come up with an impressively low-tech solution. It’s a simple stack-up of construction paper, carpet tape, and fabric that you could probably put together with what you’ve got laying around the house right now.

Between that outer cloth layer and the printed frame, the Baby Belt offers a lot of room for customization, something which was on clear display at the 2022 East Coast RepRap Festival. The machines dotted several tables on the show floor, and you could tell their builders had a lot of fun making each one their own

Continue reading “ERRF 22: Baby Belt Promises Infinite Z For Under $200”