PySpectrometer version 2, showing mini spectroscope, 4 inch display and hand for scale

Pi-based Spectrometer Gets An Upgrade

Here at Hackaday, we love to see projects re-visited and updated after we’ve covered them on the site. It’s always exciting to see what the creators come up with next, and this Pi-Based Spectrometer project is a great example of that.

[LesWright] found himself with a problem when the new version of Raspberry Pi operating system was released (Bullseye), and it broke some functionality on his original software. Rather than just fix the issues, [Les] chose to rewrite the software more dramatically and has ended up with a much more capable spectrometer that is able to match professional devices costing many times more.

Screenshot of Waterfall Display for PySpectrometer 2

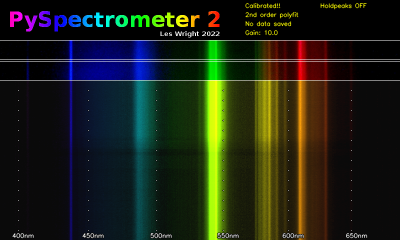
By using multi-wavelength calibration and polynomial regression data, the new version is much more accurate and can now resolve wavelengths down to +/- 1nm.

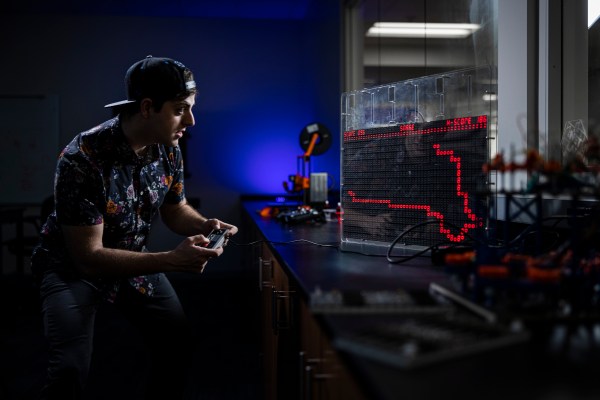
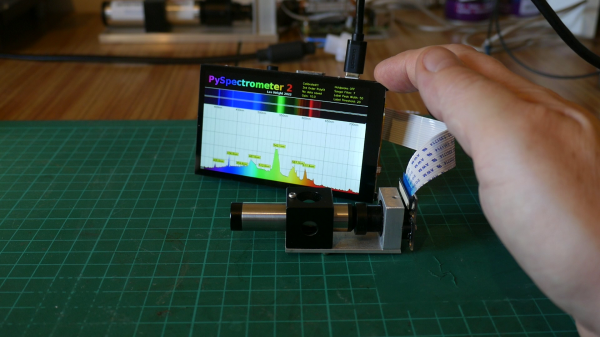
The whole project is now written in OpenCV, and there’s a nifty new waterfall spectrum display, that will show changes in measured spectra over time.

A low-cost benchtop spectroscope is coupled to a RaspberryPi Camera via a CCTV zoom lens and the whole setup is mounted to a small block of aluminium for thermal and mechanical stability. The spectroscope is pointed at a fluorescent lamp and the user is guided through a calibration routine to tune the software to the hardware.

We’re impressed with the precision [Les] has achieved with his builds, and the write-up is sufficiently detailed to allow others to follow in his footsteps. We’d love to see if readers build one themselves, and what they use them for!

If you want to read up on the original build, you can find our article here. We’ve covered several spectrometry projects in the past, including this Gamma-Ray Spectrometer and this one based around an STM32 Nucleo board. Continue reading “Pi-based Spectrometer Gets An Upgrade”

All Your Pixels Are (Probably Not) Belong To Pantone

There’s a piece of news floating around the open IP and allied communities at the moment which appears to have caused some consternation. It comes from Adobe, who have announced that due to an end of their licensing deal with Pantone LLC, PSD images loaded into Photoshop will have pixels containing unlicensed Pantone colours replaced with black. What, Pantone owns colours now? Are we expected to pay a royalty every time we take a picture of a blue sky? It’s natural to react with suspicion when hearing a piece of news like this, but for once we think this might not be the unreasonable intellectual property land grab it may first appear. To illustrate this, it’s necessary to explain what Pantone does, and what they don’t do. Continue reading “All Your Pixels Are (Probably Not) Belong To Pantone”

Welding Aluminum With A MIG Welder

Steve Martin had a bit that was like a fake infomercial where he says, “You can be a millionaire and never pay taxes!” The instructions were, “First, get a million dollars. Then,…” [Brandon’s] instructions for how to convert your MIG welder to do aluminum for under $25 is not quite like that, but you do need the right kind of MIG welder to make it work. In particular, you need an actual MIG welder that has a provision to connect external gas. The instructions show a Hobart Handler 140 that meets the criteria and has sufficient power to handle aluminum.

The main task is to replace the liner for the torch. The stock liner is steel which is fine for its intended purpose, but it is too rough for aluminum wire. A PTFE liner is inexpensive and will work fine with the aluminum wire. If you want to do normal welding later, you’ll need to put the original liner back in.

Continue reading “Welding Aluminum With A MIG Welder”

A transparent blue resin waterfall tabletop with a single wooden leg sits on a grey rug between two grey leather chairs.

Using The Sun To Turn Epoxy Into Furniture

Epoxy resins have been used to make some pretty cool furniture, but since it’s still a relatively new material, makers are still discovering new techniques to work with resin. [Cam] from Blacktail Studio may be the first person to bend fully cured epoxy using nothing but a form and the power of the sun.

Inspired by a friend’s mishap with an epoxy table left out in the sun too long, [Cam] wanted to see if he could purposely bend an epoxy sheet into an interesting shape. The tabletop was poured in sections to give an ombre look before being planed and given a preliminary surface finish. The epoxy sheet was then clamped onto a form made of kerfed plywood and left in direct sunlight on a 104°F (40°C) day. Once the sheet began to deform in the sunlight, ratchet straps and more clamps were added to conform the sheet to the bending form.

After letting the tabletop relax for a few days, [Cam] finished the surface with lots of sanding and an automotive polishing regimen. The epoxy was then attached to a single zebrawood leg to give a very modern-looking, waterfall-esque table.

More interesting projects with resin you might want to check out are this ocean-themed epoxy nightlight, how to degas epoxy on the cheap, or some techniques for cold casting with resin.

Continue reading “Using The Sun To Turn Epoxy Into Furniture”

Play DOOM On Seven-Segment Displays

Getting DOOM to run on a computer it was never meant to run on is a fun trope in the world of esoteric retro computers. By now we’ve seen it run on everything from old NES systems to microwaves, treadmills, and basically anything with a computer inside of it. What we don’t often see are the displays themselves being set up specifically to run the classic shooter. This build might run the game itself on ordinary hardware, but the impressive part is that it’s able to be displayed on this seven-segment display.

This build makes extensive use of multiplexers to drive enough seven-segment displays to use as a passable screen. There are 1152 seven segment digits arranged in a 48 by 24 array, powered by a network of daisy-chained MAX7219 chips. A Python script running on a Raspberry Pi correlates actual image data with the digit to be displayed on each of the segments, and the Raspberry Pi sends all of that information out to the screen. The final result is a display that’s fast enough and accurate enough to play DOOM in a truly unique way.

There is much more information available about this project on their project page, and they have made everything open source for those who wish to follow along as well. The project includes more than just the ability to play DOOM, too. There’s a built-in video player and a few arcade programs programmed specifically to make use of this display. Perhaps one day we will also see something like this ported to sixteen-segment displays instead of the more common seven-segment.

Hackaday Supercon: Back At Last!

I’m unashamed to admit that I’ve really missed in-person hacker conferences over the last two and a half years. And while we’re not out of the water yet, COVID-wise, things are controlled and controllable enough that we felt we could safely hold our smallish, halfway out in the back-alley conference safely. It’s going to be so nice to see all the familiar faces, and meet the first-time Superconnisti as well. Welcome! You’re going to have fun.

For health, money, or other reasons, a lot of people who would like to go still can’t, and that bums me out. Of course there’s no substitute for being there live, but we’re trying our best to spread the Supercon love to everyone out there. If the two years of Remoticon were different, I’m not willing to say they were worse. It was awesome to be able to share live talks on some fantastic hacky topics, typing amongst ourselves instead of chatting in person, and it spanned the globe. There were no borders.

We’re still working on our remote plans – yes, a week before the con – because I don’t think things can ever fully go back to the before-times. That said, we will be streaming the main stage live as always, and you can pretend it’s Remoticon all over again by hanging out in our Discord, or over at the Supercon Hack Chat.

So to those of you attending, it’ll be great to see you in person. The rest of you out there – join us virtually. We’ve been working on this for the last five months now, and next week, it’s go time!

3D Printer Slicing In The Manufacturing World

It is no secret that the way you build things in your garage is rarely how big companies build things at scale. But sometimes new techniques on the production floor leak over to the hobby builder and vice versa, so it pays to keep an eye on what the other side is doing. Maybe that was the idea behind [Carolyn Schwaar’s] post on All3DP entitled “Beyond Cura Slicer: 3D Printing Build Prep Software for Pros.” In it, she looks at a few programs that commercial-grade 3D printers use for slicing.

The differences in the software we typically use and those meant to work with a dedicated high-end machine are pretty marked, but maybe not in the way you would expect. While you might expect them to have tight integration with their target machine, you might not expect that they usually offer less control over parameters than a product like Cura. As a quote in the post points out, Cura has over 400 settings. Commercial 3D printers don’t have time to tweak those settings endlessly. So the emphasis is more on canned profiles that just work.

Not all of the programs are tied to machines, though. Commercial CAD offerings are becoming more capable with 3D printers and can sometimes slice and send jobs to printers directly. Regardless of software type, though, everyone needs certain functions: design, repair, simulation, build plate layout, and more.

If you are looking for a hobby-grade slicer other than Cura, we’ve been using SuperSlicer which is a fork of PrusaSlicer, which is a fork of Slic3r lately.