Charger Caddy Shows What 3D Printers Were Meant For

As computers became more popular in the late 80s and into the 90s, they vastly changed their environments. Of course the technological changes were obvious, but plenty of other things changed to accommodate this new technology as well. For example, furniture started to include design elements to accommodate the desktop computer, with pass-through ports in the back of the desks to facilitate cable management. While these are less common features now there are plenty of desks still have them, this 3D printed design modernizes them in a simple yet revolutionary way.

While these ports may have originally hosted thick VGA cables, parallel printer cables (if they would fit), and other now-obsolete wiring, modern technology uses simpler, smaller solutions. This doesn’t mean that they aren’t any less in need of management, though. This print was designed to hold these smaller wires such as laptop chargers, phone chargers, and other USB cables inside the port. A cap on the top of the print keeps everything hidden until it is lifted by hand, where a cable can be selected and pulled up to the top of the desk.

While it might seem like a simple project at first, the elegance of this solution demonstrates excellent use of design principles and a knack for integrating slightly older design decisions with modern technology. If you have a 3D printer and a cable management port on your desk, the print is available on Thingiverse. Not every project needs a complicated solution to solve a problem, like this automatic solar tracker we recently saw which uses no complicated electronics or algorithms to reliably point itself at the sun.

3D Printed Material Might Replace Kevlar

Prior to 1970, bulletproof vests were pretty iffy, with a history extending as far as the 1500s when there were attempts to make metal armor that was bulletproof. By the 20th century there was ballistic nylon, but it took kevlar to produce garments with real protection against projectile impact. Now a 3D printed nanomaterial might replace kevlar.

A group of scientists have published a paper that interconnected tetrakaidecahedrons made up of carbon struts that are arranged via two-photon lithography.

We know that tetrakaidecahedrons sound like a modern invention, but, in fact, they were proposed by Lord Kelvin in the 19th century as a shape that would allow things to be packed together with minimum surface area. Sometimes known as a Kelvin cell, the shape is used to model foam, among other things.

The 3D printing, in this case, is a form of lithography using precise lasers, so you probably won’t be making any of this on your Ender 3. However, the shape might have some other uses when applied to conventional 3D printing methods.

We’ve actually had an interest in the history of kevlar. Then again, kevlar isn’t the only game in town.

Fail Of The Week: The Metal Hot End Upgrade

My son, Patrick, has observed on more than one occasion that I do not like 3D printing. That may sound odd, because I built a printer back in 2012 and since then I’ve built a lot of printers and I currently have at least three in my lab. But Patrick correctly realized that I don’t actually enjoy printing things that I need. What I do enjoy is building, fixing and even more importantly improving the printers themselves. If you are reading Hackaday, you probably know how that is. This is the story of an upgrade gone bad, although the ending is happy enough. If you’ve ever thought about moving from a traditional hot end to an all-metal hot end, you might want to hear me out and maybe I can save you some trouble.

A few years ago, I picked up an Anet A8 for a really low price. As printers go, it is adequate. Not bad, but not amazing. But it is a fun printer because you really need to do some work on it to brace the acrylic frame and fix other shortcomings. I merrily improved the printer quite a bit over a relatively short period of time and I also bought a bunch of aluminum extrusion to rebuild the frame to the AM8 plans you can find on Thingiverse.

Continue reading “Fail Of The Week: The Metal Hot End Upgrade”

3D Printer Add On Makes Sharp(ie) Colors

We’ve all seen 3D printed jigs that use a permanent marker to color filament as it goes into the hot end. [Sakati84] has a completely different idea. A holder on the print head can pick up one of several pens and use it to color the layer the hot end just laid down. In the video below, it looks like it works well and, although we imagine it will be a bear to calibrate on height, it seems like something you could replicate with nearly any conventional printer.

Logically, you print a layer with no pen in the holder and when you do pick up a pen, it will need to be somewhat lower than the print nozzle or else you’ll drag around in the fresh plastic.

Continue reading “3D Printer Add On Makes Sharp(ie) Colors”

See This Hybrid Approach To Folded 3D Printed Mechanisms

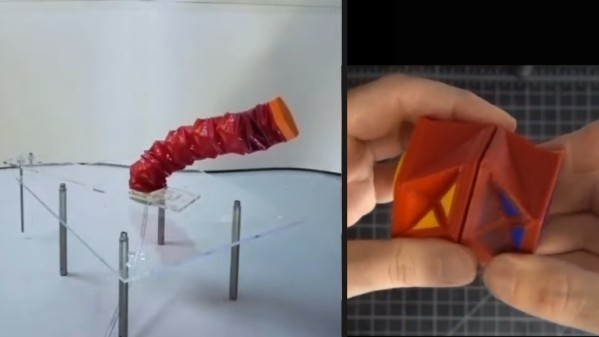
3D printers are quite common nowadays, but we’re still far from exhausting new ideas to try with them. [Angus] of [Maker’s Muse] recently got interested in 3D printing small mechanical assemblies that can be put together by folding them up, and also depend on folding linkages for the moving parts. (Video, embedded below.) The result would be lightweight, functional assemblies that would be simple to manufacture and require very few parts; but how to make the hinges themselves is the tricky part. As a proof-of-concept, [Angus] designed a clever steering linkage that could be printed flat and folded together, and shows his work on trying to make it happen.

[Angus] points out that that 3D-printed hinges have a lot of limitations that make then less than ideal for small and lightweight assemblies. Printing hinge pieces separately and assembling after the fact increases labor and part count, and print-in-place hinges tend to have loose tolerances. A living hinge made from a thin section of material that folds would be best for a lightweight assembly, but how well it works depends a lot of the material used and how it is made.

[Angus] tries many different things, and ultimately decided on a hybrid approach, combining laser cutting with 3D printing to create an assembly that consists of a laser-cut bottom layer with 3D printed parts on top of it to create a durable and lightweight device. He hasn’t quite sorted it all out, but the results show promise, and his video is a fantastic peek at just how much work and careful experimentation can go into trying something new.

Continue reading “See This Hybrid Approach To Folded 3D Printed Mechanisms”

Walk The First 3D-Printed Bridge And Be Counted

Way back in 2018, we brought you news of a 3D-printed stainless steel pedestrian bridge being planned to span a Dutch canal in Amsterdam. Now it’s finally in place and open to the public — the Queen made it official and everything. MX3D printed it on their M1 Metal additive manufacturing machine that is essentially a group of robots welding layers of metal together using traditional welding wire and gas.

The partnership of companies involved originally planned to build this beautiful bridge in situ, but safety concerns and other issues prevented that and it was built in a factory instead. The bridge has been printed and ready since 2018, but a string of delays got in the way, including the fact that the canal’s walls had to be refurbished to accommodate it. Since it couldn’t be made on site, the bridge was taken there by boat and placed with a crane. After all this, the bridge is only permitted to be there for two years. Hopefully, they have the option to renew.

This feat of engineering spans 40 feet (12.2 meters) long and sits 20 feet (6.3 meters) wide. It’s equipped with sensors that measure structural stuff like strain, displacement, load, and rotation, and also has environmental sensors for air quality and temperature. All of this data is sent to the bridge’s digital twin, which is an exact replica in the form of a computer model. One of the goals is to teach the bridge how to count people. Be sure to check out our previous coverage for a couple of short videos about the bridge.

3D Printed Roller Coaster Looks Pretty Darn Fun

Rollercoasters are great fun if you can deal with the exhilaration without throwing up or otherwise screaming until you pass out. Of course, the big outdoors ones are a little hard to get to at the moment, what with a pandemic raging outside. However, [3d_coasters] has built a tabletop design that, while it’s too small to ride, is nonetheless quite impressive. (Video, embedded below.)

The coaster is of the launch design. It relies on an elastic cord that is wound up to high tension to launch the train up to speed, with the train then coasting around the rest of the curves on the track. The quality of the modelling is highly impressive, too. The doors at the boarding platform are even actuated to simulate riders boarding the train! Everything is controlled by an Arduino, a handful of micro servos, and a DC motor.

As you might imagine, this project didn’t happen overnight. 600 hours were logged in Fusion 360 developing the track, and slicing the models in Cura for 3D printing took a further 5 hours. The actual printing process itself took 800 hours, not including finishing, so this project certainly isn’t one for the faint of heart. The final model weighs a full 30 lbs.

Believe it or not, we’ve featured 3D printed rollercoasters before, too. Video after the break.

Continue reading “3D Printed Roller Coaster Looks Pretty Darn Fun”