Repairing A Pair Of Voodoo 2 GPUs For Some SLI Action

Well there's your problem. (Credit: Bits und Bolts, YouTube)
Well there’s your problem. (Credit: Bits und Bolts, YouTube)

Recently [Bits und Bolts] stumbled over a pair of Dragon 3000 branded 3dfx Voodoo 2 cards in his unfixed cards pile, and decided that the best course of action was to not only fix them, but also run them in SLI for some sweet Unreal Tournament action. Naturally, these cards being in the broken cards pile meant that he first had to figure out why they were broken and fix all issues.

The advantage of having two identical Voodoo 2 cards is of course that any missing components, like some resistors on one card, could be referenced on the other card. Beyond that it was mostly a matter of reflowing clearly corroded pins on the ICs and replacing damaged resistors and resistor arrays before the first tests could be run.

Using the mojo utility it was easy enough to spot that there were still some lingering issues, with clear issues visible in 3D games as well. These were tracked down to a dodgy pin on one of the texture mapping units (TMUs) that needed some more reflowing, and a very sneaky resistor array that was cracked but not obviously so until prodded with a multimeter.

With both cards now making happy noises when individually tested, it was time to go full SLI, fire up the Pentium 2 system and enjoy the glory of 24 MB of VRAM at high resolutions in Unreal Tournament. Considering that the bloke who had sent in these cards had found them while cleaning up a shed, it’s quite amazing how little rework was needed to once again party like it’s 1999.

Continue reading “Repairing A Pair Of Voodoo 2 GPUs For Some SLI Action”

How The 2020s Chip Crisis Led To A Buggy Saleae Analyzer In 2026

For those of us old enough to remember the harrowing days of the early 2020s, alongside another major kerfuffle there was a complete breakdown in global supply chains that led to the 2020-2023 global chip shortage. Unsurprisingly, this pushed many hardware manufacturers into less orthodox approaches, massive BOM changes, and hurried redesigns. One of the results of this era found its way into the hands of the bloke over at the [Playduino] YouTube channel, who was mystified to find two bodge wires in his fancy Saleae logic analyzer.

The reason for popping open the LA was crosstalk between two channels, which was bad enough that it made the unit quite unusable for the intended task. After seeing the cut traces and bodge wires he initially assumed that since he bought it used that the previous owner had modified it, but said person denied having opened it since purchasing it from an official retailer.

This was when he emailed Saleae support to see whether they knew anything. Initially they denied knowing anything about such a modification, but then the CTO emailed back with a long and very detailed confession. As explained in the video, during the aforementioned chip crisis Saleae was forced to rapidly redesign their LAs to use whatever FPGAs and other parts they could still get their hands on.

An initial prototype unit passed their internal tests, so they had a first batch manufactured using PCBs from a different supplier. Despite sending the same Gerber files, the resulting PCBs had ground fill issues that necessitated the observed rework, but due to insufficient testing for crosstalk a total of 406 units made it into the wild.

Sadly he had to return the defective unit for a replacement, making it somewhat hard to let go of such a piece of history. That said, if you want to know whether you’re also one of the lucky remaining 405 LA owners, the CTO provided the affected serial number range: 00200026245 to 00200026675 are affected.

Continue reading “How The 2020s Chip Crisis Led To A Buggy Saleae Analyzer In 2026”

Repairing A Apple PowerBook 150 With Serious Issues

Sometimes you purchase an old device that is very cheap for a good reason. So too with the 1995 Apple PowerBook 150 that [Hugh Jeffreys] purchased for a single Aussie buck back in 2018. After finally taking it off the shelf recently, the issues are very apparent. Without even trying to turn it on, the visible damage ranges from the display that’s gone full vinegar with wolverine scratches, to the snapped hinge. Naturally the HDD also turned out to be dead.

Without a functioning display there was little point in continuing, so the disassembly started there, revealing many broken plastic clips. The cause of the vinegar symptom is the degrading polarizer, which with some finesse can be removed like a thick screen protector. Fortunately, here it’s put on top of the glass layer of the display, so after peeling it off the remaining glue can be safely dissolved and scraped away.

Inside the case the RTC battery was found to have started leaking, causing corrosion and damaging a variety of important traces for the keyboard and display. All of this damage seemed fixable, but after a while the damage was just too severe. Fortunately he was able to obtain a replacement for the affected daughter PCB, which allowed the display to come back to life, so that a new polarizer could be installed after cutting a large sheet down to size.

A replacement hinge was then printed in PETG and glued to the part of the lid where it had broken off, while snapped plastic clips were reinforced with glue where they had hung on. Finally, the IDE HDD was replaced with a CF card via an IDE adapter and the entire system reassembled.

Unfortunately [Hugh] wasn’t able to immediately source or create MacOS floppies with a version that the laptop wanted to install from, so that part couldn’t be tested yet, but there’s a good chance that this old PowerBook 150 has finally been cured of at least its biggest ills, without spending much more than the original asking price.

Continue reading “Repairing A Apple PowerBook 150 With Serious Issues”

Fixing A Nintendo Game Boy Clone That Runs Too Fast

There’s no shortage of cloned Nintendo hardware out there, and most of it is pretty poor. A few are actually pretty interesting though, such as the GB Boy by Gangfeng, which takes real cartridges and thus in many ways should provide the original Game Boy Pocket experience with modern hardware. But as you might imagine, even the best of the clones comes with various technical issues at no additional charge — with this particular unit having a habit of running the game too fast. It’s an issue that [Sharopolis] addresses in a recent video with a partial fix.

As can be seen in the demonstration, it runs games just too fast to make it very usable or fun, hence why it sat in a drawer for a few years after purchasing off AliExpress. This raises the question of what’s wrong with these units, as others report similar issues with this and other ‘GB Boy’ variants.

Fortunately the unit is easy to open, revealing the PCB with a couple of chips on it, one marked KF2001 being the brains of the operation alongside two memory chips. The crystal resonator marked X1 for the main IC is rated for 5 MHz, whereas a quick look inside the Game Boy Pocket shows that its crystal resonator runs at 4.1943 MHz, which is a bit of a difference.

Because of how buying components and pricing works, [Sharopolis] ended up with a reel of 100 of replacement resonators with the right parameters for a drop-in replacement. After swapping the resonator, the GB Boy now does indeed run games at the right speed, but a new issue has now cropped up in the form of flicker on the display.

In the comments it’s suggested that replacing the cheap capacitors on the GB Boy’s board can help here, but it highlights just how these clone systems keep managing to snatch defeat from the jaws of victory by pairing what looks to be a pretty good IC with either the wrong or sub-par components.

Continue reading “Fixing A Nintendo Game Boy Clone That Runs Too Fast”

Restoring Apple’s Terrible But Awesome IBook Laptop

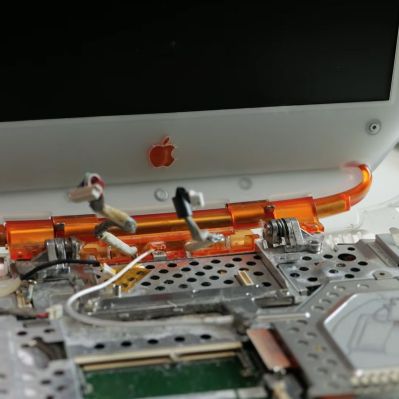
Before the Apple MacBook there was the Apple iBook, fruity 1999 colors included. These PowerPC-based laptops targeted low-cost PC-compatible laptops much like the iMac did, albeit it the latter with more success. That said, these laptops are said to be a nightmare to repair, so when [This Does Not Compute] got his hands on a shiny first generation, 300 MHz PowerPC powered, tangerine-colored one, he somewhat dreaded trying to fix it.

Aside from some relatively minor cosmetic issues such as typical cracks in the plastic and a missing optical drive door it seemed in good condition. The first issue came on boot, when MacOS 9.0 would throw up an error message about an issue with cache memory. After booting into the OS this cache memory did indeed show up as missing. Next issue was the optical drive doing absolutely nothing and restarting leading to the system locking up and not starting until plugging in the power adapter.

Fortunately the optical drive started working after addressing a software issue, but the power and cache issues were concerning. Cue a long troubleshooting and repair session that involved purchasing a ‘parts unit’ from Japan to merge both into a single iBook with hopefully a working system at the end.

Along the way the reason why people dislike maintaining these systems, as to do something like getting to the hard drive requires removing the entire display. The cause for the first iBook’s problems also seemed to be due to a liquid spill of some type, as on boot there was no chime either, indicating a wider board-level issue. Unfortunately this was left further undiagnosed and the Japanese mainboard used instead. It’d be interesting to see the deeper cause, but most likely the mainboard will be used for components.

Continue reading “Restoring Apple’s Terrible But Awesome IBook Laptop”

Recreating A Broken Laminated Wooden Furniture Part

Everyone loves those rather bouncy wooden lounge chairs that got popularized by a certain Swedish seller of furniture, but as tough as they are, the laminated wood can still break at some point. The chair that [John’s Furniture Repair] got in for repair had cracked right around where a bolt hole had been drilled, apparently creating a weak spot that over the years turned into a crack.

The way to fix this issue is to recreate the one piece of curved, laminated wood as demonstrated in the video. This starts with tracing the contours of the original part on a piece of MDF, which then gets doubled up by a second plate of MDF. After cutting out the contours this then creates the two halves of a mold for the laminated part.

Next is preparing the layers of wood that will become the new part, making sure to keep the same final thickness as the original. With everything glued up the layers are put into the mold, clamped down and the glue left to dry.

Finally, the part is freed from the mold, cut to its final size, and sanded down to prepare it for final treatment and installation on the lounge chair. Perhaps the only negative one can say about this kind of fix is that after you’re done, you really get that itch to sand down and re-lacquer all of the other parts as well so that they also look new and shiny.

Continue reading “Recreating A Broken Laminated Wooden Furniture Part”

Fixing A Cotton Candy Vending Machine

Cotton candy is probably the best way to eat pure sugar, which makes having your very own cotton candy vending machine to automate making it a bit of a dream. The machine that [Block’s Retro Repairs] got should therefore make him very happy, but unfortunately it was bought as defective. After digging into the machine in an earlier video, this time around there’s some actual success and proper cotton candy to enjoy.

The PCB with the rather frayed temperature sensor. (Credit: Block's Retro Repairs, YouTube)
The PCB with the rather frayed temperature sensor. (Credit: Block’s Retro Repairs, YouTube)

The way that cotton candy is made involves spinning thin threads of sugar, which are created by the heating and rapid crystallization of the sweet stuff. Unfortunately this machine wasn’t even really extruding sugar any more, so it had to get a deep clean to remove probably years of crusty buildup. After this things still weren’t working right, although cranking up the temperature on the induction heated head improved the results somewhat.

To really fix the machine, this head with its clearly dodgy thermocouple had to be disassembled. This revealed that said sensor was looking rather frayed, potentially shorting out against the aluminium head and likely not in the entirely right position any more. After adding some insulation back and making sure that the thermocouple was located closer to the top of the head, it was time for more testing.

Repairing the thermocouple seems to have fixed most ills, with still some calibration of the temperature required, but finally resulting in fancy shaped cotton candy in its myriad of colors. Along with the looming hazard of potentially acquiring Type II diabetes from all the testing, there was still a problem involving the remote management feature of this Red Rabbit machine.

These $6,000 vending machines do feature an Android 7-based software with a Rockchip SoC and access to a lot of settings via its large touch screen, but features such as setting prices for the products are locked away via a remote account. The machine was sadly still linked to someone else’s account, and so far Red Rabbit support had not responded to any documentation, repair help or account unlinking requests. This has left the machine in somewhat of a pickle.

It was possible to dump the software of the machine, which can be fetched from Archive.org, so if anyone would like to pitch in and break this remote lock, that would be very welcome. It’s also considered to replace the cash reader with a simple button or so, but where’s the fun in that?

Continue reading “Fixing A Cotton Candy Vending Machine”