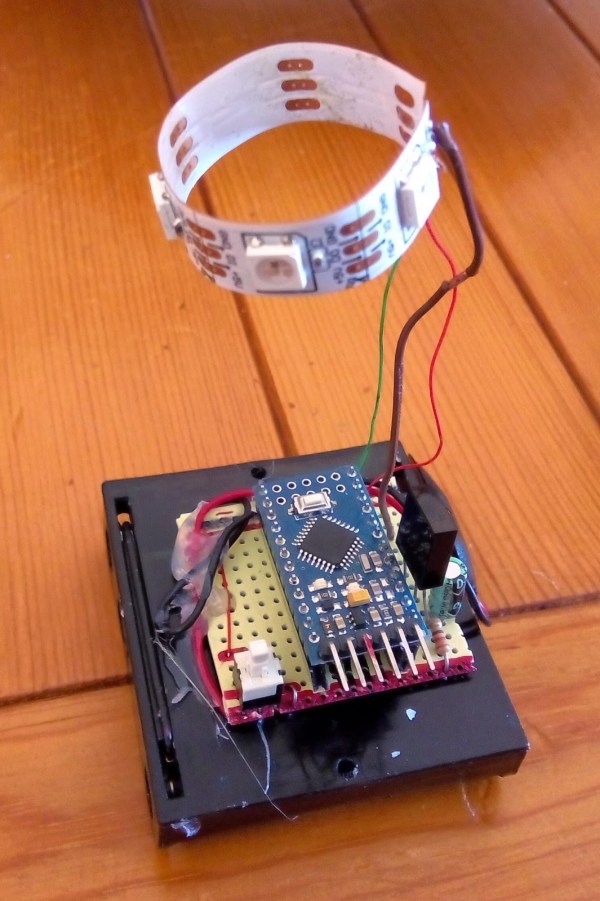
Meet The WIDGEDUINO

diagram of the widgets for the widgeduino

Arduino has made a name for itself by being easy to use and has become an excellent tool for rapid prototyping of an idea. If one wakes up in the middle of the night in a eureka moment and hammers out a contraption – using an Arduino as the brains is about as fast and easy as it gets.

With that said, the WIDGEDUINO aims at making this process even faster and easier. Bristling with an array of meters, graphs and data entry widgets, the WIDGEDUINO is sure to be a hit with hackers, makers and engineers alike.

It’s based on the .NET framework and was designed with Visual Studio Windows Presentation Foundation. The user simply writes a sketch using the WIDGEDUINO library, and connects to a PC via serial or Ethernet to gain access to the assortment of awesome widgets.

You can find a few examples here. We hope the creators will keep us updated on the progress of this impressive project. Be sure to stick around after the break for a video demonstrating what the WIDGEUINO can do.

Continue reading “Meet The WIDGEDUINO”

The Ultimate Tiny Altimeter

altimeter

While traditionally a project geared more toward the model rocket crowd, a lot of people are flying quadcopters these days, and knowing the altitude your RC aircraft reached is a nice thing to know. [Will] came up with a very nice, very small, and very lightweight altimeter that’s perfect for strapping to microquads, their bigger brothers, and of course model rockets. As a nice bonus, it also looks really cool with an exceedingly retro HP bubble display.

The components used in this tiny altimeter include a MEMS altitude and pressure sensor, HP bubble display featuring four seven-segment LEDs, an Arduino Pro Mini, and a tiny 40 mAh LiPo capable of powering the whole contraption for hours.

In the video below, [Will] shows off the functions of his altimeter, sending it aloft on a quadcopter to about 100 ft. There are settings for displaying the minimum, maximum, and delta altitudes, all accessed with a single button.

While it’s not the most feature packed altimeter out there, it’s still much better than commercial offerings available for the model rocket crowd.

Continue reading “The Ultimate Tiny Altimeter”

Triggering Remote Fireworks With An Arduino And An Android

LIGHTING ROCKET

With Canada day and Independence day fast approaching, some makers are looking towards setting up their own fireworks to shoot off in celebration – sure you could use a match or lighter… or you could crack out your trusty Arduino and a cellphone! (translated)

To ignite the fuse, [Oscar] is using a short length of Nichrome wire which is controlled via a Mosfet by the Arduino. To control the Arduino he’s using ArduDroid with a Bluetooth module. The app lets you trigger the various digital and analog outputs, and send and receive data.

Stick around to see a few different demonstration videos of the circuit, testing, and launching some little bottle rockets!

Continue reading “Triggering Remote Fireworks With An Arduino And An Android”

Reflow Oven Controller With Graphic LCD

Reflow Controller

A reflow oven is one of the most useful tools you will ever have, and if you haven’t built one yet, now is as good a time as any. [0xPIT’s] Arduino based reflow oven controller with a graphic LCD is one of the nicest reflow controllers we’ve seen.

Having a reflow oven opens up a world of possibilities. All of those impossible to solder surface mount devices are now easier than ever. Built around the Arduino Pro Micro and an Adafruit TFT color LCD, this project is very straight forward. You can either make your own controller PCB, or use [0xPIT’s] design. His design is built around two solid state relays, one for the heating elements and one for the convection fan. “The software uses PID control of the heater and fan output for improved temperature stability.” The project write-up is also on github, so be sure to scroll down and take a look at the README.

All you need to do is build any of the laser cutters and pick and place machines that we have featured over the years, and you too can have a complete surface mount assembly line!

From 300W To 10W — A LED Lighting Solution

LED halogen light

Halogen lights are great — they produce lots of bright warm light, but they suck a lot of juice to run. [Sven] had found a nice floor lamp years ago that was in pretty rough shape — his wife redecorated it, and he fixed it up, but between the 300W power consumption and the lack of a dimmer circuit (this thing was bright!), he knew he had to upgrade.

Like we recommend for all projects, [Sven] started by setting some goals for the conversion. He wanted to keep the warm light color tone, produce over 700lm, allow for dimming via remote, and work with presence detection.

He sourced a 10W power LED which requires 12V @950mA to run, which almost stumped him as it turns out there aren’t many LED drivers of that specification even available! Luckily, he managed to find one from China that wasn’t too large and would fit in the lamp cover with the other components. He found a large heat sink for the LED, and for safety, has even wired it up with a temperature sensor to his Arduino in order to shut it down if it gets too hot. The Arduino also provides the dimming circuit and remote control capabilities.

[Sven] admits that the end result isn’t that pretty, but lucky for him, it stands about 6′ tall so no one can see the jumble of wires and components inside! This is also only the first iteration, as he plans on upgrading it further — as it turns out, 700lm isn’t quite enough.

Hard Drive Clock Is Simple And Elegant

Binary hard drive clock

[Aaron] has been wanting to build his own binary desk clock for a while now. This was his first clock project, so he decided to keep it simple and have it simply display the time. No alarms, bells, or whistles.

The electronics are relatively simple. [Aaron] decided to use on of the ATMega328 chips he had lying around that already had the Arduino boot loader burned into them. He first built his own Arduino board on a breadboard and then re-built it on a piece of protoboard as a more permanent solution. The Arduino gets the time from a real-time clock (RTC) module and then displays it using an array of blue and green LED’s. The whole thing is powered using a spare 9V wall wort power supply.

[Aaron] chose to use the DS1307 RTC module to keep time. This will ensure that the time is kept accurately over along period of time. The RTC module has its own built-in battery, which means that if [Aaron’s] clock should ever lose power the clock will still remember the time. The RTC battery can theoretically last for up to ten years.

[Aaron] got creative for his clock enclosure, upcycling an old hard drive. All of the hard drive guts were removed and replaced with his own electronics. The front cover had 13 holes drilled out for the LED’s. There are six green LED’s to display the hour, and seven blue LED’s for the minute. The LED’s were wired up as common cathode. Since the hard drive cover is conductive, [Aaron] covered both sides of his circuit board with electrical tape and hot glue to prevent any short circuits. The end result is an elegant binary clock that any geek would be proud of.

The first Radar Arduino Shield

The First Arduino Radar Shield

The very first fully operational radar Arduino shield was recently demonstrated at Bay area Maker Faire. It was built by [Daniel] and [David], both undergrads at UC Davis.

Many have talked about doing this, some have even prototyped pieces of it, but these undergrad college students pulled it off. This is the result from Prof. ‘Leo’ Liu’s full-semester senior design course based on the MIT Coffee Can radar short course, which has been going on for 2 years now. Next year this course will have 30 students, showing the world the interest and market-for project based learning.

Check out the high res ranging demo, where a wider band chirp was used to amazing results. Video below.
Continue reading “The First Arduino Radar Shield”