Polyphonic Arduino Sketches

MIDUINO

Creating music for the Arduino is simple – just use the tone() library – but it truthfully doesn’t sound that great. That’s because this library is monophonic, making chords difficult or at the very least sound a little weird. [Connor]’s miduino aims to change that, turning raw MIDI files into polyphonic Arduino sketches.

To convert MIDI files into Arduino sketches, [Connor] whipped up a Python script based on midiCSV that reads the notes and channels of a MIDI file and converts it into the language of the Arduino. Unlike the built-in tone() library, miduino is polyphonic making the music produced from any Arduino sound great. It’s basically the difference between writing music for a PC speaker and a true keyboard; sure, you’re only getting square waves, but it sounds much better.

Oddly, [Connor] hasn’t put up his Python script as far as we can tell. All the MIDI songs are being converted on [Connor]’s own Raspberry Pi. This is supposed to be cheaper than a VPS, and makes for a very cool project to boot.

Edit: Miduino isn’t polyphonic yet, but [Connor] says he should have that wrapped up in a week or two.

FlightDeck: A “Touchless” MIDI Controller

flightdeckmidi

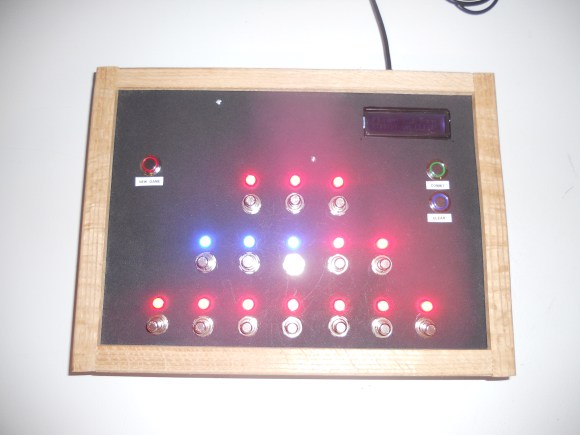
[Edward] wanted a different way to modulate notes on his MIDI controller, so he decided to go touchless. Inspired by the pressure-sensing modulation on his Edirol keyboard, [Edward] aligned eight sensors into a row of playable notes and used infrared to sense the distance of a player’s hand from the keys. He also included some function buttons to cycle through 10 octaves and RGB LEDs beneath the table that perform alongside the music.

He chose SHARP GP2D120 sensors (direct link to datasheet) for their low threshold, which allowed the board to detect distance close to the sensor. Each is mounted onto a sheet of frosted acrylic along with its own “hold note” button and an LED to indicate the key is playing. The lower panel houses an Arduino Mega that drives the system along with an RGB LED strip and its driver board. [Edward] used Maxuino and OSC-Route to interface the Mega to a Max/MSP patch which runs the show.

Learn more about the FlightDeck’s features in a video demonstration of the controller and the software after the break, then check out some other MIDI hacks like this organ pedal or the Arduino-driven MIDI sequencer.

Continue reading “FlightDeck: A “Touchless” MIDI Controller”

Interactive Boozeshelf Is Its Own Dance Party

boozeshelf

[Jeremy] refused to settle on your typical alcohol storage options, and instead created the Boozeshelf. Like most furniture hacks, the Boozeshelf began as a basic IKEA product, which [Jeremy] modified by cutting strips of wood to serve as wine glass holders and affixing the front end of a wine rack at the base to store bottles.

In its standard operating mode the Boozeshelf lies dark and dormant. Approaching it triggers a cleverly recessed ultrasonic sensor that gently illuminates some LEDs, revealing the shelf’s contents. When you walk away, then lights fade out. An Arduino Mega running [Jeremy’s] custom LEDFader library drives the RGB LED strips, which he wired with some power MOSFETS to handle current demands.

[Jeremy] didn’t stop there, however, adding an additional IR receiver that allows him to select from three different RGB LED color modes: simple crossfading, individual shelf colors (saved to the on-board EEPROM), or the festive favorite: “Dance Party Mode.” Stick around after the break to see [Jeremy] in full aficionado attire demonstrating his Boozeshelf in a couple of videos. Considering blackouts are a likely result of enjoying this hack, we recommend these LED ice cubes for your safety.

Continue reading “Interactive Boozeshelf Is Its Own Dance Party”

A GPU For An Arduino

GPU

As the creator of the Gameduino, a shield that adds a VGA port and graphics capability to any Arduino, [James] knows a little something about generating high quality video with a microcontroller. His latest project, the Gameduino 2, blows his previous projects out of the water. He’s created an Arduino shield with a built-in touchscreen that has the same graphics performance as the Quake box you had in the late 1990s.

The power behind this shield comes from a single-chip graphics solution called the FTDI EVE. This isn’t the first time we’ve heard about the FTDI EVE, but this is the first instance of a project or product using this very cool embedded graphics engine. The Gameduino 2 uses an FT800 graphics chip over an SPI connection to give a 480×272 TFT touch panel the same graphical capabilities as a Voodoo 2 graphics card. From the video, [James] is able to put thousands of sprites on a screen, as well as simple 3D animation, and extremely impressive 2D animations using only an Arduino.

While the Gameduino 2 is designed to be a game console you program yourself, we’re thinking this would be even more useful as a display for standalone projects.

HaDuino: Open Your Beer Using Arduino

Frankly we’re tired of Arduino having a bad name here at Hackaday. So [Brian Benchoff] came up with a way to make it useful to a wider audience. His creation, which we call the HaDuino, lets you use the Arduino clone to open a tasty bottle of beer.

Continue reading “HaDuino: Open Your Beer Using Arduino”

Arduino-based Sieve Of Eratosthenes

ofTs7UD

[Darkmoonsinger’s] sister is finishing her graduate degree in mathematics, and [Darkmoonsinger] wanted to give her a gift that fit with her achievement. Naturally, building a Sieve of Eratosthenes using an LED matrix and an Arduino made perfect sense. If you’re unfamiliar, a Sieve of Eratosthenes is a simple, but very efficient, technique for finding prime numbers. Starting with a group of numbers, you step through each one in order. If it’s prime, you eliminate any multiples from the list. After a few iterations, the numbers remaining are all primes. After getting the LED matrix and sieve algorithm running, [Darkmoonsinger] designed an enclosure for the project. She made a couple of mistakes with this part, and happily included them for everyone’s benefit.

It only figures primes up to 64, and she lights the LED for 1 because it ‘makes the array look prettier’. Also, we couldn’t help but think that mounting the components a bit differently would have made a cleaner install (here’s a prime number generator with a backlit faceplate). However, that probably doesn’t matter to his sister. As they say, it’s the thought that counts, and we never get tired of seeing people build rather than buy!

Pokewithastick, An Arduino Programmable Web-logger/server


[Stewart] tipped us about his very nice project: pokewithastick. It is an Arduino compatible board (hardware, not footprint) based on the ATMEGA1284P which can be programmed to collect and post data to internet logging sites such as Thingspeak or Xively.

As you can see in the picture above, it has a small 50x37mm footprint (roughly 2″x1.5″). The pokewithastick is composed of an Wiz820 Ethernet module, a micro-SD card slot, 2 serial ports, one battery backed Real Time Clock (RTC), one radio connector (for the usual nRF24L01 2.4GHz radio), one power & user LED and finally a reset button. There are two power rails on the board which can be split (5v + 3.3V) or combined (3.3v only) which may allow you to connect Arduino shields to it. You can program the board using the standard 6-pin header or via a serial programmer if an appropriate (Arduino) bootloader is installed.

The project is open hardware, has been designed using Kicad and all the files can be downloaded as a zip file.