Temp-Sensitive Automatic Blinds

blindMinder

Any opportunity to shave a few bucks off your power bill is probably worth considering, especially if it’s a device like [Steve Hoefer’s] Mini Blind Minder. This little guy staves off (or welcomes) the sun by monitoring the room with a temperature sensor and checking against a setpoint. If the room is too warm or too cool, the top-mounted servo will spin the wand and close or open the blinds, respectively.

[Steve] started by building a homemade Arduino shield from some perfboard to which he added a handful of discrete components: some current-limiting resistors for the RGB LED indicator light and a 10k trim pot for fine-tuning the temp sensor. Although this build forgoes an LCD readout to display precise information, it does provide feedback by stepping the RGB LED’s color through a spectrum of blue to red to indicate how the current room temperature compares to your setpoint. The two momentary pushbuttons beneath the light allow the user to adjust the setpoint up or down.

See the video below for a detailed guide to building your own, and take a look at a similar automatic blinds build from earlier this year that opens and closes in response to ambient light.

Continue reading “Temp-Sensitive Automatic Blinds”

Arduino-based Enigma Replica Is Fully Functional

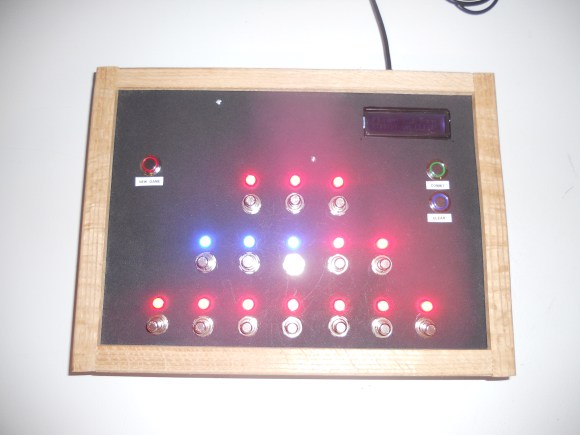
This open-source Enigma replica by the folks at [ST-Geotronics] is simply stunning. They drew their inspiration from a hilarious build we saw a few years ago that hacked a children’s toy into an Enigma machine. Their project is instead modeled on the original Enigma M4 cipher machine, and aside from a bit of artistic license, we think they nailed the visual style. As for functionality, the guide claims everything works, right down to the plugboard.

Rather than try to immediately cram everything into the final enclosure, the [ST-Geotronics] gang painstakingly worked out a prototype to be sure the four 16-segment LED displays had been wired correctly and functioned properly. The next step was laying out a swarm of buttons and resistors on a 6″x8″ perfboard. They used charlieplexing to handle the 16-segment displays (which actually have 17 LEDs each), and deceptively disguised each display as a nixie tube by mounting them vertically and encasing them in a transparent dome. The case follows the M4’s original dimensions and consists of a plywood box with scrap steel for the top plate.

Swing by their Instructables page for more details. There you can find several Arduino sketches to test functionality and the code for five different M4 operation modes.

Remote Servo-controlled Lightswitch

remoteServoLightSwitch

We frequently get home automation tips, many of which have simple circuit-based on/off control for lights. [Paulo Borges] has created something quite different, however, with his in-the-wall servo-controlled light switch. This build forgoes the need of any relay to switch mains power, and because it’s physically flipping your switch, provides a distinct advantage over other builds that require a phone or tablet interface: you can use your switches as you normally would.

[Paulo] picked up a rocker-type switch at the local hardware store and carefully pried off the large, flat switch plate to notch out a small hole at its fulcrum. He then carefully shaped a piece of 12 gauge wire to provide a pivot point for the servo. His choice to use wire here seems to be entirely to provide a sturdy yet bendable component that functions mechanically rather than electrically. A small 9G servo fits to the back of the switch’s housing, and the servo’s arm connects up to the previously attached 12 gauge wire. He pieced together the remote control feature with an RF link kit with an inexpensive 433mhz Code duplicator from eBay.

[Paulo] explains that his Instructable is simply an overview rather than a step-by-step guide, so if you’re eager to reproduce this hack you’ll have to work out the code and the remote control portion yourself. He also acknowledges the biggest remaining hurdle: finding space in the wall to shove all the microcontroller guts. Check out a couple of videos of the switch after the break, and remember, there’s always the option of doing away with all light switches.

Continue reading “Remote Servo-controlled Lightswitch”

LED Costumes And Clothing

3ledCostume

Our tips line recently received an influx of wearable LED projects, both for casual and professional wear. [Elizabeth] and [Luis] have created the Lüme wearable collection, aimed at accessorizing by adding adjustable accent colors to jackets, t-shirts and dresses. The electronics are custom-made, built around an ATMega32u4, and each is Bluetooth enabled to interact with a user’s cell phone. From the phone, you can change colors, sequences, set up events, and even take advantage of an “inkdropper-style” feature that matches the color of the LEDs to any object you point your camera at.

[Michal’s] project is an entire suit for a dance and laser show entitled “Tron Dance”, which uses several RGB LED strips placed on key points of the wearer’s costume. It looks like [Michal] has intentionally avoided the joint areas to prevent any problems with breaks or bends, but still manages to place enough to cover the entire body. We aren’t sure what controls everything, but you can watch it go through various sequences and survive an onstage performance after the break.

Finally, in yet another kind of performance, magician [Kiki Tay] has built a jacket that’s overflowing with RGB LEDs. [Kiki] wanted wearable LED control that could be used in various situations without having to re-invent the wheel each time, so he developed his own board — the LED Magician: an Arduino-compatible solution. The board has 12 outputs channels, drives 50+ LEDs per channel and features 12 on-board LEDs that display a preview of the output. To make interactions user-friendly, [Kiki] has provided 32 built-in sequences and adjustable speeds that the user can program via 4 buttons on the board. If that isn’t enough control, there are some options for external control as well. The jacket itself runs off a hobby LiPo battery and is blindingly bright: stick around after the break for a video.

Continue reading “LED Costumes And Clothing”

Tre: When Arduino Meets Beagle Bone

Although yesterday saw the announcement of an x86-based Arduino powered by an Intel chip. This may have not been the big story to come from [Massimo] at Maker Faire Rome. Announced along with the x86 Arduino Galileo was the Arduino TRE, a collaboration between Arduino and the BeagleBoard foundation.

The TRE is really two Arduinos in one: in the center is basically an Arduino Leonardo with the standard Arduino headers and an ATmega32u4. Elsewhere on the board is a TI Sitara ARM Cortex A-8 processor running at 1GHz with 512 MB of RAM, 10/100 Ethernet, HDMI out, USB host and device ports, and a bunch of connectors intended for an LCD and a ZigBee.

There is, of course, the obvious comparison between the TRE and Raspberry Pi. Hardware-wise, the TRE is very close to the BeagleBone Black, a bit more powerful than the Raspberry Pi, and able to do some very cool stuff (i.e. OpenCV) the Pi just can’t handle.

There is – I think – no official price for the Arduino TRE quite yet. It will be available in spring, 2014, though. You can check out all the press release photos in the gallery below.

Continue reading “Tre: When Arduino Meets Beagle Bone”

The Intel-powered Arduino

Dev boards based on microcontrollers and ARM System on Chips are everywhere, but finding a small pocketable computer based on an Intel processor has been difficult to find. [Massimo] of Arduino just unveiled a new Intel architecture Arduino-compatible board at the Rome Maker Faire. It’s called the Galileo, and it has everything you’d expect from a juiced-up Arduino running x86.

The main chip is an Intel Quark SoC running at 400MHz with 256 MB of DRAM. On board is a Mini-PCIe slot, 100Mb Ethernet port, Micro SD slot, RS-232, and USB host and client ports. Here’s the datasheet for the Galileo with all the applicable information.

The Galileo can be programmed with the standard Arduino IDE, but from the getting started guide, it looks like this board is running Yocto, a stripped down Linux for embedded environments.

Realistically, what we have here is a board with about the same processing power as a Raspberry Pi, but with Arduino compatibility, and a Mini PCIe port for some really fun stuff. It will be interesting to see what can be made with this board, but if you have any ideas on what to do with a Galileo before it’s released in two months, drop a note in the comments.

Smart Citizen: Arduino-compatible And Packed With Sensors

smartCitizenBoard

If you’re going to develop another Arduino-compatible board these days, you might as well take a “kitchen sink” approach. The Smart Citizen Kit piles it on, including Wi-Fi, an SD card slot, and EEPROM on its base. The attached shield—dubbed the “Ambient Board”—is a buffet of sensors: temperature, humidity, CO, NO2, light intensity, and a microphone for reading sound levels. The board’s intended purpose is to provide an open-source, interactive, environmental database by crowdsourcing data from multiple Smart Citizen Kits, but you can add your own stuff or yank the shield off altogether. Additional shields are also under development, aimed at providing agricultural data, monitoring biometrics, and more.

Stick the Smart Citizen somewhere and it can send sensor data to the web over a WiFi connection. The result is worth a look. Here’s the map with the real-time data from early release models scattered over Europe, most of which appear to be solar-powered with a small LiPo battery to keep them going overnight. There’s also an accompanying iPhone app that lets you set up the Smart Citizen, retrieve data from nearby sensors, and allows you to match your phone’s GPS location to any data you collect while carrying the board around.

The developers met their Kickstarter goals earlier this summer and the board has recently entered the manufacturing process, Rummage through their GitHub files here, and watch a video preview of the Smart Citizen below.

Continue reading “Smart Citizen: Arduino-compatible And Packed With Sensors”