These LED Shades Will Blind You With Science

Unless you’re particularly fond of looking at the back of 88 individual WS2812B LEDs, these “RGB Goggles” from [Mukesh Sankhla] won’t offer you much of a view. But from an outsider’s perspective, the smartphone-controlled glasses certainly make a statement. Just don’t try to operate any heavy machinery while wearing them.

The build starts off with a pair of shades dark enough that the lights won’t be obvious until they’re powered up. [Mukesh] then carefully aligned the LEDs into a grid pattern on a piece of clear tape so they could be soldered together with the fewest number of jumper wires possible. Even if you’re not in the market for some technicolor eyewear, this clever arrangement of WS2812B modules could come in handy if you’re looking to make impromptu LED panels.

To control the LEDs, [Mukesh] is using an Arduino Nano and an HC-06 Bluetooth module that’s linked to an application running on an Android smartphone. The software, developed with the MIT App Inventor, allows the user to easily switch between various patterns and animations on the fly. With such an easy-to-use interface, the RGB Goggles don’t look far off from a commercial product; other than the whole not being able to actually see through the thing.

We’ve actually seen a number of custom glasses projects over the years, as it seems that a cheap pair of shades make an ideal platform for head-mounted hacks. We’ve even found what may be the ideal power source for them.

Continue reading “These LED Shades Will Blind You With Science”

21st Century Cheating: WiFi In A Calculator

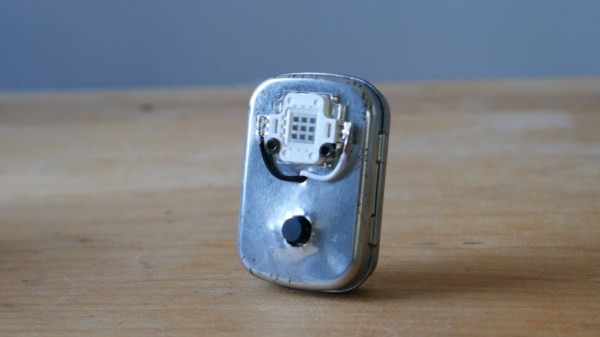
Obviously, we would never endorse cheating on an exam, but sometimes a device is just too tempting to be left untouched. For [Neutrino], it was an old Casio calculator that happened to have a perfectly sized solar panel to fit a 128×32 OLED as replacement. But since the display won’t do much on its own, he decided to connect it to an ESP8266 and mount it all inside the calculator’s housing, turning it into a spy-worthy, internet-connected cheating device, including a stealthy user interface controlled by magnets instead of physical buttons. (Video, embedded below.)

Editor’s Update: Please read our follow-up coverage to the copyright claims made against this project. The video linked above and embedded below are unavailable due to these claims, despite widespread belief that this project does not violate copyright. For now, the original video is available via the Internet Archive.

To achieve the latter, [Neutrino] added two Hall effect sensors and a reed switch inside each end of the calculator. Placing a magnet — possibly hidden in a pen cap — near the reed switch will turn the display on, and placing another magnet near the Hall-effect sensors will navigate through the display’s interface, supporting two inputs with long, short, and multi-tap gestures each. To obtain information through WiFi, the ESP8266 connects to Firebase as backend, allowing to set up predefined content to fetch, as well as a possibility to communicate with your partner(s) in crime through a simple chat program.

As the main idea was to keep visible modifications to a minimum, one shortcoming is that charging the additional battery that powers the whole system would require an additional, external charging circuit. But [Neutrino] had a solution for that as well, and simply exposed two wires to the back, which could easily be mistaken for random solder splatters. And well, of course, requiring WiFi might also be tricky in some situations, so maybe you might want to consider a mobile network upgrade for yourself.

Continue reading “21st Century Cheating: WiFi In A Calculator”

Sun-Seeking Sundial Self-Calibrates In No Time

Sundials, one of humanity’s oldest ways of telling time, are typically permanent installations. The very good reason for this is that telling time by the sun with any degree of accuracy requires two-dimensional calibration — once for cardinal direction, and the other for local latitude.

[poblocki1982] is an amateur astronomer and semi-professional sundial enthusiast who took the time to make a self-calibrating equatorial ‘dial that can be used anywhere the sun shines. All this solar beauty needs is a level surface and a few seconds to find its bearings.

Switch it on, set it down, and the sundial spins around on a continuous-rotation servo until the HMC5883L compass module finds the north-south orientation. Then the GPS module determines the latitude, and a 180° servo pans the plate until it finds the ideal position. Everything is controlled with an Arduino Nano and runs on a 9V battery, although we’d love to see it run on solar power someday. Or would that be flying too close to the sun? Check out how fast this thing calibrates itself in the short demo after the break.

Not quite portable enough for you? Here’s a reverse sundial you wear on your wrist.

Celebrate Spring With A DIY Vibration Sensor

Is your heaving pile of electronic parts shrinking by the day as you finish old back-burnered projects and come up with new ones? Try an old pastime that never gets old: rolling your own sensors using household objects. [Nematic!] needs a way to sense vibration for an upcoming project. Instead of spending $1 plus shipping and waiting who knows how long for a spring vibration sensor to come in the mail, they made one in a matter of minutes.

A spring vibration sensor is a simple device that can be used as a poor man’s accelerometer, or simply to detect vibration. All you need is a length of conductive wire, a 10 kΩ resistor, and a way to pick up those good vibrations. For the purposes of demonstration, [Nematic!] is using an Arduino Nano in the short build video after the break.

The wire is wound around the threads of a bolt to form a coil that’s just large enough for a resistor to fit inside. One end of the coil is connected to 5 V, and one leg of the resistor connects to an input pin. Together, they form a normally-open switch. When vibrations force the free ends of both to touch, the circuit is complete and the pin is pulled high.

If you make one of these and find the sensitivity is off, just twist up a new coil with stiffer or softer wire depending on the problem. Iterating doesn’t get much cheaper than wrapping wire around a bolt. We can’t wait to see how [Nematic!] will use this sensor. In the meantime, we’re planning to use one to detect when the dryer stops running and send a text.

Speaking of bargain basement sensors, did you know you can detect water leaks with two pennies, an aspirin, and a clothespin? These projects demonstrate the kind of ingenuity that can win you a pile of toys in our new Making Tech At Home contest, running now through July 28th, 2020.

Continue reading “Celebrate Spring With A DIY Vibration Sensor”

Lego Microscope Does Research

We’ve seen a lot of practical machines built using Lego. Why not? The bricks are cheap and plentiful, so if they can get the job done, who cares if they look like a child’s toy? Apparently, not [Yuksel Temiz]. He’s an engineer for IBM whose job involves taking pictures of microscopic fluidic circuits. When he wasn’t satisfied with the high-power $10,000 microscopes he had, he built his own. Using Lego. How are the pictures? Good enough to appear in many scientific journals.

Clearly, the microscope doesn’t just contain Lego, but it still came in at under $300. According to an interview from Futurism, the target devices are reflective which makes photographing them straight-on difficult. After experimenting with cameras on tripods, [Yuksel] decided he could build his own specialized device. You can see a video of the devices in question and some of the photographs below.

Continue reading “Lego Microscope Does Research”

Measure The Speed Of A Speeding Bullet

In the study of ballistics, you can do very little without knowing the velocity of a projectile. Whether you need to hit a target at over a mile, check if a paintball gun is safe for opposing players, or photograph high-velocity objects, you need a way to measure that velocity. [td0g] enjoys the challenge of photographing bullets impacts, and has created an open-source ballistic chronograph to help achieve this.

A rifle bullet punching through a wine glass, captured with the help of the chronograph

[td0g]’s design makes use of two light gates spaced some distance apart, and the time that an object takes to travel between the two is measured and used to calculate velocity. Most commercial ballistic chronographs also work in this way. [td0g] created the light gates using pairs of infrared photodiodes and LEDs. When there is a sudden dip in the amount of light received by the photodiode, the Arduino control circuit knows that an object has passed between the photodiode and LEDs and triggers the timer. An LCD shield on the Arduino is used to control the software and display velocity. As you probably guessed, clock accuracy is very important for such time measurements, and [td0g] demonstrates a simple technique using a smartphone metronome app to manually calibrate the clock to acceptable accuracy for his purposes. Continue reading “Measure The Speed Of A Speeding Bullet”

Get Quarantine Fit With This Smart Pull-up Bar

Most gyms are closed right now due to social distancing rules, which is what we’re using as our latest excuse to justify our sloth-like lifestyle. But apparently some people miss working out enough that they’re putting together impromptu home gyms. [Michael Pick] has even outfitted his DIY pull-up station with an Arduino to keep track of his exercise while on lockdown. You may not like it, but this is what peak performance looks like.

Can you beat the HaD high score?

In the video after the break, [Michael] explains the design and construction of the bar itself which technically could be thought of as its own project. Obviously the Arduino counter isn’t strictly necessary, so if you just wanted to know how to put some scraps of wood and suitably beefy rod together in such a way that it won’t rip off the wall when you put your weight on it, this video is for you.

Towards the end of the video, he gets into an explanation of the electronic side of the project. Inside the 3D printed enclosure is an Arduino Pro Mini, a HC-SR04 ultrasonic sensor, and a 1602 serial LCD. Once the gadget has been mounted in the proper position and activated, it will count how many pull-ups [Michael] has done on the screen.

While we historically haven’t seen a whole lot in the way of homebrew exercise equipment, the current COVID-19 situation does seem to be getting the adrenaline flowing for some of you. We recently covered some DIY dumbbells made from hardware store finds that would be an excellent first project for any hackers who’ve recently been ejected from the Matrix and are trying to use their muscles for the first time.

Continue reading “Get Quarantine Fit With This Smart Pull-up Bar”