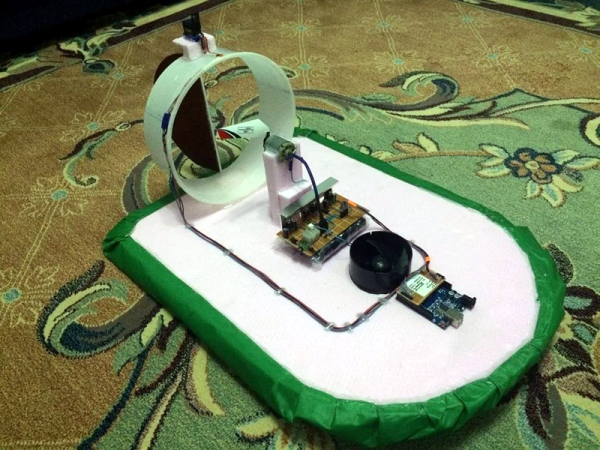
Robot Fights Fire With IR

Fighting fire with robots may take jobs away from humans, but it can also save lives. [Mell Bell Electronics] has built a (supervised) kid-friendly version of a firefighting robot that extinguishes flames by chasing them down and blowing them out.

This hyper-vigilant robot is always on the lookout for fire, and doesn’t waste movement on anything else. As soon as it detects the presence of a flame, it centers itself on the source and speeds over to snuff it out with a fan made from a propeller and a DC motor.

Here comes the science: fire emits infrared light, and hobbyist flame sensors use IR to, well, detect fire. This fire bot has three of these flame sensors across the front that output digital data to what has got to be the world’s smallest Arduino – the ATmega32U4-based PICO board that [Mell Bell] just so happens to sell. Cover your mouth and nose and crawl along the floor toward the break to see how responsive this thing is.

Firefighters aren’t the only brave humans involved in the process of keeping the forests standing, or who feel the rising pressure of automation. Hackaday’s own [Tom Nardi] wrote a piece on a dying breed called fire lookouts that will no doubt ignite your interest.

Continue reading “Robot Fights Fire With IR”

Z80 Computer Is Both Arduino And Shield

There have been plenty of Z80 computer builds here on Hackaday, but what sets them apart is what you do with them. [Andrew] writes in with his Z80 single-board computer made from scratch, using the Arduino standard headers for its I/O. In turn, since he needed an easy way to program the flash memory which holds the software to run on the Z80, he used an Arduino Mega as a debugger, making the SBC an Arduino shield itself.

Using such a common header pinout for the Z80 computer allows it to be used with a variety of readily-available Arduino shields. This compatibility is achieved with an analog-digital converter and a 3.3 V regulator, mimicking the pins found in an Arduino Uno. The code, available on GitHub, includes an extensive explanation and walkthrough over the process in which the Mega takes over the bus from the Z80 to function as a fully-featured debugger. Programs can be loaded through embedding an assembly listing into the Mega’s sketch, or, once the debugger is up you can also upload a compiled hex file through the serial connection.

This isn’t the first time [Andrew] has been featured here, and his past projects are just as interesting. If you need to translate a Soviet-era calculator’s buttons into English, hack a metallurgical microscope or even investigate what’s that Clacking Clanking Scraping Sound, he’s the one you should call.

Pump Up The (Windows) Volume With Physical Sliders

For as long as we can remember, Windows has provided a mixer that breaks out the volume level of every applicable application into its own slider-controlled lane. But navigating to these controls is non-trivial, especially if you’re in a hurry to silence someone on team speak. You have to stop what you’re doing, click the speaker, go into the mixer, and then go find the appropriate slider. Windows won’t respect resizes between mixer visits, so you’ll almost always have some horizontal scrolling to do.

So why on Earth would you put yourself through all of this when you could be pushing physical sliders on the fly like a DJ? A slider is just a potentiometer in a straight line, after all.

These are wired up to an Arduino Nano, which sends the serial data to a Python script on the PC that changes the volume values accordingly for whatever five programs are in the config file. Thanks to a little bit of Visual Basic, the Python script can run in the background.

[Aithorn]’s got everything you need to replicate this, so slide on over and grab the STL files and code. If you get to point where these sliders are too small, just build some bigger ones.

Stop ‘n Go DUPLO

[beshur]’s 2-year-old is obsessed with transportation, so he lifted a few DUPLO blocks from the bin and made this toy traffic light as a birthday present. Hey, might as well get him used to the realities of traffic, right? It also makes for a good early hacker lesson: why buy something when you can make it yourself?

The traffic pattern is determined by an Arduino Nano V3 situated inside the carved-out rear block. There’s a push button on the side in case there’s a spill and the lights need to go blinking red until the issue is dealt with. Instead of trying to solder everything in situ and risk melting the plastic, [beshur] dead-bugged the LEDs and resistors to the Nano with a helping hands and then worked everything into the case. The 5mm LEDs fit perfectly into the drilled-out posts of a second block and produce a nice, soft glow. Proceed with caution and check it out after the break.

Of course, plastic building blocks can do real work, too. This LEGO chocolate pantograph is pretty sweet.

Continue reading “Stop ‘n Go DUPLO”

A Honeycomb Patching Robot Powered By Arduino

No, it’s not the kind of honeycomb you’re probably thinking of. We’re talking about the lightweight panels commonly used in aerospace applications. Apparently they’re rather prone to dents and other damage during handling, so Boeing teamed up with students from the California State University to come up with a way to automate the time-consuming repair process.

The resulting machine, which you can see in action after the break, is a phenomenal piece of engineering. But more than that, it’s an impressive use of off-the-shelf components. The only thing more fascinating than seeing this robotic machine perform its artful repairs is counting how many of its core components you’ve got laying around the shop.

Built from aluminum extrusion, powered by an Arduino Due, and spinning a Dewalt cut-off tool that looks like it was just picked it up from Home Depot, you could easily source most of the hardware yourself. Assuming you needed to automatically repair aerospace-grade honeycomb panels, anyway.

At the heart of this project is a rotating “turret” that holds all the tools required for the repair. After the turret is homed and the condition of all the cutting tools is verified, a hole is drilled into the top of the damaged cell. A small tool is then carefully angled into the hole (a little trick that is mechanical poetry in motion) to deburr the hole, and a vacuum is used to suck out any of the filings created by the previous operations. Finally a nozzle is moved into position and the void is filled with expanding foam.

Boeing says it takes up to four hours for a human to perform this same repair. Frankly, that seems a little crazy to us. But then again if we were the ones tasked with repairing a structural panel for a communications satellite or aircraft worth hundreds of millions of dollars, we’d probably take our time too. The video is obviously sped up so it’s hard to say exactly how long this automated process takes, but it doesn’t seem like it could be much more than a few minutes from start to finish.

Continue reading “A Honeycomb Patching Robot Powered By Arduino”

Arduino Drives Astronomy Dome

The South Florida Science Center recently added a new ten-inch telescope and turned to [Andres Paris] and his brother to replace the hand-cranked dome door system. They turned to an Arduino along with some beefy motor drivers. You can see some videos of the beast in operation, below.

According to a Reddit post, the brothers picked up a 5A 12V motor but decided to overdesign and selected an H-bridge that would handle 20A peak current. An IR remote allows the operator to open and shut the door and reed switches sense the extremes of the door’s motion.

Continue reading “Arduino Drives Astronomy Dome”

Giant Clock Made In The Nick Of Time

When [tnjyoung] was asked to build a huge lighted clock for a high school theater’s production of Cinderella with only two weeks before opening night, he probably wished for a fairy godmother of his own to show up and do it for him. But he and his team pulled it off, and it looks amazing. That medallion in the middle? It was laid out painstakingly by hand, using electrical tape.

This thing is 12 feet wide and weighs more than 500 pounds. Even so, it isn’t a permanent set piece, so it has to move up and down throughout the show on airplane cables. Now for the minutiae: there’s an Arduino Uno with built-in Wi-Fi that receives UDP commands from a phone to raise and lower the clock at the appropriate times. The ‘duino is also controlling two stepper motors, one for the hour hand and one for the minute hand.

Time is almost a minor character in the story of Cinderella, since she has to get back by midnight. Because of this, [tnjyoung] programmed a dozen or so time cues that move the steppers at various speeds to achieve different effects, like time flying by as she dances the night away with the Prince. Hour you still just sitting there? Sweep past the break to watch the build process fly by in a matter of minutes.

Got all the time in the world? Make a clock out of clocks. Clocks all the way down.

Continue reading “Giant Clock Made In The Nick Of Time”