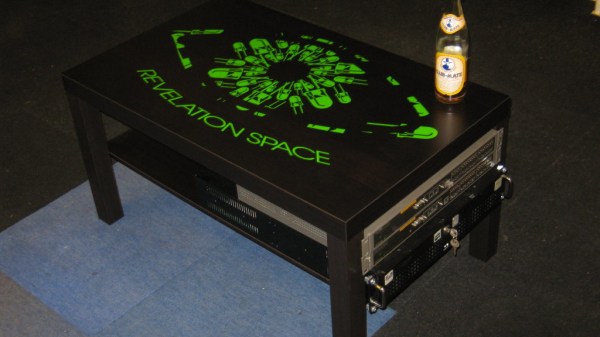
Vintage HP-25 Calculator Gets Wireless Charging

[Jan Rychter] really likes his multiple HP-25C calculators, but the original battery pack design is crude and outdated. No problem — he whips up a replacement using Fusion 360 to design an enclosure, prints a few on his SLS 3D printer, and packs them with LiPo batteries and Qi/WPC wireless charging circuits.

In his blog post, he explains the goals and various design decisions and compromises that he made along the way. We like [Jan]’s frank honesty as he remarks on something we have all been guilty of at one time or another:

In the end, I went with design decisions which might not be optimal, but in this case (with low power requirements) provide acceptable performance. In other words, I winged it.

One problem which proved difficult to solve was how to provide a low battery indicator. Since low voltage on a LiPo is different from the original HP-25’s NiCad cells, it wasn’t straightforward, especially since [Jan] challenged himself to build this without using a microcontroller. He discovered that the HP-25’s internal low battery circuit was triggered by a voltage of 2.1 volts or lower.

In a really clever hack, [Jan] came up with the idea of using an MCU reset supervisor chip with a low voltage threshold of 3.0 volts, which corresponds with the low voltage threshold of the LiPo battery he is using. The reset signal from the supervisor chip then drives one of the pins of the TPS62740 programmable buck converter, changing its output from 2.5 volts to 2.1 volts.

This project is interesting on several levels — extending the life of a useful but end-of-life calculator, improving the original battery design and introducing new charging techniques not available in the early 1970s, and it is something that a hobbyist can afford to do in a home electronics lab. We do wonder, could such a modification could turn an HP-25 into an HP-25C?

We’ve written about battery pack replacement project before, including one for the Sony Discman and another for an electric drill. Let us know if you have any battery pack replacement success (or failure) stories in the comments below.

Spacewar! On PDP-11 Restoration

If you want to play the original Spacewar! but you don’t have a PDP-1 nearby, then you’re in luck — assuming you have a PDP-11, that is. [Mattis Lind] has successfully restored a PDP-11 port of the game from PDF scans of the source code, which was thought to have been lost to the trash bins of DECUS (Digital Equipment Computer Users’ Society). Fortunately, [Mattis] learned that [Bill Seiler], one of the original authors, had saved a printout of the assembly language. Using a combination of OCR and manual transcription to retrieve the code, [Mattis] took a deep dive into cleaning up the errors and solving a whole lot of system library and linking issues. Adding to the difficulty is that his PDP-11 is slightly different from the one used in 1974 when this port was written.

The project was not all software — [Mattis] also needed to make a pair of joysticks, which he made from a handful of items found on AliExpress. As you can see in the video below, he indeed got it all working. [Mattis] is no stranger to the PDP-11 world. We wrote about his PDP-11 restoration project back in 2015, a quest that took over 18 months.

Continue reading “Spacewar! On PDP-11 Restoration”

3D Printed Terminal Takes Computing Back In Time

It’s hard to look at today as anything but the golden age of computing. Even entry level machines have quad-core processors and a terabyte or more of storage space, to say nothing of the incredible amount of tech packed into the modern smartphone. But even so, there’s something to be said for the elegant simplicity of early desktop computers.

Looking to recreate the feeling of those bygone days, [Pigeonaut] created the Callisto II. Its entirely 3D printed case snaps together without glue or screws, making it easy to assemble, and the parts have been sized so they’ll be printable even on smaller machines like the Prusa Mini. Inside you’ll find a 1024×768 Pimoroni HDMI 8″ IPS LCD, 60% mechanical keyboard, four-port USB 3 hub, Raspberry Pi 4, and a 22 watt USB power supply to run it all.

The internal components can be easily accessed with the hatch on the rear of the case, and there’s plenty of room inside to add new hardware should you want to toss in a hard drive or even swap out the Pi for a different single-board computer.

To really drive home the faux-retro concept of the Callisto II, [Pigeonaut] has created a website for the fictional computer company behind the machine, replete with all the trappings you’d expect from the early web. There’s even a web-based “operating system” you can use to show off your freshly printed Callisto II.

Incidentally the II suffix isn’t just part of the meme, there really was a Callisto before this one. We covered the earlier machine back in 2019, and while we’re a bit sad to see that the functional 3.5 inch floppy drive has been deleted, we can’t deny the overall aesthetics have been greatly improved in the latest version.

Continue reading “3D Printed Terminal Takes Computing Back In Time”

Original Game Boy Powered Up With GBA Motherboard

The Game Boy DMG-01 is about as iconic as a piece of consumer electronics can get, but let’s be honest, it hasn’t exactly aged well. While there’s certainly a number of games for the system that are still as entertaining in 2021 as they were in the 80s and 90s, the hardware itself is another story entirely. Having to squint at the unlit display, with its somewhat nauseating green tint, certainly takes away from the experience of hunting down Pokémon.

Which is precisely why [The Poor Student Hobbyist] decided to take an original Game Boy and replace its internals with more modern hardware in the form of a Game Boy Advance (GBA) SP motherboard and aftermarket IPS LCD panel. The backwards compatibility mode of the GBA allows him to play those classic Game Boy and Game Boy Color games from their original cartridges, while the IPS display brings them to life in a way never before possible.

Relocating the cartridge connector took several attempts.

Now on the surface, this might seem like a relatively simple project. After all, the GBA SP was much smaller than its predecessors, so there should be plenty of room inside the relatively cavernous DMG-01 case for the transplanted hardware. But [The Poor Student Hobbyist] made things quite a bit harder on himself by deciding early on that there would be no external signs that the Game Boy had been modified; beyond the wildly improved screen, anyway.

That meant deleting the GBA’s shoulder buttons, though since the goal was always to play older games that predated their addition to the system, that wasn’t really a problem. The GBA’s larger and wider screen is still intact, albeit hidden behind the Game Boy’s original bezel. It turns out the image isn’t exactly centered on the physical display, so [The Poor Student Hobbyist] came up with a 3D printed adapter to mount it with a slight offset. The adapter also allows the small tactile switch that controls the screen brightness to be mounted where the “Contrast” wheel used to go.

An incredible amount of thought and effort went into making the final result look as close to stock as possible, and luckily for us, [The Poor Student Hobbyist] did a phenomenal job of documenting it for others who might want to make similar modifications. Even if you’re not in the market for a rejuvenated Game Boy, it’s worth browsing through the build log to marvel at the passion that went into this project.

Some would argue [The Poor Student Hobbyist] should have just put a Raspberry Pi into a Game Boy case and be done with it, but where’s the fun in that? Sure it might have been a somewhat better Bitcoin miner, but there’s something to be said for playing classic games on real hardware.

Mobile Electronics Workstation Has It All In A Small Package

Home is absolutely everything these days. Plenty of spaces around the abode have had to do double and triple duty as we navigate work, play, and everything in between. Although it’s been a great time to engage in hobbies and even find new ones, where exactly are we supposed put all the stuff that accumulates?

[Fabse89] needed a portable, usable solution for doing electronics work that could be easily packed away. They happened upon a tool case being thrown out, and repurposed it into a great one-stop solution for whenever the urge to play with pixies strikes.

[Fabse89] started by stripping the box out to the bare walls and modeling the inside in Fusion360. Then they built and cut an acrylic insert that holds two power supplies and a soldering station. There are fixed 5 V and 12 V outputs on one power supply, plus a variable supply that maxes out at 48 V.

When it came to tool storage options, [Fabse89] got lucky with a small, seldom-used set of plastic drawers that fits perfectly next to the power station. These hold all the small tools like flush cutters, pliers, and a de-soldering pump. The top section of the case folds back and is the perfect place for component storage boxes. We think this is a tidy solution and especially like that you don’t have to dismantle it to use it — can be used with everything in place and packed up quickly. We also like that the front lid pulls down into a makeshift table, so this really could go anywhere with mains power.

Acrylic not rugged enough for your tastes? Here’s a DIY supply that doubles as a melee weapon.

An Epic Quest To Put More Music On An IPod Nano 3G

While many would argue that the original iPod is the most iconic entry in the long and diverse line of digital audio players that Apple released over the years, there must certainly be some consideration for the third generation (3G) iPod Nano. It’s a device that was ahead of its time in many ways, and is still perfectly usable today, although [Tucker Osman] does think it could stand to have its maximum flash storage doubled to 16 GB.

Now, we’d like to tell you that he’s already succeeded in this task. After all, in theory, it should be pretty straightforward: just remove the 8 GB flash chip and replace it with a pin-compatible 16 GB version. But of course, this is Apple we’re talking about. Nothing is ever quite that easy, and it seems that at every turn both the hardware and software in the thirteen-year-old iPod are fighting the change.

It took several attempts before the original flash chip could be swapped out, but eventually [Tucker] and his friend [Wesley] got one to survive the operation. Unfortunately, all they had to show for their effort was an unhelpful error screen.

From here on out the assumption was that they were dealing with a software problem. Luckily the Rockbox bootloader had previously been ported to the 3G Nano, which helped get the ball rolling. The next step would be to patch the Nano’s firmware to accept the ID of the new flash chip, but after a year of work, it’s turned out to be a bit more complicated than that.

[Tucker] hasn’t given up yet, and is actively looking for anyone who’d like to help out with his quest. He’s shared some information with a few like minded individuals on Hackaday.io, and he’s also started a Discord server dedicated to Nano hacking. At this point, it sounds like he’s very close to actually reading data from the 16 GB chip, but there’s still a long way to go before the Nano’s firmware will actually play music from it.

Despite most people now using their smartphones to play music these days, we still see a lot of interest in upgrading and modernizing the iPod. From replacing their original hard drives with micro SD cards to installing a Raspberry Pi Zero in place of the original electronics, hackers are still infatuated with Apple’s legendary media player.

Continue reading “An Epic Quest To Put More Music On An IPod Nano 3G”

Build An ESP32 Stock Ticker To Watch Your GME Gains

Meme investing is all the rage these days, and what better way to get in on the loss fun than with your very own old-timey mechanical stock ticker? Unfortunately, they’re about as expensive and rare as you might expect for a piece of Victorian-era electronics. Lucky for us, [secretbatcave] has shown that you can put together a functional look-alike that costs about as much as a GameStop (GME) share was worth before it started heading to the Moon.

This might seem like an ambitious project, but in actuality the machine only has a few moving parts. There’s a stepper motor to feed the paper, another to spin an inked embossing wheel, and a couple of solenoids attached to a pusher plate. Rather than trying to move the heavy wheel, the pusher plate smashes the paper up into it. The fact that this produces a satisfying “clack” sound as each character is printed is just an added bonus.

Extending the base to hold the solenoids.

To sell the look, [secretbatcave] put the whole mechanism inside a tall glass dome from IKEA. The matching wooden base was extended so the pusher plate solenoids could fit inside, after which it was dunked in ink and sprayed with a gloss sealer to give it that shiny black finish people seemed to love in the 1900s. With the addition of an engraved brass nameplate, it looks like the machine fell out of a time warp.

In terms of electronics, there’s an ESP32, a pair of stepper motor controllers, and a relay for the solenoids. As of right now it all lives in a rather utilitarian box that’s tethered to the ticker, but we’re sure the lot could get tucked under the base with the help of a custom PCB should you be so inclined.

With an ESP32 at the helm, the ticker could easily be configured to print out whatever data it receives over the network or picks up from MQTT. With hardware like this and a pair of Diamond Hands, those tendies are as good as yours.

Continue reading “Build An ESP32 Stock Ticker To Watch Your GME Gains”