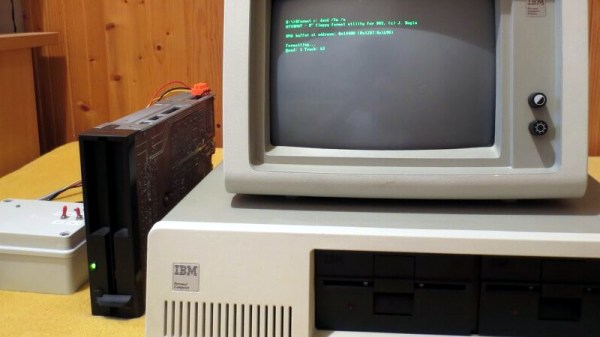
Windows Utility Helps ID Serial Ports

The humble serial interface has been around for a very long time, and will stay with us in one form or other for the foreseeable future. It was easy enough to keep track of back in the days when a computer only had one, or perhaps two COM ports. However, in this day and age of USB-programmable microcontrollers, it’s likely you’ve got COMs coming out the wazoo. Thankfully, [Amr Bekhit] has put together a utility to help solve this problem.

[Amr’s] utility is called Serial Port Monitor, and it does what it says on the tin. When new serial ports are enumerated in Device Manager, a system tray notification pops up noting the number of the newly attached COM port. Additionally, it maintains a list of ports sorted in order of the newest first, and also features a right-click menu that allows the launching of various terminal programs.

It’s a useful tool to keep in your back pocket that can prove particularly so when programming many devboards at once, or any other time when you find yourself dealing with a mess of serial devices.

Incidentally, if you find yourself having continual headaches with USB-to-Serial adapters on Windows, this might just be your problem. Happy hacking.

Footnote: In light of this article, the author would like to formally apologise to [Cosmos2000] for permanently disabling COM1 on his main programming rig. Sorry, friend.

Modern Evolution Of The Classic Water Rocket

Whether it was home-built from scraps or one of the various commercial versions that have popped over up over the years, there’s an excellent chance that the average Hackaday reader spent at least a couple of their more formative summers flying water rockets. You might not have realized it at the time, but with shirt soaked and head craned skywards, you were getting a practical physics lesson that was more relatable than anything out of a textbook. Water rockets are a great STEM tool for young people, but in a post-Fortnite world, the idea could use a little modernization to help keep kids engaged.

With his entry into the 2019 Hackaday Prize, [Darian Johnson] hopes to breathe some new life into this classic physics toy. His open source kit would provide a modular water rocket intended for a wide range of ages thanks to various payloads and upgrade options. The younger players would be content to simply see it take off, but high school students could outfit the craft with an electronic payload to capture performance data or an automatic parachute.

[Darian] has been building and flying rockets with his own children and other youth in community for years now, and has found them to be a huge hit. They became so popular that he started thinking of a way to not produce them in larger quantities, but make them stronger so they would survive more flights.

Of course, the fuselages are easy enough; there’s no shortage of one-liter bottles you can recycle. But for the nose cone, fins, and ultimately even the launch pad, [Darian] turned to 3D printing. This allows him to continually optimize the design while delivering repeatable performance. When he had a semi-printable water rocket on his hands, he started to wonder if he could get older kids interested by adding some electronics into the mix.

His current proof of concept is a flight data recorder using a Adafruit nRF52 Bluefruit LE Feather, a BMP280 sensor to determine altitude via barometric pressure, and an SD card breakout for local data storage. Long term, [Darian] wants to be able to stream flight data to student’s phones over Bluetooth, with the SD card providing a local copy which can be analyzed after the flight.

[Darian] has leaned heavily on the open source community for the various components of his water rocket kit, and is dedicated to giving back. He hopes that his final kit will allow communities to create engaging STEM activities at little to no cost. This includes creating a repository of lesson plans and designs contributed from others experimenting with water rockets. It’s a noble goal, and we’re excited to see how the project progresses.

Zork And The Z-Machine: Bringing The Mainframe To 8-bit Home Computers

Computer games have been around about as long as computers have. And though it may be hard to believe, Zork, a text-based adventure game, was the Fortnite of its time. But Zork is more than that. For portability and size reasons, Zork itself is written in Zork Implementation Language (ZIL), makes heavy use of the brand-new concept of object-oriented programming, and runs on a virtual machine. All this back in 1979. They used every trick in the book to pack as much of the Underground Empire into computers that had only 32 kB of RAM. But more even more than a technological tour de force, Zork is an unmissable milestone in the history of computer gaming. But it didn’t spring up out of nowhere.

DEC PDP-10 Flip Chip module

The computer revolution had just taken a fierce hold during the second World War, and showed no sign of subsiding during the 1950s and 1960s. More affordable computer systems were becoming available for purchase by businesses as well as universities. MIT’s Laboratory for Computer Science (LCS) was fortunate to have ties to ARPA, which gave MIT’s LCS and AI labs (formerly part of Project MAC) access to considerable computing resources, mostly in the form of DEC PDP systems.

The result: students at the MIT Dynamic Modeling Group (part of LCS) having access to a PDP-10 KA10 mainframe — heavy iron at the time. Though this PDP-10 was the original 1968 model with discrete transistor Flip Chip modules and wire-wrapping, it had been heavily modified, adding virtual memory and paging support to expand the original 1,152 kB of core memory. Running the MIT-developed Incompatible Timesharing System (ITS) OS, it was a highly capable multi-user system.

Naturally, it got mostly used for playing games.
Continue reading “Zork And The Z-Machine: Bringing The Mainframe To 8-bit Home Computers”

Solving The Final Part Of The IClicker Puzzle

The regular Hackaday reader might remember the iClicker from our previous coverage of the classroom quiz device, or perhaps you even had some first hand experience with it during your university days. A number of hackers have worked to reverse engineer the devices over the years, and on the whole, it’s a fairly well understood system. But there are still a few gaps in the hacker’s map of the iClicker, and for some folks, that just won’t do.

[Ammar Askar] took it upon himself to further the state of the art for iClicker hacking, and has put together a very detailed account on his blog. While most efforts have focused on documenting and eventually recreating how the student remotes send their responses to the teacher’s base station, he was curious about looking at the system from the other side. Specifically, he wanted to know how the base station was able to push teacher-supplied welcome messages to the student units, and how it informed the clients that their answers had been acknowledged.

He started by looking through the base station’s software update tool to find out where it was downloading the firmware files from, a trick we’ve seen used to great effect in the past. With the firmware in hand, [Ammar] disassembled the AVR code in IDA and got to work piecing together how the hardware works. He knew from previous group’s exploration of the hardware that the base station’s Semtech XE1203F radio is connected to the processor via SPI, so he started searching for code which was interacting with the SPI control registers.

This line of logic uncovered how the radio is configured over SPI, and ultimately where the data intended for transmission is stored in memory. He then moved over to running the firmware image in simavr. Just like Firmadyne allows you to run ARM or MIPS firmware with an attached debugger, this tool allowed [Ammar] to poke around in memory and do things such as simulate when student responses were coming in over the radio link.

At that point, all he had to do was capture the bytes being sent out and decode what they actually meant. This process was complicated slightly by the fact the system uses to use its own custom encoding rather than ASCII for the messages, but by that point, [Ammar] was too close to let something like that deter him. Nearly a decade after first hearing that hackers had started poking around inside of them, it looks like we can finally close the case on the iClicker.

Integrated Circuits Can Be Easy To Understand With The Right Teachers

For years I’ve been trying to wrap my mind around how silicon chips actually work. How does a purposefully contaminated shard of glass wield control over electrons? Every once in a while, someone comes up with a learning aid that makes these abstract concepts really easy to understand, and this was the case with one of the booths at Maker Faire Bay Area. In addition to the insight it gave me (and hundreds of Faire-goers), here is an example of the best of what Maker Faire stands for. You’ll find a video of their presentation embedded below, along with closeup images of the props used at the booth.

The Uncovering the Silicon booth had a banner and a tablecloth, but was otherwise so unassuming that many people I spoke with missed it. Windell Oskay, Lenore Edman, Eric Schlepfer, John McMaster, and Ken Shirriff took a 50-year-old logic chip and laid it bare for anyone who cared to stop and ask what was on display. The Fairchild μL914 is a dual NOR gate, and it’s age matters because the silicon is not just simple, it’s enormous by today’s standards making it relatively easy to peer inside with tools available to the individual hacker.

ATmega328 decapped by John McMaster was also on display at this booth

The first challenge is just getting to the die itself. This is John McMaster’s specialty, and you’re likely familiar from his Silicon Pr0n website. He decapped the chip (as well as an ATmega328 which was running the Arduino blink sketch with it’s silicon exposed). Visitors to the booth could look through the microscope and see the circuit for themselves. But looking doesn’t mean understanding, and that’s where this exhibit shines.

To walk us through how this chip works, a stack-up of laser-cut acrylic demonstrates the base, emitter, and collector of a single transistor. The color coding and shape of this small model makes it easy to pick out the six transistors of the 941 on a full model of the chip. This lets you begin to trace out the function of the circuit.

For me, a real ah-ha moment was the resistors in the design. A resistive layer is produced by doping the semiconductor with impurities, making it conduct more poorly. But how do you zero-in on the desired resistance for each part? It’s not by changing the doping, that remains the same. The trick is to make the resistor itself take up a larger footprint. More physical space for the electrons to travel means a lower resistance, and in the model you can see a nice fat resistor in the lower right. The proof for these models was the final showpiece of the exhibit as the artwork of the silicon die was laid out as a circuit board with discrete transistors used to recreate the functionality of the original chip.

Windell takes us through the booth presentation in the video below. I think you’ll be impressed by the breakdown of these concepts and how well they aid in understanding. This was a brilliant concept for an exhibit; it brought together interdisciplinary experts whom I respect and whose work I follow, and sought to invite everyone to gain a better understanding of the secrets hiding in the chips that underpin this technological age. This is exactly the kind of thing I love to see at a Maker Faire.

Continue reading “Integrated Circuits Can Be Easy To Understand With The Right Teachers”

It’s Time To Embrace The Toilet Of The Future

You use things every day that are very different from the same items from even a decade ago. Your car, your cellphone, and your computer all have probably changed a lot in the last ten years. But there’s something you almost certainly use every day that hasn’t changed much in a very long time: your toilet. That is unless you live in Japan where some toilets are a high tech delight. Lifehacker recently did a video about the toilet of the future, which might be coming to the US soon if Toto — one of the Japanese toilet makers — has its way.

It made us think. For as ubiquitous as the porcelain throne is, we don’t see many hacks related to it. There are several really obvious ones. For example, in the Lifehacker video, the seat automatically raises when you approach. We don’t know how it could figure out if you were going to stand or sit, but maybe that’s a good application for machine learning. What we really want is one that can clean itself. That would be worth something. Every time we see a Sanisette washing itself in Paris we want to take it home.

Continue reading “It’s Time To Embrace The Toilet Of The Future”

Concrete Speakers Are Attractive And Functional

In a lot of fields – motorsport, space exploration, wearables – lighter is better. But it’s not always the case. When you want to damp vibration, stop things moving around, and give things a nice weighty feel, heavier is the way to go. This is the case for things like machine tools, anvils, and yes – speakers. Using this philosophy, [SoundBlab] built a set of concrete speakers. (Youtube link, embedded below)

The concrete speaker enclsosures are sized for 3″ drivers, and were cast using two measuring jugs as the mold. This gave the final product a smooth and glossy surface finish, thanks to the surface of the plastic used. The concrete was also agitated during the casting process to minimise the presence of air bubbles in the mixture.

Once cast, the enclosures are fitted with plywood end caps which mount the Fountek FE85 speaker drivers. These are a full-range driver, meaning no cross-overs or other drivers are required. The speakers are then mounted on stands constructed from wood edging, which are stained in a contrasting colour for a nice aesthetic touch. Felt pads are placed on the base, and polyfill inside the enclosure to further minimise any unwanted vibrations.

The sound test confirms the speakers perform well, and they look great as a part of a lounge audio setup. We think they make an excellent pair of bookshelf speakers, which would be ideal for comfortable listening at moderate volume levels.

We’ve seen many speaker builds at Hackaday, from 3D-printed omnidirectional builds to the more classical designs. Video after the break.

Continue reading “Concrete Speakers Are Attractive And Functional”