It’s Time To Embrace The Toilet Of The Future

You use things every day that are very different from the same items from even a decade ago. Your car, your cellphone, and your computer all have probably changed a lot in the last ten years. But there’s something you almost certainly use every day that hasn’t changed much in a very long time: your toilet. That is unless you live in Japan where some toilets are a high tech delight. Lifehacker recently did a video about the toilet of the future, which might be coming to the US soon if Toto — one of the Japanese toilet makers — has its way.

It made us think. For as ubiquitous as the porcelain throne is, we don’t see many hacks related to it. There are several really obvious ones. For example, in the Lifehacker video, the seat automatically raises when you approach. We don’t know how it could figure out if you were going to stand or sit, but maybe that’s a good application for machine learning. What we really want is one that can clean itself. That would be worth something. Every time we see a Sanisette washing itself in Paris we want to take it home.

Continue reading “It’s Time To Embrace The Toilet Of The Future”

Muscle Wire BugBot And A Raspberry Pi Android With Its Eye On You At Maker Faire

I spent a good chunk of Saturday afternoon hanging out at the Homebrew Robotics Club booth at Maker Faire Bay area. They have a ton of really interesting robot builds on display and I just loved hearing about what went into these two in particular.

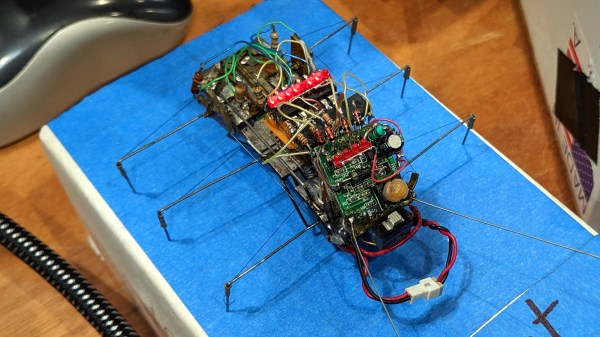
It’s obvious where BugBot gets its name. The six-legged walker is the creation of [Mark Johnston] who built the beast in a time where components for robots were much harder to come by. Each leg is driven by a very thin strand of muscle wire which contracts when high voltage is run through it. One of the really tricky parts of the build was finding a way to attach this wire. It has a very low melting point, so trying to solder it usually results in melting right through. His technique is to wrap the wire around the leg itself, then slide a small bit of brass tubing over it and make a crimp connection.

At the heart of the little bug is a PIC microcontroller that is point-to-point soldered to the rest of the components. This only caused real problems once, when Mark somehow bricked the chip and had to replace it. Look close and you’ll see there’s a lot of fiddly bits to work around to pull that off. As I said, robot building was more difficult before the explosion of components and breakout modules hit the scene. The wireless control components on this were actually salvaged out of children’s RC toys. They’re not great by any stretch of the imagination, but it was the best source at the time and it works! You can find a demo of the robot embedded after the jump.

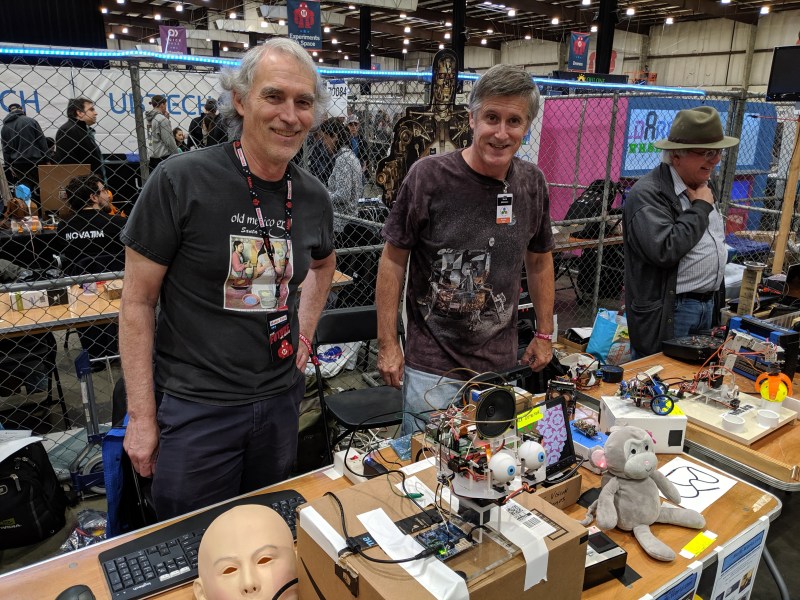
Ralph Campbell (left) and Mark Johnston (right)

An Android robot was on display, but of course, I was most interested in seeing what was beneath the skin. In the image above you can see the mask sitting to the left of the “Pat” skeleton. Ralph Campbell has been working on this build, and plans to incorporate interactive features like facial recognition and gesture recognition to affect the gaze of the robot.

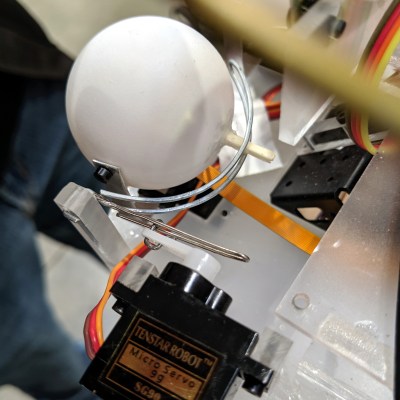
Inside each of the ping pong ball eyes is a Raspberry Pi camera (actually the Adafruit Spy Camera because of its small board size). Ralph has a separate demonstration for facial recognition that he’s in the process of incorporating. But for me, it was the mechanical design of the bot that I find fascinating.

The structure of the skull is coat hanger lashed and soldered together using magnet wires. The eyes move thanks to a clever frame made out of paper clips. The servos to the side of each eye move the gaze up and down, while a servo beneath the eye takes care of left and right. A wooden match stick performs double duty — keeping the camera in place as the pupil of the eye, and allowing it to pivot along the paperclip track of the vertical actuator. It’s as simple as it can be and I find it quite clever!

Continue reading “Muscle Wire BugBot And A Raspberry Pi Android With Its Eye On You At Maker Faire”

Hackaday Links Column Banner

Hackaday Links: May 19, 2019

Cheap nostalgia, that’s the name of the game. If you can somehow build and ship ‘cheap nostalgia’, you’re going to be raking in the bucks. For the ‘musicians’ in the crowd, the king of cheap nostalgia has something great. Behringer is cloning the Yamaha CS-80. and it was announced at this month’s Superbooth.

The Yamaha CS-80 is the synth in Blade Runner, and since Toto’s Africa is making a comeback on top-40 radio, it’s the instrument of our time. A Wonderful Christmas Time, it seems. Aaaannnyway, yes, there might be a huge and inexpensive version of one of the greatest synthesizers ever made real soon. The cheap 808s and 909s are making their way to stores soon, and the 101 needs a firmware update but you can buy it now. Cheap nostalgia. That’s how you do it.

The PiDP-11/70 is a project we’ve been neglecting for some time, which is an absolute shame. This is a miniature simulation of what is objectively the best-looking minicomputer of all time, the PDP-11/70. This version is smaller, though, and it runs on a Pi with the help of SimH. There are injection molded switches, everything is perfect, and now there are a whole bunch of instructional videos on how to get a PiDP-11/70 up and running. Check it out, you want this kit.

Considering you can put a phone screen in anything, and anyone can make a keyboard, it’s a wonder no one is making real, well-designed palmtop computers anymore. The Vaio P series of PCs would be great with WiFi, Bluetooth, and a slight upgrade in memory and storage. This was [NFM[‘s recent project. This palmtop gets an SSD. The object of modification is a decade-old Sony Vaio CPCP11 palmtop modified with a 256 GB SSD. The Vaio only supports PATA, and the SSD is mSATA, so this is really a project of many weird adapters that also have to be built on flex connectors.

Here’s something for the brain trust in the Hackaday comments. First, take a look at this picture. It’s the inside of a rotary encoder. On the top, you have a Gray code (or what have you) that tracks the absolute position of a shaft. On the bottom, you have some sort of optical detection device with 13 photodiodes (or something) that keeps track of each track in the Gray code. This is then translated to some output, hopefully an I2C bus. What is this device, circled in red? I know what it is — it’s an optical decoder, but that phrase is utterly ungooglable, unmouserable, and undigikeyable. If you were me, what would you use to build your own custom absolute rotary encoder and you only needed the sensor? I technically only need 10 tracks/sensors/resolution of 1024, but really I only need a name.

Lol, someone should apply to Y Combinator and pitch yourself as a B Corp.

New Arduino Nano Line Rolls Out In Four Flavors At Maker Faire Bay Area

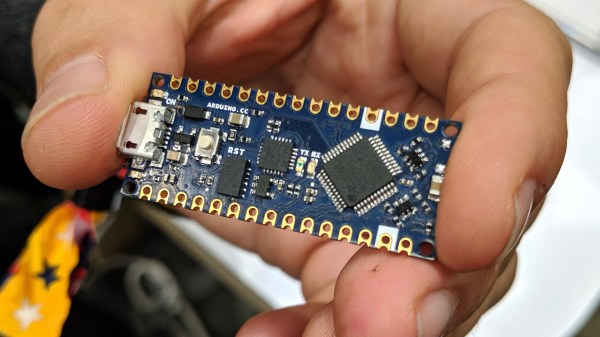
Arduino has announced a new line of Nano boards that will begin shipping next month. From the design, to the chips and features on the board, to the price, there’s a lot that is new here. I stopped by their booth at Maker Faire Bay Area for a look at the hardware.

Immediately noticeable is the new design for the pins on either side of the board, which has transitioned from through-hole to a castellated through-hole hybrid. The boards can be ordered with or without pin headers soldered in place. If you get them without, you can reflow these nano boards as modules on a larger PCB design. Recommended footprints are not yet available but I’m told they will be published soon.
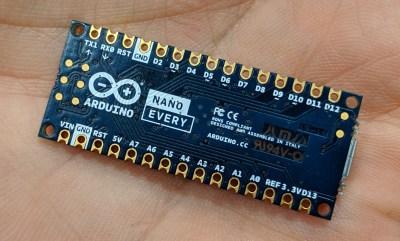
The most basic model in this lineup is the “Nano Every”, a 5V board with the ATmega4809 at its center. This brings 48 KB of flash and 6 KB of RAM to the party, running at 20 Mhz. A really nice touch is the inclusion of power regulation that turns up to 21 V of input into the regulated 5 V for the chip, with the added bonus of sourcing up to 1 A for external components through the 5 V pin on one of the headers. For the hackers out there, you can choose to inject your unregulated power through the VIN line, or the USB header.

All of this is a really nice upgrade to the previously available Nano design, with the $9.90 price tag making it a really desirable board for your 8-bit microcontroller needs. The one critique that comes to my mind is that the pins are labeled nicely on the bottom silk screen, but I would also have liked to see these labels on the top layer. When used in a breadboard, or soldered to another PCB, pin labels will be hidden.
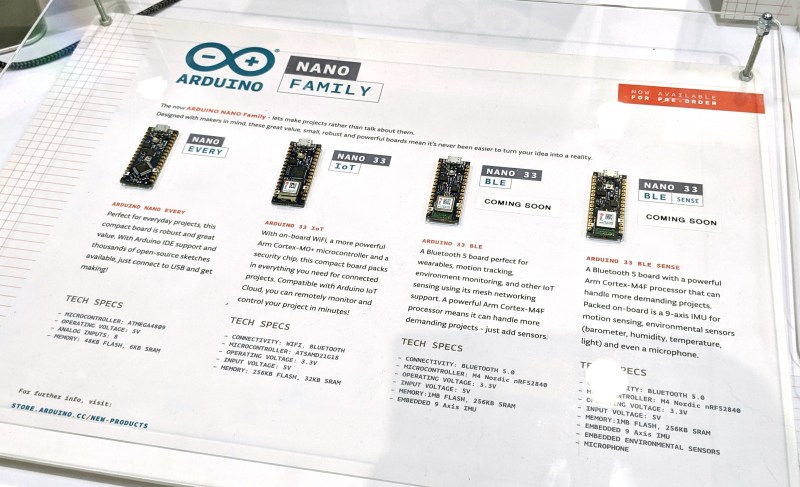
The rest of the Nano family center around more powerful chips. As mentioned above, the “Nano Every” board runs an 8-bit chip at 5 V, but the three different “Nano 33” boards have 32-bit chips running at 3.3 V. There’s an “IoT” version with an Arm Cortex-M0+ SAMD21 processor, 6-axis IMU, plus a uBlox NINA-W10 modules which is an ESP32-based board for WiFi, Bluetooth, and cryptography features. MSRP on this board is $18.

The “Nano 33 BLE” and “Nano 33 BLE Sense” boards both do away with the SAMD21 chip and utilize the Nordic nRF52480 which is part of the uBlox NINA-B306 modules and provide Bluetooth connectivity. At $19, the BLE flavor gets you a 9-axis accelerometer. For an additional ten bucks, the “BLE Sense” adds a slew of sensors: pressure, humidity, digital proximity, ambient light, gesture sensor, and a microphone. Pre-orders for these two are slated to begin shipping this July.

The new Arduino Nano designs bring a lot of power to a small footprint. I have to wonder if Arduino is looking to compete with ESP32 modules. The castellated edges on ESP32 modules have allowed them to pop up in all kinds of development boards and other products. The new Nano design continues the legacy of Arduino boards being prototype friendly, but adds the ability to include the boards in a product design based on surface mount assembly.

Desktop Weather Monitor Leaves Nothing To Chance

[Mirko Pavleski] has put together a little weather station for himself that combines Internet-sourced forecasts with physical sensor data to give him a complete view of his local conditions. There’s no shortage of weather applications for our smartphones and computers that will show us the current local conditions and the forecast for the next couple of days. It’s so easy to pull weather data from the various APIs out there that you even see the functionality “baked in” to different gadgets these days. Of course, you can dig through every weather API in the world and not find the temperature and humidity inside your office; for that, you need your own sensors.

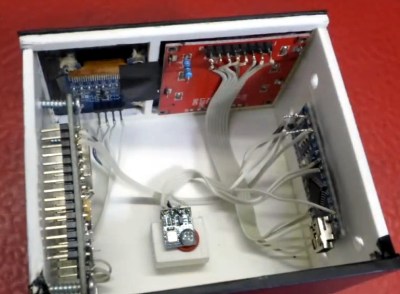
[Mirko] took a somewhat unconventional approach by essentially building two totally separate weather devices and packing them into one enclosure, which gives the final device a rather unique look thanks to the contrasting display technologies used.

Local conditions are detected by an Arduino Nano connected to a BMP180 sensor and displayed on a Nokia 5110 LCD. The screen shows not only real-time temperature and barometric pressure, but the change in pressure over the last several hours. The three-day forecast, on the other hand, is provided by a NodeMCU ESP8266 development board connected to the increasingly ubiquitous 0.96 inch OLED.

If you’re not into the whole duality thing and would rather do it all on the same device, you might be interested in one of the ESP8266 weather monitors we’ve seen in the past.

Decap ICs Without The Peril

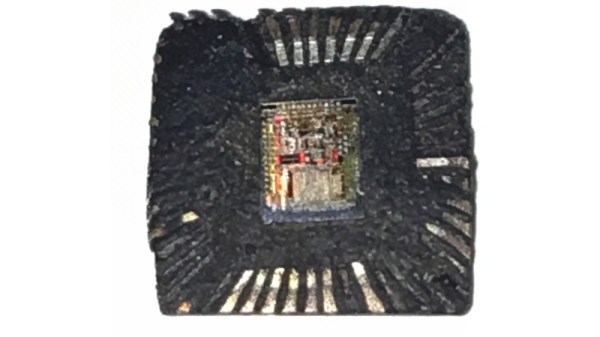
There can be few of us who haven’t gazed with fascination upon the work of IC decappers, whether they are showing us classic devices from the early years of mass semiconductor manufacture, or reverse-engineering the latest and greatest. But so often their work appears to require some hardcore scientific equipment or particularly dangerous chemicals. We’ve never thought we might be able to join the fun. [Generic Human] is out to change all that, by decapping chips using commonly available chemicals and easy to apply techniques. In particular, we discover through their work that rosin — the same rosin whose smell you will be familiar with from soldering flux — can be used to dissolve IC packaging.

Of course, ICs that dissolved easily in the face of soldering wouldn’t meet commercial success, so an experiment with flux meets little success. Pure rosin, however, appears to be an effective decapping agent. [Generic Human] shows us a motherboard voltage regulator boiled in the stuff. When the rosin is removed with acetone, there among the debris is the silicon die, reminding us just how tiny these things are. We’re sure you’ll all be anxious to try it for yourselves, now, so take a while to look at the video below showing their CCC Congress talk.

The master of chip decapping is of course [Ken Shirriff], whose work we’ve featured many times. Our editor [Mike Szczys] interviewed him last year, and it’s well worth a look.

Continue reading “Decap ICs Without The Peril”

[Ben Krasnow] Makes A DSKY

There are hundreds if not thousands of artifacts from the Apollo program scattered around the globe, some twisted wrecks at the bottom of the ocean, others lovingly preserved and sitting in museums or in the hands of private collectors. All of what’s left is pretty much pure unobtainium, so if you want something Apollo-like, you’re probably going to have to make it yourself.

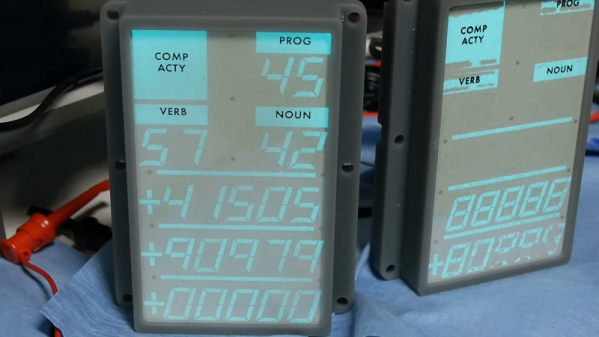
[Ben Krasnow] took up the challenge to make an electroluminescent Apollo-era DSKY display from scratch, with outstanding results. The DSKY, or “display and keyboard”, was the user interface for the Apollo Guidance Computer, the purpose-built digital navigation system that got a total of 24 men there and back again. [Ben] says it took a long time to recreate the display, and we can see why. He needed to master quite a few skills, including screen printing to get the glass-panel display working. The panel is a sandwich of phosphorescent paint, a dielectric, and conductive ink. The ink is silkscreened on the back to form the characters, all applied to indium tin oxide (ITO) conductive glass. A PCB with the same pattern of character segments lays behind that, driving each segment with 300 volts or so through a trio of HV507 high-voltage shift registers. It’s an impressive bit of engineering and gives off a decidedly not-homebrew vibe.

In the video below, [Ben] goes into detail about the trials he experienced on the way to this amazing endpoint, not least of which was frying chip after chip due to ineffective protection diodes in the shift registers. That’s an epic debugging story that’s worth the price of admission all by itself. It’s not the only DSKY in town, of course – [Fran Blanche] has been working on one for a while too – but there’s just something about that blue glow that we really like.

Continue reading “[Ben Krasnow] Makes A DSKY”