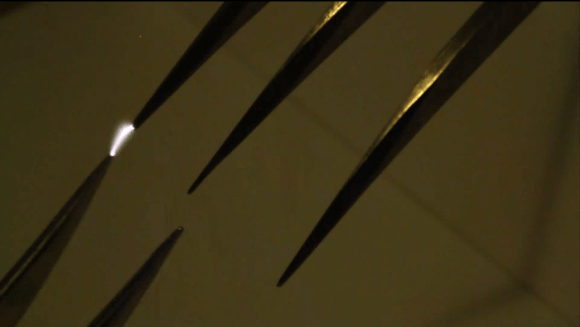
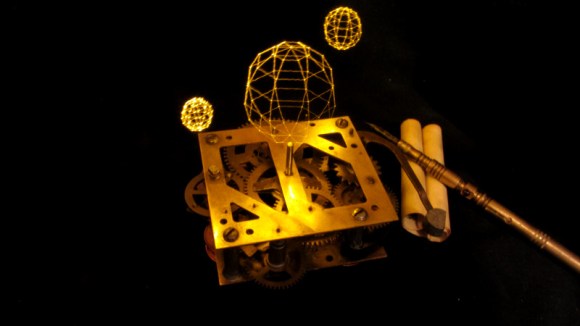
Mug Plotter Based On The Egg-Bot

mug-plotter

Here’s a fun way to break up the monotony in the old cubicle farm. The Mug Plotter will let you expertly inscribe your coffee vessel with a different witty saying or design for each day of the week. If it looks familiar that’s because it’s loosely based on the non-flat drawing robot, the Egg-Bot.

[Teed] built the machine using laser cut plywood parts. He starts off the build description with the griping technique. There are two parts to this, one is concave and fits in the mouth of the mug. The convex side grips the bottom edges of it. These parts go on the frame along with the slide and thread rods which hold the stylus. A servo motor is along for the ride, providing the ability to lift the marker when necessary.

You can see in the clip after the break that there’s a bit of oscillation in the rig when one of the steppers starts turning really fast. But it doesn’t seem to affect the look of the design very much at all.

Continue reading “Mug Plotter Based On The Egg-Bot”

Handwriting Suck? Build A Machine To Do It For You

calligraphy-machine

Children of the information age are doomed to have the worst handwriting just for lack of use if nothing more. But some students at Olin College harnessed technology to find a solution to that problem. Meet Herald, a CNC machine that can produce beautiful calligraphy.

The machine uses a gantry to move the writing tip along the X and Y axes. The flexible-nib calligraphy pen is mounted on a sprocket which rotates the tip onto the writing surface, taking care of the third axis. The rig was beautifully rendered from their CAD drawings, then tweaked to ensure the smoothest motion possible before the quintet of Sophomores began the physical build.

The drive hardware is very simple yet it produces great results. It uses an Arduino along with three stepper motor drivers. There are also limiting switches to protect the hardware from runaway code. The software interface designed by the team lets the user cut and paste their text, and select a font, font size, alignment, etc. It then converts the text to G-code and pushes it to the Arduino where the GRBL package takes care of business.

Don’t miss the device in action, writing out a [Langston Hughes] work in the clip after the break.

Continue reading “Handwriting Suck? Build A Machine To Do It For You”

Time-lapse Dolly Uses Some Stock Parts And A Bit Of Machining Work

linear-carriage-for-time-lapse-photography

[Ben] just finished building this time-lapse dolly and decided to share his experience. We think he struck just the right balance of diy and commercially available materials to create a rig that is stable yet relatively inexpensive.

The project was inspired by Project Chronos. It gives a lot of details about the drive electronics and code used, but there are some gaps in the instructions for building the track itself. [Ben] forged ahead, purchasing linear bearings and a double-guide rail from IGUS. He didn’t mention the price on that item but we found 1000mm of the stuff (about 40 inches) for under $75 so it’s not outrageous. The part he couldn’t get for a reasonable price was precision thread bar. He ended going with regular threaded rod and a couple of nuts combined with a spring mechanism to keep the sled steady. That seems to work just fine. You can see the rod bouncing a bit in the clip after the break but it doesn’t harm the stability of the captured images.

The end stops including the one to which the stepper motor is mounted are his own work. It sounds like they required a bit more fabrication work than he was planning on but we figure if you don’t challenge your skill set you never get any better.

Continue reading “Time-lapse Dolly Uses Some Stock Parts And A Bit Of Machining Work”

Oreo-creme Hater Builds Rube Goldberg CNC Router To Remove The Stuf

oreo-separator

Look, we understand the need to find a project to occupy your time and interest. So we’re not going to ask the wrong question (why?) for this one. This guy hates the creme that connects the chocolate cookies to make an Oreo. So he built a complicated system to separate the cookies and remove the creme. Check out the video after the break for a hardware overview (where we catch a glimpse of an Arduino RBBB) and a complete demonstration.

Although the project is a marketing gimmick for the company, we really love the fun they had making the video and the device actually works! Drop a cookie in the chute and it will be lifted into position for cleaving with a hatchet (we’re unsure what the string mechanism on the hatchet is for). The two pieces are then grabbed by some servo-powered grippers and transferred to a CNC router bed where a Dremel tool removes the residual creme before dumping the cookies out into your hand.

Once again, marketers should take note of this style of advertising. Notice the two main features achieved here: including a product in something we’re genuinely interested in and not being annoying (we’re looking at you Head-On).

Continue reading “Oreo-creme Hater Builds Rube Goldberg CNC Router To Remove The Stuf”

Acrylic Enclosures Use Integrated Clips To Do Away With Fasteners

acrylic-clip-lock-enclosures

Here’s a design that lets you make acrylic enclosures without using fasteners. The red outline in the diagram above is a bit hard to make out. But look closely and you’ll realize that there is very little material which has been removed to form the clip. This uses the rigidity/flexibility of the material to form a spring that will hold a couple of pieces tightly together.

In a links post last year we looked at [Patrick Fenner’s] fantastic analysis of the strength of using kerf-bending to form several sides of a case out of one piece of material. He’s used that same analytic expertise to take a look into this design. He even suggests that making the cut on the hook-side a bit deeper will help improve the resilience of the part. If you have a laser cutter on hand and want to give this a try he’s posted the plans on Thingiverse.

Taking The Pain Out Of Making Custom Eagle Parts

eagle

Cadsoft’s Eagle is a great tool for the independent maker. It’s a relatively easy to use PCB layout program with a ton of part libraries available for just about any project. If you’re using a part this isn’t included in these libraries, though, creating them by hand is a pain. [Dave] sent in a project he’s been working on that makes parts for Eagle with a Perl script, allowing for easy creation of custom parts that aren’t included in any library.

One thing that’s really convenient for custom Eagle parts is that most components are DIPs or some sort of leaded SMD component. [Dave]’s script takes the dimensional data from any chip’s datasheet and creates a custom outline for each part. The inputs and outputs can also be ripped directly from the datasheet and assigned to the footprint, making for a relatively automated process that creates custom parts in Eagle. Now for someone to use this script with a little OCR to make a ‘create Eagle part from PDF’ app…

The Perils Of Buying A Stereo Microscope Without A Stand

scope

[Steve] has wanted a stereo microscope in his lab for years now. Since his eyesight is becoming progressively worse, he figured it was time to look around on ebay and see what he could dig up. He ended up buying a very cheap microscope without a stand, figuring he could build one rather easily. Well, the articulated stand was rather easy to put together, but it did take a whole lot of time to build.

The main goal of [Steve]’s project was to have his microscope at the end of an articulated arm. With this setup, he could easily tuck the ‘scope against the back of his workbench when not in use and easily bring it out when necessary. This meant building a custom arm, though, and in the building process [Steve] used just about every machine tool he had at his disposal.

The end result is a fully articulated arm that can be moved to just about any point on his workbench and adjusted up and down for those really weird project. [Steve] says this may be a great introduction to home powder coating, and he really should build a small LED light source, but we’re loving the project so far.

Continue reading “The Perils Of Buying A Stereo Microscope Without A Stand”