Machining Beer Can Solder Stencils

This is a solder paste stencil machined from a beer can. [Simon Ludborzs] spent quite a bit of time dialing in his process to get to this point. Note the nice crisp edges of the openings. That’s a big change from his first attempt.

When looking for a way to make his own stencils he considered two options: plastic and aluminum. He produced both (more about the plastic stencil and his reflow process is discussed in this post). Plastic is a bit easier to work with since it lays flat. But it proves to be too thick. After applying paste with a squeegee there’s way too much solder on the pads. Aluminum beverage can walls are much thinner, depositing less paste.

We’ve seen soda cans used in the past, but they were produced through an etching process. [Simon] cut these holes using a CNC mill. This required a bit of futzing to figure out the right settings. For instance, he used Altium to produce CAM files from his circuit design. But the program is set up to mill the outside of traces, resulting in openings that are too large. He fixed this by setting the pasted expansion rule in the program to a negative value. The other advantage to using a mill is that he can cut precision tooling holes to ensure proper alignment. You can see them in the upper corners of this image.


Beck’s Beer Bottle Sound Recording

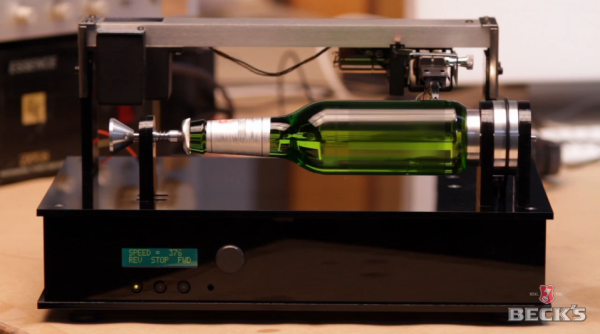
This beer bottle includes recorded audio etched into the glass. But you certainly won’t find half an album included with your next sixer. This is a one of a kind item that took a team of engineers to craft.

The idea comes from Phonographic Cylinders invented by [Thomas Edison]. Analog audio was etched into cylinders made of wax which could then be played by a needle and amplifying horn. The beer bottle is a similar size of cylinder, but etching the audio signal into glass is a horse of a different color. The video below includes a recounting of the development process from the guys who pulled it off. It includes using hard drive parts and special processing filters that remove harmonics introduced by the milling rig.

We’re sure you’ve figured it out by now; this is an advertisement. We say good! This is the kind of advertising we want. It’s topical, well targeted, and worth paying attention to. We felt the same way about the recent Oreo campaign and that Skittles hack. We hope that ad execs will take note of this.

By the way, it is possible to do this stuff at home. Check out the guy who made an Edison Cylinder wedding ring.

Continue reading “Beck’s Beer Bottle Sound Recording”

Already Impressive Wolverine Claws Now Energized With High Voltage

wolverine-claw-high-voltage

A few years back [James] built an utterly amazing set of Wolverine replica claws. They are held together by a bar that laces between his fingers so that when he’s gripping it you don’t see anything but the claws. Add to that the tail design which makes it look like they’re actually coming out of his skin and he’s made an amazing replica. But they’re also rather utilitarian as you can see in the demo/how-it-was-done video where he spears hay bails as they’re thrown at him from off camera. Machine shop fans are going to love learning how these were made.

More recently he decided to update the project after seeing our own Thor’s Hammer offering. He got down to business by salvaging a huge transformer from an old oil furnace. He has no idea what kind of voltage this thing puts out, but that doesn’t stop him from wiring it up to the pair of claws and letting the sparks fly. He even creates a Jacob’s Ladder effect by placing the claws at a narrow angle to each other.

Continue reading “Already Impressive Wolverine Claws Now Energized With High Voltage”

Magnetic CNC Marble Maze

magnetic-cnc-marble-maze

[Martin Raynsford] figured out a way to sneak some learning into a fun package. He did such a good job the test subjects didn’t even know they were teaching themselves just a tiny bit of CNC programming.

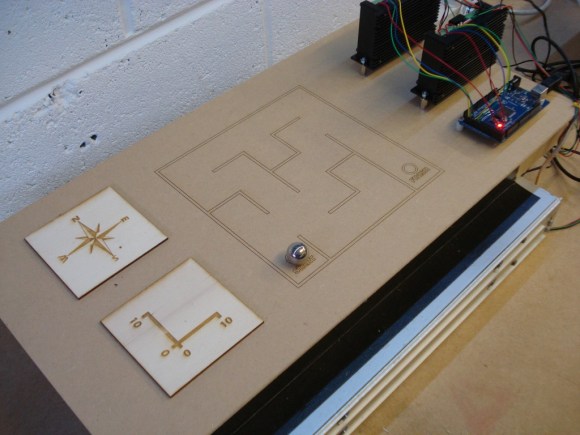
The apparatus above is a marble maze, but instead of building walls [Martin] simply etched a pattern on the playing field. The marble is a ball bearing which moves through the maze using a magnetic CNC gantry hidden underneath. Where does one get ball bearings of this size? If you’re [Martin] you scavenge them from your laser-cut Donkey Kong game.

He showed off the rig at the Maker Faire.  It takes simple commands as cardinal directions and units of movement. The ‘player’ (remember, they’re secretly learning something, not just playing a game) inputs a series of movements such as “N10,E10” which are then pushed through a serial connection to the Arduino. It follows these commands, moving the hidden magnet which drags the ball bearing along with it. It’s simple, but watch the clip after the break and we think you’ll agree the sound of the stepper motors and the movement of the ball will be like crack for young minds.

Continue reading “Magnetic CNC Marble Maze”

Altering Automotive Window Motors For Use In Your Projects

automotive-window-motor-for-your-projects

We agree with [Mário Saleiro] that the motors from a car’s power windows make for a fantastic high-torque solution to your next project. If you have a you-pick junkyard in your town they’ll be dirt cheap after you put in a bit of time to find and removing the parts from the yard. But you’ll probably want to add a few extra steps to get them ready, and he’s done a great job of documenting how he augmented them with wheels and rotary encoders.

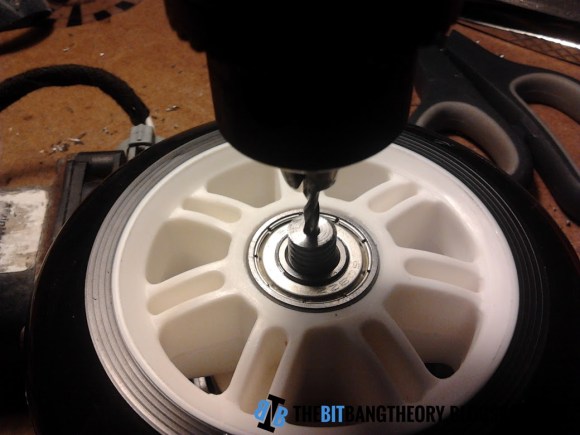
One aspect of the project which really struck home with us was his machine-shop-101 style tricks to mate the axle of the motor with the wheel. He has a process which ensures you will find the exact center of a cylinder as you work. This starts by lining up a bench vice on his drill press. He then inserts a drill bit upside down in the drill chuck, lowers it and clamps the vice on the bit. After loosening the chuck he ends up with the bit pointing up at the exact center of the chuck. Next he chucks up a piece of threaded rod, drilling a perfectly centered hole by lowering it into the drill bit while the drill press is rotating. The image above shows him using this machined part as a guide to continue the hole into the motor’s axle. Click through the link above to learn the rest of the tricks he uses.

Update: Lost PLA Metal Casting — The Movie

lost-pla-metal-casting-movie

Turning 3D printed plastic parts into metal objects is not a new concept. But we don’t see a lot of it and enjoyed watching the documentary version of [3DTOPO’s] lost PLA metal casting process so much we figured you’d want to see it too.

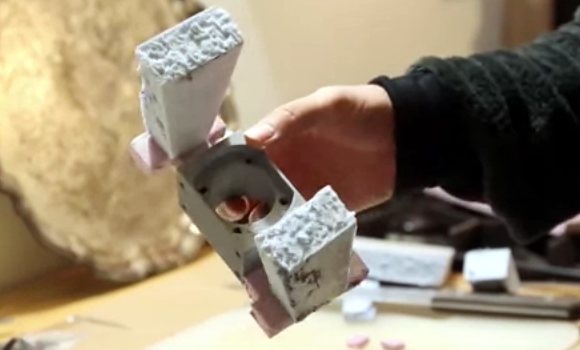
The thirty-five minute video walks through every part of the process which we originally learned about in September of last year. The process was developed as a way to fabricate parts that will be used in high-stress applications. For instance, the part seen above is a mounting bracket for the ball screws that moves the Z axis on a huge CNC build he’s been working on. A plastic part will break under the strain so he needed to make it out of aluminum alloy.

To start, the piece is modeled and printed in plastic to check the fit. Once it’s just right he scales it to 103% and prints it again to account for the shrinking of the metal as it cools. The next step is pictured above, adding paths using rigid foam insulation that allow for the metal pour and for air to escape. This is packed into a plaster and sand mold which dries before being cooked in a furnace to vaporize the foam and PLA. This leaves a perfect mold for the metal pour.

After the break you can see a 5-minute overview version of the project.

Continue reading “Update: Lost PLA Metal Casting — The Movie”

Voice Controlled Chess Robot

voice-controlled-chess-robot

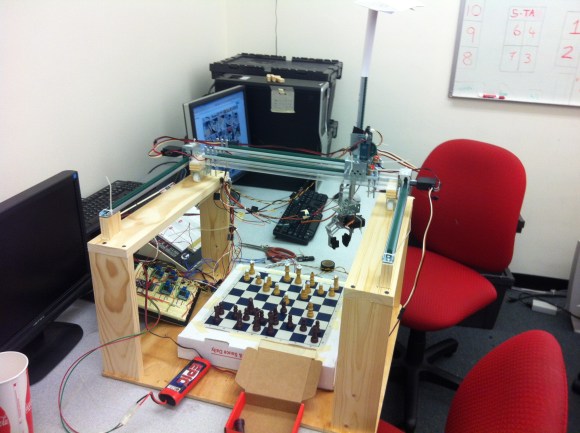
[Ben Yeh] wrote in to tell us about this voice-controlled chess robot he built along with three others as a final project for their Georgia Tech ECE 4180 Embedded Systems Design class.

To handle the speech recognition they grabbed an EasyVR board. This is a fine solution because it prevents the need for a computer to process voice commands (remember, it’s an embedded systems class). This concept breaks down when you find out that the desktop computer next to the robot is where the chess game is running. Perhaps that can be moved to a microcontroller by the next set of 4180 students.

The robot arm portion of the project is shown off well in the clip after the break. Normally we’d expect to see stepper motors driving the axes of a CNC machine but in this case they’re using servo motors with built-in encoders. The encoders are i2c devices which feed info back to the main controller. There was a parts ordering snafu and the z axis motor doesn’t have an encoder. No problem, they just added a distance sensor and a reflector to measure the up and down movement of the claw.

Continue reading “Voice Controlled Chess Robot”