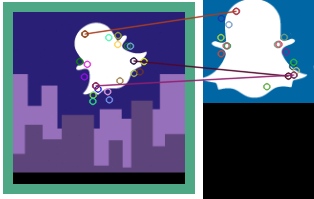
Building A Turing Machine From Magic The Gathering

If you really know your Magic the Gather and you’re a programming wiz you’ll appreciate this paper on building a functioning Turing Machine from Magic the Gathering cards. We’re sure you’re familiar with Turing Machines, which uses a rewritable strip to store and recall data. Most of the time we see these machines built as… machines. For instance, this dry-erase marker Turing Machine has long been on the top of our favorites list. But as The Diamond Age by Neal Stephenson illustrates, there’s more than one way to skin this cat.

A complete list of the cards used in this machine can be found here. A little bit of preparation (casting to tweak abilities) goes into making sure the cards will work as called for in the Turing design. The tape is made of Ally tokens to the right of the head, and Zombie tokens to the left. The computational abilities of the head depend on the colors of the cards. It’s a bit too complex to paraphrase, but the design is based on this 2-state, 3-symbol setup whose rules are listed in the image above.

It’s going to take us a while to fully wrap our heads around this thing, but it’ll be fun getting to that point!

[via Slashdot]

Breadboarding A 4-bit ALU

[TGTTGIT] recently took the plunge and decided to build his own computer using logic chips. He just completed a 4-bit ALU which can compute 18 functions. It took a long time to get the wiring right, but in true geek fashion his build was accompanied by an alternating Chapelle’s Show and Star Trek: TNG marathon playing in the background.

This project is the stepping stone for a larger 16-bit version. The experience of wiring up just this much of it has convinced him that an FPGA is the only way to go for the future of the build. But since he had already ordered the chips it was decided that the only thing to do was to see this much through. He used the truth table from The Elements of Computing Systems for the design and posted several times about the project before arriving at this stopping point so you may be interested in clicking through the other post on his blog. There’s also a lot of other TTL computer projects around here worth checking into.

Continue reading “Breadboarding A 4-bit ALU”

IMac Reborn With Present-day Parts

[Paul] spent his summer bringing an iMac G3 into this decade. There’s plenty of room to work with since he removed the CRT which originally occupied most of the computer’s space. The final project is much more powerful and since he preserved most of the metal mounting parts inside it remains quite strong.

He started by swapping flat screen monitors with his Grandma (who incidentally runs Linux… nice!). She had a 15″ model which would fit nicely in the case so he upgraded her to 17″ and took the old one. With bezel removed it fits perfectly where to old tube had been. Next comes the power supply. It’s mounted on the bracket which held the back of the tube, with a bit of metal removed to clear the air intake. To mount the motherboard he fabricated a bracket at one end where the iMac’s stage drops away. In retrospect he wishes he had rotated the board to make the I/O panel more accessible. The hard drive mounts on the original carriage, and he did some creative gluing to make his replacement DVD drive align with the original optical drive opening. The finished product looks great from the front and sides, with the cables running out the back as the only indication that it’s had some major work done on it.

An STM32 Processor Powers This PC

This 32-bit computer is a project [Bogdan Marinescu] built as a contest entry. Sadly he didn’t win, but he did do an excellent job of documenting the build. Having seen several other home built PC projects we’re familiar with the challenges that go into such a thing, and he found some great solutions to each of them.

He started with an STM32F103ZET6 chip. This is an ARM Cortex-M3 processor which brings a lot of power to the playing field. That being said, generating a VGA signal would pretty much zap the usefulness of the chip for other processes so he offloaded that work on a separate Propeller chip. A microSD card serves as storage for the machine, which runs eLua (embedded Lua programming language). There is 1 MB of external RAM and a PS/2 port for keyboard interface. The system is networked thanks to an ENC28J60 Ethernet controller. Don’t miss the video after the break where you can see several demos running on the system.

Continue reading “An STM32 Processor Powers This PC”

Work Station Includes A Smartcard Lock For USB Ports

The USB ports on this work station are locked. In order to use a USB device you’ll need to insert a Smartcard into the reader seen above. The interesting thing here is that this shouldn’t affect your ability to charge a USB device. When you visit the link above make sure to check out the worklog tab as it contains nine pages worth of build information.

The device is conceived of in two parts. There is one board which does the USB switching, and another that takes care of the Smartcard reader. That reader is based on a PIC 16F1939. It readers the Smartcard, verifies the data, then controls the USB switching board via SPI. An ADG714 chip completes the circuit on eight data lines making up the four USB ports. There is also a mechanical relay on the board which can cut USB power. Since this is separate from the data switching, the power could be left on for charging or toggled separately by a card that has permission to charge but not to use the data ports. You can see a demonstration of the system embedded after the break.

Continue reading “Work Station Includes A Smartcard Lock For USB Ports”

A Custom Monitor Mount Built From Wood

[LuckyNumbrKevin] wanted an epic monitor array of his own but didn’t really have the desk real estate to pull it off. His solution was to build a three computer monitor mounting rack with a relatively small footprint.

The design started with some virtual test builds using SketchUp. Once he had it dialed in he began transferring measurements for the base onto some plywood. The rest of the parts are built using dimensional lumber. As the project shaped up he wrapped the edges of the plywood with some trim, and gave the piece a good sanding. After a few passes with a dark stain he was ready to mount the monitors he bought from Newegg.

[Kevin] left a comment in the Reddit thread about the parts cost for his design. Including the monitors, this came in under $300. That does not include the Nvidia graphics card which is capable of driving the trio.

Swapping Out Eee PC BGA Chip For 1.6 GHz Upgrade

Personally we find this Ball-Grid Array chip-swap rather horrifying. But if you want to beef up the processor on your 701 Eee PC this is what you’ll need to go through. Not only did [Red Fathom] upgrade to a 1.6 GHz chip, but he managed to get the computer to boot up with the new hardware in place.

BGAs are notoriously hard to solder. This hack pulls it off using just a hot air gun. [Red Fathom] heats the board from the underside until the solder melts and he can pluck off the old chip. He then uses a solder braid and iron to remove extra solder from the footprint. After a little cleanup with a cotton swab and some flux he plops in an Intel Pentium M LV 778. It doesn’t look like he added any solder after the cleaning process. Perhaps he’s relying on the small amount left on the tinned pads of the board?

After the break you can see the soldering process and a video of the new processor booting Xandros.

Continue reading “Swapping Out Eee PC BGA Chip For 1.6 GHz Upgrade”