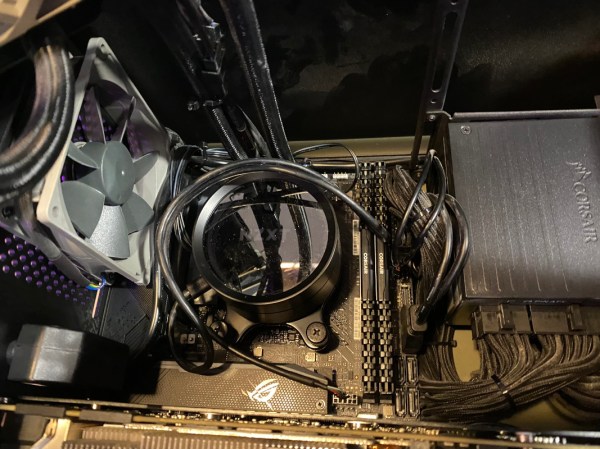
In what reads somewhat like a convoluted detective story, the events unfolding at the Chornobyl Exclusion Zone (CEZ) in Ukraine during late February had the media channels lighting up with chatter about ‘elevated gamma radiation levels’, which showed up on the public CEZ radiation monitoring dashboard for a handful of gamma radiation sensors. This happened right before this reporting system went off-line, leaving outside observers guessing at what was going on. By the time occupying forces had been driven out of the CEZ, the gamma radiation levels were reported as being similar to before the invasion, yet the computer hardware which was part of the monitoring system had vanished along with the occupying forces. After considering many explanations, this left security researchers like [Ruben Santamarta] to consider that the high values had been spoofed.
computer hacks1402 Articles
computer hacks
Jenny’s Daily Drivers: SerenityOS, And In Particular, Ladybird
As we continue on with the series in which I take a different OS for a spin every month I am afraid, dear reader, that this month I have a confession to make. Our subject here isn’t a Daily Driver at all, and it’s not the fault of the operating system in question. Instead I’m taking a look at a subject that’s not quite ready for the big time but is interesting for another reason. The OS is SerenityOS, which describes itself as “a love letter to ’90s user interfaces with a custom Unix-like core“, and the reason I’m interested in it comes from its web browser. I know that the OS is very much a work in progress and I’ll have to forgo my usual real hardware and run it in QEMU, but I’ve heard good things about it and I want to try it. The browser in question is called Ladybird, and it’s interesting because it has the aim of creating a modern fully capable cross-platform browser from scratch, rather than being yet another WebKit-based appliance.
A Pleasant Trip Into The 1990s

SerenityOS isn’t ready to be installed on real hardware, and there’s no handy ISO to download. Instead I had to clone the repository to my Linux machine and run the build script to compile the whole thing, something I was very pleased to observe only took about 40 minutes. It creates a hard disk image and opens QEMU for you, and you’re straight into a desktop.
When they mention ’90s user interfaces they definitely weren’t hiding anything, because what I found myself in could have easily been a Windows 9x desktop from the middle of that decade. There areĀ a bunch of themes including some Mac-like ones, but should you select the “Redmond” one, you’re on very familiar ground if you had a Microsoft environment back then. It’s only skin-deep though, because as soon as you venture into a command line shell there’s no DOS to be found. This is a UNIX-like operating system, so backslashes are not allowed and it’s familiarly similar to an equivalent on my Linux box. The purpose of this review is not to dive too far into the workings of the OS, but suffice it to say that both the underpinnings and the desktop feel stable and as polished as a Windows 95 lookalike can be. The various bundled utilities and other small programs seem to work well, and without any hint of the instabilities I’ve become used to when I’ve experimented with other esoteric operating systems. Continue reading “Jenny’s Daily Drivers: SerenityOS, And In Particular, Ladybird”
Decoding The 8088
There is a lot to like about open software, and in some areas, a well-thought-out piece of software can really make a huge impact. A great example of this is the Sigrok project. Creating simple devices that act like a logic analyzer is relatively easy. What’s hard is writing nice software for such a setup including protocol decoders. Sigrok has done it and since it is open, you can add your device and decode your protocol. [GloriousCow] had done the hardware part of interfacing to the 8088 in an IBM PC using an off-the-shelf logic analyzer that uses a customized version of Sigrok. But the output was a CSV file you had to process in a spreadsheet program. The next step: write a decoder for Sigrok to understand 8088 bus cycles.
The post covers the details of writing such a plug-in for Pulseview, the Sigrok GUI. It will also work for the command line interface if you prefer that. The code is in Python.
Implementing Commodore’s IEC Bus Protocol On A KIM-1 Single Board Computer
Although the PET is most likely the more well-known of Commodore’s early computer systems, the KIM-1 (Keyboard Input Monitor) single board computer was launched a year prior, in 1976. It featured not only the same MOS 6502 MPU as later Commodore systems, but also an MCS6530 PIO IC that contained the ROM, RAM and programmable I/O, reminiscent of later I/O chips on Commodore systems. As the KIM-1 was only designed to be used with an external tape drive (and a terminal for fancy users), adding a floppy drive like the ubiquitous 1541 with its IEC bus interface was not a first-party accessory. How the IEC bus can be retrofitted to a KIM-1 system is demonstrated in this video by the Commodore History channel.

What is most notable is just how similar the KIM-1 hardware is to later PET and VIC hardware, with the CIA and PIO ICs featuring the same requisite pins for this purpose, and requiring only the addition of an inverting (SN7406) IC and an EPROM featuring the new code to support the proprietary Commodore IEC bus protocol, which was mostly pilfered byte-for-byte from a C64 kernal ROM.
With some creative breadboarding in place and using nothing more than the on-board LED display and keyboard matrix, it was then possible to write to the inserted floppy disk, and also to read back from it. What’s interesting here is that this essentially replaces the tape drive as target for the KIM-1, which thus retains a lot of the original functionality, but with a big performance boost. While perhaps only interesting as an academic exercise, it’s definitely an interesting look at the early beginnings of what would blossom into the Commodore 64.
Continue reading “Implementing Commodore’s IEC Bus Protocol On A KIM-1 Single Board Computer”
CPU Built From Discrete Transistors
We all know, at least intellectually, that our computers are all built with lots of tiny transistors. But beyond that it’s a little hard to describe. They’re printed on a silicon wafer somehow, and since any sufficiently advanced technology is indistinguishable from magic, they miraculously create a large part of modern society. Even most computers from 40 or 50 years ago were built around various inscrutable integrated circuits. On the other hand, this computer goes all the way back to first principles and implements a complete processor out of individual transistors instead.
The transistor computer uses over 2000 individual transistors to implement everything comprising the 11-bit CPU. The creator, Reddit user [ Weekly_Salamander_78] also has an online interactive book that walks through each of the steps that is required to get to the point of having a working computer like this. Starting with a guide on building logic gates from transistors it will eventually cover the arithmetic logic unit, adders, memory, clocks, and everything else that is needed for the complete CPU to get up and running. The design does rely on an Arduino for memory to simplify some things, and in the end it’s able to run a Hello, World! program and play a simple dinosaur game as well.
Building a computer out of discrete components like this is an impressive accomplishment, although we might not envy the creator of it when it comes time for troubleshooting or maintenance of all of those individual components. Presumably it would be much easier to work on than something like a relay computer, but for now we’ll all take a moment to be thankful that almost no one needs to work on debugging vacuum tube computers anymore.
TMD-3: Clever Hall Sensor Hack Leads To Better Turing Demo
We’ll beat everyone to the punch: yes, actually building a working Turing machine, especially one that uses a Raspberry Pi, is probably something that would have pushed [Alan Turing]’s buttons, and not in a good way. The Turing machine is, above all else, a thought experiment, an abstraction of how a mechanical computing machine could work. Building a working one seems to be missing the point.
Thankfully, [Michael Gardi] has ignored that message three times now, and with good reason: some people just grok abstract concepts better when they can lay their hands on something and manipulate it. His TMD-1 was based on 3D printed tiles with embedded magnets — arranging the tiles on a matrix containing Hall effect sensors programmed the finite state machine, with the “tape” concept represented by a strip of eight servo-controlled flip cards. While TMD-1 worked fine, it had some limitations, which [Mike] quickly remedied with TMD-2, a decidedly more complicated affair that used a Raspberry Pi, a camera, and OpenCV to read an expanded state machine with six symbols and six states, without breaking the budget on all the Hall sensors required.
TMD-3 refines the previous design, eschewing the machine vision approach and returning to the Hall effect roots of the original. But instead of using three sensors per tile, [Mike] determined that one sensor would suffice as long as he could mount the magnet at different depths within each tile. That way, the magnetic field for each symbol could be discerned by a single Hall sensor, greatly reducing complexity and expense. An LCD screen and a Raspberry Pi run a console app that shows the tape status, the state machine, and the state transitions.
[Mike] put a ton of work into this one — there are nineteen project logs — and he includes a lot of useful tips and tricks, like designing PCBs directly in KiCAD before even having a schematic. Of course, with a track record like his, we’d expect nothing less.
Continue reading “TMD-3: Clever Hall Sensor Hack Leads To Better Turing Demo”
Chromebooks Now Get Ten Years Of Software Updates
It’s an acknowledged problem with the mobile phone industry and particularly within the Android ecosystem, that the operating system support on a typical device can persist for far too short a time, leaving the user without critical security updates. With the rise of the Chromebook, this has moved into larger devices, with schools and other institutions left with piles of what’s essentially e-waste.
Now in a rare show of sense from a tech company, Google have announced that Chromebooks are to receive ten years of updates from next year. Even better, it seems that this will be retroactively applied to at least some older machines, allowing owners to opt in to further updates for the remainder of the decade following the machine’s launch.
Of course, a Chrome OS upgrade on an older machine won’t make it any quicker. We’re guessing many users will feel the itch up upgrade their hardware long before their decade of software support is up. But anything which saves e-waste has to be applauded, and since this particular scribe has a five-year-old ASUS Transformer just out of support, we’re hoping for a chance to jump back on that train.
There’s another question though, and it relates to the business model behind Chromebooks. We doubt that the hardware manufacturers are thrilled at their customers’ old machines receiving a new lease of life and we doubt Google are doing this through sheer altruism, so we’re guessing that the financial justification comes from an extra five years of making money from the users’ data.


