Fail of the Week is a recurring Hackaday column that highlights the power of learning from things that simply didn’t work right. Help keep the fun rolling by writing about your past failures and sending us a link to the story — or sending in links to fail write ups you find in your Internet travels.
[B Arnold] is hearing voices and needs help from the Hackaday community. But before any of you armchair psychiatrists run off to WebMD, rest assured that [B Arnold] suffers not from schizophrenia but rather has an RF coupling problem.
The project (which isn’t posted yet) is an attempt to turn a C.H.I.P into an Amazon Echo, for which [B Arnold] needed an audio amplifier. Turning to the junk bin, he unearthed an LM386, that venerable power amp chip that first appeared in the mid-70s. Dead simple and able to run off a 9-volt battery, the LM386 that has found its way into thousands of commercial products and countlesshacks.
Shortly after applying power to the amp, [B Arnold] started hearing things – faint, far-off voices, scratchy but discernible. A bit of repositioning of wires and hands improved the signal enough for a station ID – an FM talk radio station on 97.1 MHz. [B Arnold] doesn’t mention the call sign, but it might have been KFTK out of St. Louis, Missouri; in any case, it would be helpful to know the range from the transmitter to the inadvertent receiver. Two low-fidelity audio clips are included below for your listening pleasure – you’ll want your headphones on, and Sample 2 is better than Sample 1 – as are photos of the offending circuit.
What do you think is going on here? We’ve heard of RF coupling of AM radio stations before, but how would FM signals be making it into this circuit and out of the speaker? Is there anything [B Arnold] did wrong to get this result? Sound off in the comments and let us know your horror stories of RF coupling.
Would you use your tech prowess to cheat at the Pinewood Derby? When your kid brings home that minimalist kit and expects you to help engineer a car that can beat all the others in the gravity-powered race, the temptation is there. But luckily, there are some events that don’t include the kiddies and the need for parents to assume the proper moral posture. When the whole point of the Pinewood Derby is to cheat, then you pull out all the stops, and you might try building an electrodynamic suspension hoverboard car.
Fortunately for [ch00ftech], the team-building Derby sponsored by his employer is a little looser with the rules than the usual event. Loose enough perhaps to try a magnetically levitating car. The aluminum track provided a perfect surface to leverage Lenz’s Law. [ch00ftech] tried different arrangements of coils and drivers in an attempt to at least reduce the friction between car and track, if not outright levitate it. Sadly, time ran out and physics had others ideas, so [ch00ftech], intent on cheating by any means, tried spoofing the track timing system with a ridiculous front bumper of IR LEDs. But even that didn’t work in the end, and poor [ch00f]’s car wound up in sixth place.
So what could [ch00ftech] had done better? Was he on the right course with levitation? Or was spoofing the sensors likely to have worked with better optics? Or should he have resorted to jet propulsion or a propeller drive? How would you cheat at the Pinewood Derby?
Fail of the Week is a Hackaday column which celebrates failure as a learning tool. Help keep the fun rolling by writing about your own failures and sending us a link to the story — or sending in links to fail write ups you find in your Internet travels.
There are times when you set out to do one thing, and though you do not achieve your aim you succeed in making something else that’s just a bit special. [TheKhakinator] sent us something he described as a fail, but even though we’re posting it as one of our Fail Of The Week series we think the result still has something of the win about it. It may not be the amazing hack he hoped it would become, but that really does not matter in this case.
On his travels in China his attention was caught by an everyday electronic gadget, an electronic calculator that speaks the numbers and operations in Chinese as you use it. He bought a few of them, hoping that when he got them back to his bench he’d find an EEPROM containing the samples, which he could replace with his own for a cheap but low bitrate sampler.
Sadly this neat hack was not to be, for when he tore the surprisingly well-built calculators down he found only an epoxy blob concealing a single chip. All was not lost though, for while investigating the device’s features he discovered that as well as speaking Chinese numbers and operands it also had a selection of alarm tunes built-in, plus a mode in which it operated as a rudimentary electronic organ. He leaves us with a couple of videos we’ve posted below the break, first his teardown, and then a virtual orchestra of calculators playing dance music as he forgets the fail and concentrates on the win.
Is it possible to recycle failed 3D prints? As it turns out, it is — as long as your definition of “recycle” is somewhat flexible. After all, the world only needs so many coasters.
To be fair, [Devin]’s experiment is more about the upcycling side of the recycling equation, but it was certainly worth undertaking. 3D printing has hardly been reduced to practice, and anyone who spends any time printing knows that it’s easy to mess up. [Devin]’s process starts when the colorful contents of a bin full of failed prints are crushed with a hammer. Spread out onto a properly prepared (and never to be used again for cookies) baking sheet and cooked in the oven at low heat, the plastic chunks slowly melt into a thin, even sheet.
[Devin]’s goal was to cast them into a usable object, so he tried to make a bowl. He tried reheating discs of the material using an inverted metal bowl as a form but he found that the plastic didn’t soften evenly, resulting in Dali-esque bowls with thin spots and holes. He then flipped the bowl and tried to let the material sag into the form; that worked a little better but it still wasn’t the win he was looking for.
In the end, all [Devin] really ended up with is some objets d’art and a couple of leaky bowls. What else could he have done with the plastic? Would he have been better off vacuum forming the bowls or perhaps even pressure forming them? Or does the upcycling make no sense when you can theoretically make your own filament? Let us know in the comments how you would improve this process.
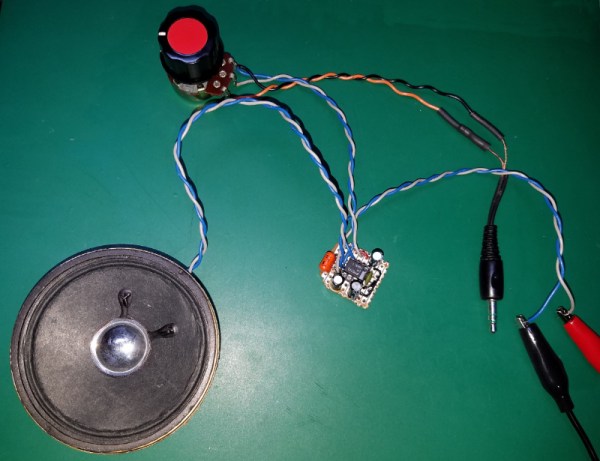
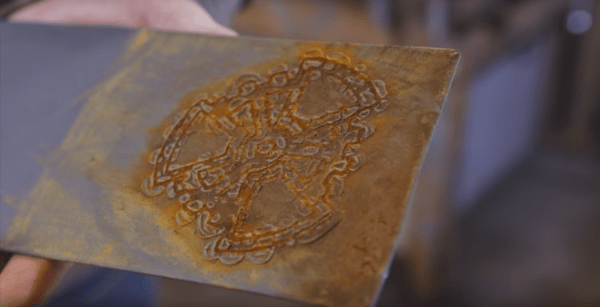
[NightHawkInLight] wants what may be the impossible – a dirt cheap replacement for a laser cutter or a water jet. He’s got this crazy idea about using electrolysis to etch sheet steel parts, but he just can’t get the process to work. Sounds like a job for the Hackaday community.
In theory, electrolytic cutting of metal is pretty simple to understand. Anyone who lives in the northeast of the USA knows all about how road salt can cut holes in steel given enough time – say, one winter into payments on that new car. Adding a few electrons to the mix can accelerate the process of removing metal, but doing so in a controlled manner seems to be the crux of [NightHawkInLight]’s problem.
In his research into the method, he found a 2010 video by [InterestingProducts] of etching reed valves for DIY pulse jet engines from spring steel that makes it look easy. [NightHawkInLight] deviated from the reed valve process by substituting baking soda for salt to avoid the production of chlorine gas and changed up the masking technique by using different coatings. We applaud the empirical approach and hope he achieves his goal, but we tend to agree with frequent-Hackaday-tipline-project notable [AvE]’s assessment in the YouTube comments – the steel is just too darn thick. Once the etching starts, a third dimension is created at 90° to the surface and is then available to electrolyze, causing the corrosion to extend under the masking.
What does the Hackaday hive mind think? Is there any way to fix this process for thicker steel stock? Narrower traces, perhaps? Somehow modulating the current in the tank? Perhaps using the Hackaday logo would have helped? Chime in down below in the comments, and maybe we can all throw out our laser cutters.
“I wasted a weekend learning why elemental bismuth is not commonly used for metal parts.“
It’s a fair assessment of his time spent growing unspectacular bismuth crystals, casting a bismuth cylinder that cracked, and machining bismuth only to be left with a very rough finish. But even though he admits the exercise was unsuccessful, he does provide us with a fascinating look at the physical properties of the element.
This is what [David] wanted to make. Alchemist-hp + Richard Bartz with focus stack. (Own work) [CC BY-SA 3.0], via Wikimedia Commons
Bismuth is one of those elements you pass by in your school chemistry lessons, it has applications in machining alloys and as a lead replacement but most of us have never knowingly encountered it in the real world. It’s one of the heavy metals, below antimony and to the right of lead on the Periodic Table. Curious schoolchildren may have heard that like water it expands on solidifying or that it is diamagnetic, and most of us have probably seen spectacular pictures of its crystals coated in colourful iridescent oxides.
It was a Hackaday story about these crystals that attracted [David] to the metal. It has a low enough melting point – 271.5 °C – that it can be liquified on a domestic stove, so mindful of his marital harmony should he destroy any kitchen appliances he bought a cheap electric ring from Amazon to go with his bismuth ingot. and set to work.
His first discovery was that cheap electric rings outdoors aren’t very effective metallurgy furnaces. Relocating to the kitchen and risking spousal wrath, he did eventually melt his bismuth and pick off the top layer once it had resolidified, to reveal some crystals.
These are the bismuth crystals he made.
Unfortunately for him, instead of spectacular colors and huge crystals, the sight that greeted him was one of little brilliance. Small grey crystals with no iridescence. It seems the beautiful samples are made by a very slow cooling of the liquid bismuth, followed by a quick pouring off of the remaining molten metal. Future efforts, he assures us, will involve sand-insulated molds and careful temperature monitoring.
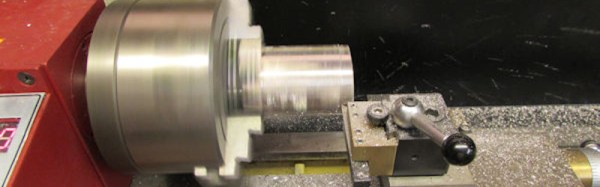
Undeterred, he continued with his stock of bismuth and embarked on the creation of a cylinder. Early efforts with a clay mold resulted in cracked cylinders, so in desperation he cast the entirety of the metal in an aluminium baking tray and cut the resulting ingot to a rough piece of stock for turning.
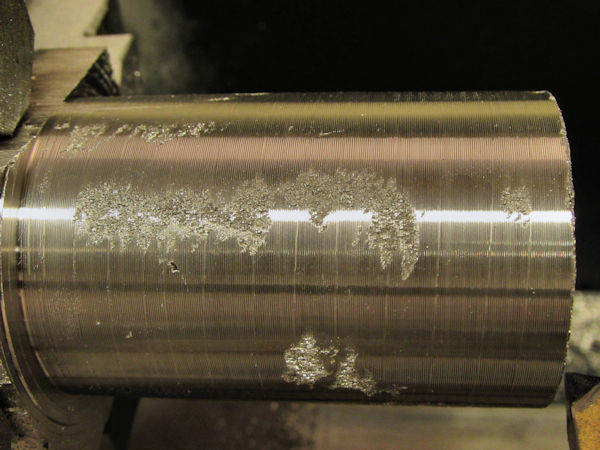
Poor finish on machined bismuth.
With the bismuth in the lathe, he then came face to face with what he alluded to in his conclusion above, why machined bismuth parts aren’t something you’ll encounter. His cylinder came out with significantly rough patches on the surface, because bismuth is both crystalline and brittle. He suggests improvements could be made if the metal could be solidified with fewer crystals, but it’s obvious that elemental bismuth on its own is not a winner in the turning stakes.
We suggest you take a look at [David]’s write-up. It may be presented as a Fail of The Week here, but in fact it’s more of a succession of experiments that didn’t work than an unmitigated disaster. The result is an interesting and well-documented read that we’re sure most Hackaday readers will gain something from.
Fail of the Week is a Hackaday column which celebrates failure as a learning tool. Help keep the fun rolling by writing about your own failures and sending us a link to the story -- or sending in links to fail write ups you find in your Internet travels.
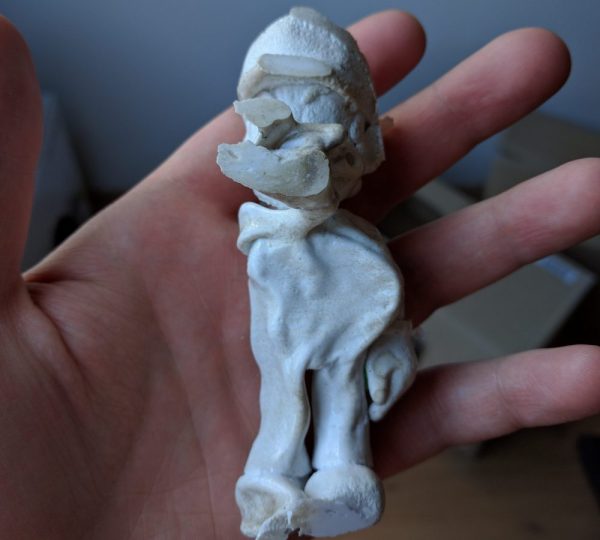
Many of the Fail Of The Week stories we feature here are pretty minor in the grand scheme of things. At worse, gears are ground, bits are broken, or the Magic Blue Smoke is released. This attempt to smooth a 3D print released far more than a puff of blue smoke, and was nearly a disaster of insurance adjuster or medical examiner proportions.
Luckily, [Maxloader] and his wife escaped serious injury, and their house came out mostly unscathed. The misadventure started with a 3D printed Mario statue. [Maxloader] had read acetone vapor can smooth a 3D print, and that warming the acetone speeds the process. Fortunately, his wife saw the looming danger and wisely suggested keeping a fire blanket handy, because [Max] decided to speed the process even more by putting a lid on the pot. It’s not clear exactly what happened in the pot – did the trapped acetone vapors burp the lid off and find a path to the cooktop burner? Whatever it was, the results were pretty spectacular and were captured on a security camera. The action starts at 1:13 in the video below. The fire blanket came in handy, buying [Max] a few seconds to open the window and send the whole flaming mess outside. Crisis averted, except for nearly setting the yard on fire.
What are we to learn from [Maxloader]’s nearly epic fail? First, acetone and open flame do not mix. If you want to heat acetone, do it outside and use an electric heat source. Second, a fire extinguisher is standard household equipment. Every house needs at least one, and doubly so when there’s a 3D printer present. And third, it’s best to know your filaments – the dearly departed Mario print was in PLA, which is best smoothed with tetrahydrofuran, not acetone.
Anything else? Feel free to flame away in the comments.

 Fail of the Week is a Hackaday column which celebrates failure as a learning tool. Help keep the fun rolling by writing about your own failures and

![This is what [David] wanted to make. Alchemist-hp + Richard Bartz with focus stack. (Own work) [CC BY-SA 3.0], via Wikimedia Commons](https://hackaday.com/wp-content/uploads/2016/08/bi-crystal.jpg)

 Fail of the Week is a Hackaday column which celebrates failure as a learning tool. Help keep the fun rolling by writing about your own failures and