A weld bead laid down with homemade CO2

Cooking Up A Batch Of Homebrew Welding Gas

You know the feeling — you’re making good progress on a weekend project, you’re really in the groove, things are going right. Right up until you run out of That One Thing™ that you can’t do without, the only store that sells it is closed, and you get a sudden case of whiplash as your progress hits a virtual brick wall.

Of course, every challenge holds the opportunity to hack your way around it, which is how [Lucas] ended up building this carbon dioxide generator. The “IG” in MIG welding stands for the “inert gas” that floods the weld pool and keeps the melted metal — the “M” in MIG — from rapidly oxidizing and ruining the weld. Welders often use either straight CO2 or a mix of CO2 and argon as a MIG shielding gas, which they normally get from a commercial gas supplier, generally on non-weekend days.

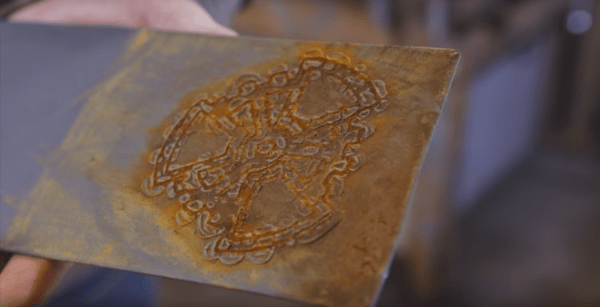
[Lucas] turned to grade-school chemistry for his CO2 generator, using the vigorous reaction of baking soda and vinegar to produce the gas. Version one was sketchy as all get-out; the second iteration still had some sketch factor thanks to the use of ABS pipe, but the inclusion of a relief valve should prevent the worst from happening. After some fiddling with how to get the reagents together in a controlled fashion, [Lucas] was able to generate enough CO2 to put down a decent bead — a short one, to be sure, but the video below shows that it worked.

Could this be scaled up to something for practical use? Probably not. But it’s cool to see what’s possible, and something to file away for a rainy day. And maybe [Lucas] can use this method to produce CO2 for his homemade laser tube. But again, probably not.

Continue reading “Cooking Up A Batch Of Homebrew Welding Gas”

DIY Closed-Cell Silicone Foam

Most of us have a junk drawer, full of spare parts yanked from various places, but also likely stocked with materials we bought for a project but didn’t use completely. Half a gallon of wood glue, a pile of random, scattered resistors, or in [Ken]’s case, closed-cell silicone foam. Wanting to avoid this situation he set about trying to make his own silicone foam and had a great degree of success.

Commercial systems typically rely on a compressed gas of some sort to generate the foam. Ken also wanted to avoid this and kept his process simple by using basic (pun intended) chemistry to generate the bubbles. A mixture of vinegar and baking soda created the gas. After a healthy amount of trial and error using silicone caulk and some thinner to get the mixture correct, he was able to generate a small amount of silicone foam. While there only was a bit of foam, it was plenty for his needs. All without having a stockpile of extra foam or needing to buy any specialized equipment.

We appreciate this project for the ingenuity of taking something relatively simple (an acid-base reaction) and putting it to use in a way we’ve never seen before. While [Ken] doesn’t say directly on the project page what he uses the foam for, perhaps it or a similar type of foam could be used for building walk-along gliders.

Photo via Wikimedia Commons

Hacking Broken Plastic Parts Without A 3D Printer

We’ve all encountered the odd plastic part that is broken and unobtainable. Sure, 3D printers can print big replacement parts, but sometimes you just need to rebuild a very specific piece. [AkBkukU] shows off a technique for doing just that using a process you could almost call manual 3D printing. We’ve seen baking soda used to cure cyanoacrylate glue before, but this technique uses it to build layers of glue that are apparently quite solid.

There’s quite a bit of nuance in the video below, but the basic idea is to put a pile of soda on one side of a piece of tin foil and a glob of glue. You dip the part in glue and then into the soda. Each time you get a little thicker layer of glue.

Afterward, you’ll have to file and otherwise shape the new part, but the fact that it can survive being filed should tell you something. We were reminded of how some people use epoxy to form repair parts and then machine them to the exact shape needed. At the very end of the video he builds up layers on a part he can’t dip. Did it work? Watch it and see.

In addition to the manual 3D printing technique, he demonstrates using baking soda to cure repairs on a knurled knob from an old clock radio. That’s a bit more conventional, but if you haven’t seen it done before, it is nearly miraculous.

Glue is amazing. We’ve seen hot glue do injection molding. There are many more types out there, too.

Continue reading “Hacking Broken Plastic Parts Without A 3D Printer”

Fail Of The Week: Cutting Steel With Baking Soda

[NightHawkInLight] wants what may be the impossible – a dirt cheap replacement for a laser cutter or a water jet. He’s got this crazy idea about using electrolysis to etch sheet steel parts, but he just can’t get the process to work. Sounds like a job for the Hackaday community.

In theory, electrolytic cutting of metal  is pretty simple to understand. Anyone who lives in the northeast of the USA knows all about how road salt can cut holes in steel given enough time – say, one winter into payments on that new car. Adding a few electrons to the mix can accelerate the process of removing metal, but doing so in a controlled manner seems to be the crux of [NightHawkInLight]’s problem.

In his research into the method, he found a 2010 video by [InterestingProducts] of etching reed valves for DIY pulse jet engines from spring steel that makes it look easy. [NightHawkInLight] deviated from the reed valve process by substituting baking soda for salt to avoid the production of chlorine gas and changed up the masking technique by using different coatings. We applaud the empirical approach and hope he achieves his goal, but we tend to agree with frequent-Hackaday-tipline-project notable [AvE]’s assessment in the YouTube comments – the steel is just too darn thick. Once the etching starts, a third dimension is created at 90° to the surface and is then available to electrolyze, causing the corrosion to extend under the masking.

What does the Hackaday hive mind think? Is there any way to fix this process for thicker steel stock? Narrower traces, perhaps? Somehow modulating the current in the tank? Perhaps using the Hackaday logo would have helped? Chime in down below in the comments, and maybe we can all throw out our laser cutters.

Continue reading “Fail Of The Week: Cutting Steel With Baking Soda”

Camry Battery

Fixing A Toyota Camry Hybrid Battery For Under Ten Dollars

[scoodidabop] is the happy new owner of a pre-owned Toyota Camry hybrid. Well at least he was up until his dashboard lit up like a Christmas tree. He did some Google research to figure out what all of the warning lights meant, but all roads pointed to taking his car into the dealer. After some diagnostics, the Toyota dealer hit [scoodidabop] with some bad news. He needed a new battery for his car, and he was going to have to pay almost $4,500 for it. Unfortunately the car had passed the manufacturer’s mileage warranty, so he was going to have to pay for it out-of-pocket.

[scoodidabop] is an electrician, so he’s obviously no stranger to electrical circuits. He had previously read about faulty Prius batteries, and how a single cell could cause a problem with the whole battery. [scoodidabop] figured it was worth testing this theory on his own battery since replacing a single cell would be much less expensive than buying an entire battery.

He removed the battery from his car, taking extra care not to electrocute himself. The cells were connected together using copper strips, so these were first removed. Then [scoodidabop] tested each cell individually with a volt meter. Every cell read a voltage within the normal range. Next he hooked up each cell to a coil of copper magnet wire. This placed a temporary load on the cell and [scoodidabop] could check the voltage drop to ensure the cells were not bad. Still, every cell tested just fine. So what was the problem?

[scoodidabop] noticed that the copper strips connecting the cells together were very corroded. He thought that perhaps this could be causing the issue. Having nothing to lose, he soaked each and every strip in vinegar. He then wiped down each strip with some steel wool and placed them into a baking soda bath to neutralize the vinegar. After an hour of this, he reassembled the battery and re-installed it into his car.

It was the moment of truth. [scoodidabop] started up his car and waited for the barrage of warning lights. They never came. The car was running perfectly. It turned out that the corroded connectors were preventing the car from being able to draw enough current. Simply cleaning them off with under $10 worth of supplies fixed the whole problem. Hopefully others can learn from this and save some of their own hard-earned money.

Adult Sized Baking Powder Submarine

baking-powder-submarine

It really doesn’t matter what age you are, we’re sure you remember baking powder submarines. That’s because cereal manufacturers have been including them as prizes since the advent of injection molded plastic. Fill them with baking soda and take them in the bath with you. They gently dive and surface. The problem is that the cereal prizes were tiny. Now you can relive your childhood with an adult size version of your own making.

The submarine is basically a hunk of PVC with a conning tower to keep it upright and a chunk of hose into which the baking powder is placed. The idea is that the powdery acid and base that makes up the stuff reacts when hit with water. This gives off a bit of carbon dioxide, which makes the sub float to the surface until the bubble escapes and is replaced with water to again sink the ship. The difficult part is to find the right buoyancy (using wine bottle cork) so that the bubble is all it takes to oscillate between the surface and the watery depths.

Watch it go in the video after the break.

Continue reading “Adult Sized Baking Powder Submarine”