Modern smartphones, even the budget models, are extremely impressive pieces of technology. Powerful ARM processors, plenty of RAM, and an incredible number of sensors and radios are packed into a device that in some cases are literally given away for free when you sign up for a service plan. Unfortunately manufacturers are not obligated to keep up with software updates, and while the hardware may be willing to keep on fighting, the user is often pushed to upgrade due to perennially outdated software. Even if you aren’t the kind of person to be put off by using a phone that doesn’t have the latest and greatest OS, the lack of software security updates pose a clear threat in a world where mobile devices are increasingly targeted by attackers.
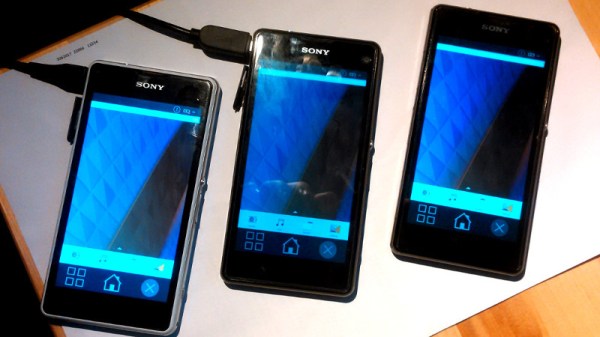
But what if the operating system on your phone worked more like the on one your computer? That’s the dream of postmarketOS, a Linux distribution created by [Oliver Smith] that is designed to be installed on outdated (mostly Android) smartphones and tablets. He’s recently made a comprehensive blog post about the state of the project a little over 6 months since it started, and we have to say things are looking very impressive so far.
 One of the key goals of postmarketOS is to avoid the fragmented nature of previous attempts at replacing Android with a community-developed operated system. By avoiding binary blobs and focusing on getting the mainline Linux kernel running on as much as the hardware as possible, there’s no need to make different forks and releases for each supported device. By unifying the OS as much as far as it can be, an upstream update can be pushed to all devices running postmarketOS regardless of their make and model, just like with traditional Linux distributions.
The blog post shows two things very clearly: that the community is extremely excited and dedicated to the prospect of running what is essentially desktop Linux on old smartphones and tablets, and that postmarketOS still has a long way to go. In these early days, many devices aren’t what could be considered “daily drivers” by most standards. In fact, the blog post mentions that they’ve decided to abandon the term “supported” when talking about devices, and make no claims beyond the fact that they will boot.
Still, incredible progress is being made on everything from mainline kernel development to getting standard Linux desktops such as Gnome, MATE and XFCE4 running. Work has also been done on the backend process of compiling and packaging up components of the operating system itself, promising to speed up development times even for those who don’t have a beefy machine they can dedicate to compiling. The blog post ends with a helpful list of things the reader can do to help support postmarketOS, ranging from making your own t-shirts to porting to new hardware.
At Hackaday we’ve seen our fair share of hackers and makers re-purposing old smartphones and tablets, keeping them out of the landfills they would almost certainly end up in otherwise. A project that aims to make it even easier to hack these cheap and incredibly useful devices is music to our ears.