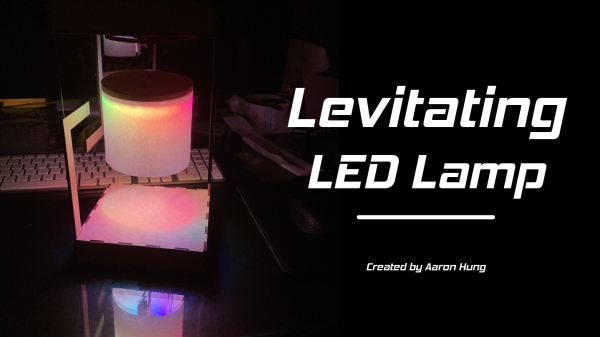
Rise And Shine With This Japanese-Inspired Clock

On the Hackaday.io page for his gorgeous “Sunrise Alarm Clock”, [The Big One] is quick to point out that his design is only inspired by Japanese lanterns, and does not use authentic materials or traditional woodworking techniques. Perhaps that’s an important fact to some, but we’ll just say that the materials used seem far less important when the end result looks this good.

Unfortunately [The Big One] hasn’t provided any interior shots of his clock, as it sounds like the aesthetics of the internal wiring isn’t quite up to the standard set by the outside of it. But he has provided a concise parts list, a wiring diagram, and source code, so we’ve got a pretty good idea of what’s under the hood.

The clock is powered by the uBBB 32u4, an ATMega32u4 development board that [The Big One] developed in conjunction with [Warren Janssens]. It uses the popular MAX7219 LED matrix for the display, and a DS3231 RTC module to help keep the time. There’s also a DFPlayer Mini module onboard that allows him to play whatever sound effects or music he wants when the alarm goes off.

Of course the star of the show is the LED strips which illuminate the shōji-style column. These have apparently been wrapped around a coffee can of all things, which not only serves as a convenient way of holding the strips, but [The Big One] says actually makes the speaker sound a bit better. Hey, whatever works.

This isn’t the first “lantern” clock to grace these pages, but compared to the high-tech presentation of previous projects, we can’t help but be impressed by the grace and elegance of this wooden masterpiece.

IR Hack Turns Kid’s Lamp Into Temp Display

Sometimes a clever hack of an off-the-shelf product can come courtesy of its dismantling and hardware modification, but at other times the most elegant of hacks can be made without ever turning a screwdriver. [Brian Lough] was given the request by a friend to replicate a commercial child’s night light that changed colour with temperature, and his response was to use an off-the-shelf colour changing kids light unmodified, sending it temperature-related colour commands via its infra-red control.

His device is a spectacularly simple one hardware-wise using an off-the-shelf Wemos D2 Mini ESP8266 board running an Arduino bootloader, coupled with a BME280 temperature sensor, IR receiver, and transmitter. His video which we’ve placed below the break is a handy primer to anyone with an interest in infra-red reverse engineering, and we can see that there will be other projects that could be seeded by it. For those curious enough to look, it can be found on GitHub.

[Brian] has appeared here so many times, and is definitely worth a follow. One of his more recent builds featured another child’s toy augmented to make it something really special.

Continue reading “IR Hack Turns Kid’s Lamp Into Temp Display”

An ESP32 Clock With A Transforming LED Matrix

Over the years we’ve seen countless ways of displaying the current time, and judging by how many new clock projects that hit the tip line, it seems as though there’s no end in sight. Not that we’re complaining, of course. The latest entry into the pantheon of unusual timepieces is this ESP32-powered desk clock from [Alejandro Wurts] that features a folding LED matrix display.

The clock uses eight individual 8 x 8 LED arrays contained in a 3D printed enclosure that hinges in the middle. When opened up the clock has a usable resolution of 8 x 64, and when its folded onto itself the resolution becomes 16 x 32.

This variable physical resolution allows for alternate display modes. When the hardware detects that its been folded into the double-height arrangement, it goes into a so-called “Big Clock” mode that makes it easier to see the time from a distance. But while in single-height mode, there’s more horizontal real estate for adding the current temperature or other custom data. Eventually [Alejandro] wants to use MQTT to push messages to the display, but for now it just shows his name as a placeholder.

The key to the whole project is the hinged enclosure and the reed switch used to detect what position it’s currently in. Beyond that, there’s just an ESP32 an some clever code developed with the help of the MD_Parola library written for MAX7219 and MAX7221 LED matrix controllers. [Alejandro] has published the code for his clock, which should be helpful for anyone who’s suddenly decided that they also need a folding LED matrix in their life.

Now if the ESP32 LED matrix project you have in mind requires full color and high refresh rates, don’t worry, we’ve got a solution for that.
Continue reading “An ESP32 Clock With A Transforming LED Matrix”

The Basics Of Persistence Of Vision Projects

Persistence of Vision (POV) is a curious part of the human visual system. It’s the effect by which the perception of an image lingers after light has stopped entering the eye. It’s why a spinning propeller appears as a disc, and why a burning sparkler appears to leave a trail in the air. It’s also commonly used as a display technology, where a series of flashing LEDs can be used to create messages that appear to float in the air. POV displays are a popular microcontroller project, and today, we’ll explore the basic techniques and skills required in such builds.

Continue reading “The Basics Of Persistence Of Vision Projects”

24 Hours Of Temperature Data At A Glance

In an era where we can see the current temperature with just a glance at our smartphones, the classic “Time and Temp” gadget sitting on the desk doesn’t have quite the same appeal. The modern weather fanatic demands more data, which is where this gorgeous full-day temperature display from [Richard] comes in.

The display, built inside of a picture frame, shows the temperature recorded for every hour of the day. If the LED next to the corresponding hour is lit that means the value displayed is from the current day, otherwise it’s a holdover from the previous day’s recordings. This not only makes sure all 24 LED displays have something to show, but gives you an idea of where the temperature might be trending for the rest of the day. Naturally there’s also a display of the instantaneous temperature (indoor and outdoor), plus [Richard] even threw in the current wind speed for good measure.

In the video after the break, [Richard] briefly walks us through the construction of his “Thermo Logger”, which reveals among other things that the beautiful panel art is nothing more exotic than a printed piece of A4 paper. The video also features a 3D model of the inside of the device which appears to have been created through photogrammetry; perhaps one of the coolest pieces of project documentation we’ve ever seen. We’ll just throw this out there: if you want to ensure that your latest build makes the front page of Hackaday, pop off that back panel and make some decent quality 3D scans.

Given the final result, it should come as no surprise to find that this isn’t the first incredible weather display that [Richard] has built. We previously covered another weather monitoring creation of his that needed two seperate display devices to adequately display all the data it was collecting.

Continue reading “24 Hours Of Temperature Data At A Glance”

Light Emitting Logic Gates Built From Scratch

What’s the weirdest computer you can think of? This one’s weirder.

[Dr. Cockroach] figured out a way to create an inverting NOT gate from just one LED and two resistors (one being a photo-resistor). The Dr. has since built AND, NAND, OR, NOR, XOR and XNOR gates, as well as a buffer, incorporating light into every logic gate.

Traditional inverters – NOT gates – are already made with diodes (typically not light-emitting), resistors (typically not light-dependent), and bipolar transistors. The challenge was to reduce the number of transistors. The schematic from the very first test shows the slight modifications [Dr. Cockroach] made to incorporate light into the logic gate using a 910 Ohm, output LED, and an LED and LDR in parallel.

The output is initially 4.5V for logic 1 and 1.5V for logic 0. Adding two 1N914 diodes and an AND gate ahead of the inverter create a two-input NAND gate. With the two diodes reversed and a 910 Ohm resistor removed, a NOR gate is created.

The next step was to build a S-R latch using the NAND gates and inverters, which holds some basic memory. From there, with some size reductions, a Master-Slave J-K Flip Flop, similarly using NAND gates and inverters, can be built. The current state of the project is a working sequencer and counter. You can even see a smooth sine wave propagating through the LED chaser, which is typically built with ICs or transistors but in this case is built simply with LEDs, LDRs, resistors, and capacitors.

The upcoming plan is to use the gates to build a processor that only uses diodes, resistors, and capacitors. While it’s probably not going to be nearly as fast as any processors we have today, it should be interesting (and educational!) to be able to visually track the flow of data from one logic gate over to the next. Continue reading “Light Emitting Logic Gates Built From Scratch”

Storm Cloud Lamp Brings The Weather Inside

The humble lamp is a common build for a hacker looking to express themselves creatively. Often, nature can serve as an inspiration, as was the case for [Michael Pick]’s Storm Cloud. (Video, embedded below.)

Electronically, the build is straightforward, consisting of an Arduino Uno, an MP3 shield, and a string of WS2801 LEDs. These are driven slightly differently than the more-common WS2812B type, but Adafruit libraries make it easy for even the beginner. There’s also an RF keyfob fitted for remote control of the device, and a voice synth that serves as a user interface.

The video also covers the construction of the body of the lamp. Cardboard forms are created, then covered in tape to create a rough 3D ovaloid shape. This mold is then fiberglassed to create two shells, which are later joined together with bolts. This allows the LEDs and electronics to be neatly mounted inside. Spray adhesive is then used to affix what appears to be cotton wool or polyfill stuffing to the outside to create the cloud effect.

The final result is rather aesthetically pleasing. There’s the usual soft-glowing rainbows as you’d expect, but the real highlight is storm mode, which causes flickers of lighting to scatter across the surface of the cloud. The accompanying sound effects from the MP3 shield help add to the drama.

We’ve seen other takes on a cloud lamp before, too. Video after the break.

Continue reading “Storm Cloud Lamp Brings The Weather Inside”