Build A DSLR Photo Booth The Easy Way

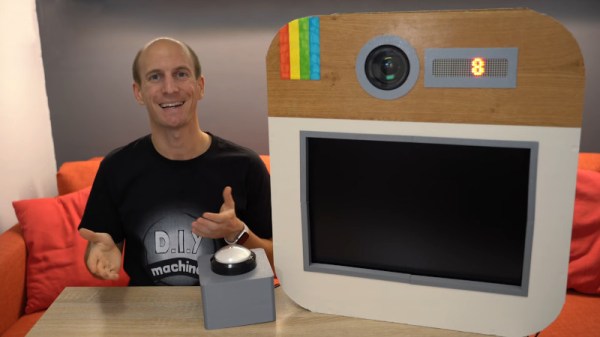
It’s a well-known fact in capitalist societies that any product or service, if being used in a wedding, instantly triples in cost. Wanting to avoid shelling out big money for a simple photo booth for a friend’s big day, [Lewis] decided to build his own.

Wanting a quality photo output, a Canon DSLR was selected to perform photographic duties. An Arduino Nano is then pressed into service to run the show. It’s hooked up to a MAX7219 LED matrix which feeds instructions to the willing participants, who activate the system with a giant glowing arcade button. When pressed, the Nano waits ten seconds and triggers the camera shutter, doing so three times. Images are displayed on a screen hooked up to the camera’s USB HDMI port.

It’s a build that keeps things simple. No single-board PCs needed, just a camera, an Arduino, and a monitor for the display. We’re sure the wedding-goers had a great time, and we look forward to seeing what [Lewis] comes up with next. We’ve seen a few of his hacks around here before, too.

Continue reading “Build A DSLR Photo Booth The Easy Way”

[Fran] Is Helping Santa Slay This Year

We know at least one person who ought to make Santa’s ‘nice’ list this year. [Fran] was probably near the top of it already, but sending Santa a handmade greeting card with a fully-functioning guitar amp inside will probably make him rewrite her name in glitter, or silver Sharpie.

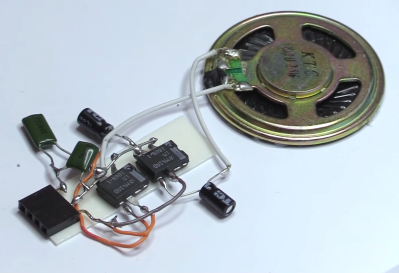
This stocking stuffer-sized amp is based around the LM386 and the bare minimum components necessary to make it rock. Everything is dead-bug soldered and sandwiched between two pieces of card stock. The first version with a single 386 sounded okay, but [Fran] wanted it louder, so she added another stage with a second 386. [Fran] glued the rim of the speaker directly to the card so it can act like a cone and give a better sound than the speaker does by itself.

All Santa needs to rock out is his axe and a small interface made of a 1/4″ jack and a 9 V wired to a 3-pin header that plugs into the card. He can take a break from Christmas music and let some of those cookies digest while he jams. Be sure to check out the build video after the break if you want to stay off the ‘naughty’ list.

Want to make your own musical greeting card? If you can program an ATtiny85, you won’t need much more than that to send a smile. If visual art is more your thing, 3D print them a 2D picture.

Continue reading “[Fran] Is Helping Santa Slay This Year”

Hackaday Links Column Banner

Hackaday Links: December 22, 2019

It’s hard to believe it, but the Raspberry Pi has been on the market for only seven years now. The single-board computer has become so entrenched in the hobby electronics scene that it’s hard to imagine life without it, or what we did before it came along. And with the recent announcement that the 30 millionth Raspberry Pi was recently manufactured, now we have some clarity on the scale of its success. Just roll that number around in your head for a bit – that’s one Pi for every nine or so people in the USA. Some of the other facts and figures in the linked article boggle the mind too, like Eben Upton figured they’d only ever sell about 10,000 units, or that the factory in Wales where most Pis are made can assemble 15,000 units a day.

Speaking of manufacturing, have you ever considered what goes into getting a small-scale manufactured product ready for shipping? The good folks over at Gigatron know all about the joys of kitting, and have put together an interesting un-unboxing video for their flagship TTL-only retro computer. It’s a nice riff on the unboxing videos that are somehow popular on YouTube these days, and shows just how much effort they put into getting a Gigatron out the door. All told, it takes about an hour to ship each unit, and the care put into the process is evident. We especially like the part where all the chips are placed into antistatic foam in the same orientation they’ll be on the completed board. Nice touch.

Last time we checked in on the Lulzbot saga, the open source 3D printer manufacturer had been saved from complete liquidation by a company named FAME 3D. Now we’re getting the first solid details about where things go from here. Not only will thirteen of the remaining Lulzbot employees be staying on, but FAME 3D plans to hire 50 new employees to get operations back up as quickly as possible. The catch? The “F” in FAME 3D stands for Fargo, North Dakota, where Fargo Additive Manufacturing Equipment 3D is based. So Lulzbot will be moving north from Loveland, Colorado in the coming months.

For the last few years, adventure travelers making the pilgrimage to Shenzhen to scour the electronics markets have stuffed a copy of Andrew “Bunnie” Huang’s The Essential Guide to Electronics in Shenzhen into their soon-to-be-overflowing backpacks. The book is a goldmine of insider information, stuffed with maps and translation tables critical for navigating a different culture with no local language skills. Bunnie’s book has only been available in dead-tree format and now that all but the last few copies have been sold, he decided to make a web version available for free. We’d have to think a tablet or phone would be a bit harder to use in the heat of negotiation than the nice spiral-bound design of the print copy, but the fact that the insider information will now be widely available probably makes this a net positive.

And finally, if you’ve ever nearly been run over by an EV or hybrid silently backing out of a parking space, you’ll no doubt appreciate attempts to legislate some sort of audible presence to these vehicles. But what exactly should an electric vehicle be made to sound like? Volkswagen has begun to address that question, and while you can certainly read through the fluff in their press release, all you really need to do is listen to the sample. We’ve got to say that they pretty much nailed what a car of the future should sound like. Although they might have missed a real opportunity here.

Listen To Your Feet, They Have A Lot To Tell You

[Umar Qattan] is in tune with his sole and is trying hard to listen to what it has to say.

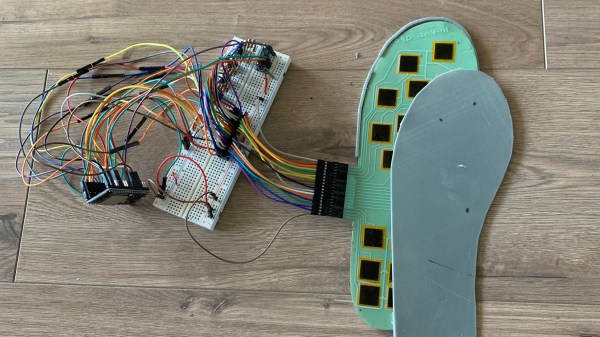
At a low level, [Umar] is building an insole with an array of force sensors in it. These sensors are affixed to a flexible PCB which is placed in a user’s shoe. A circuit containing a ESP32, IMU, and haptic feedback unit measure the sensors and send data back to a phone or a laptop.

What’s most interesting are the possibilities opened by the data he hopes to collect. The first application he proposes is AR/VR input. The feedback from the user’s feet plus the haptics could provide all sorts of interesting interaction. Another application is dynamically measuring a user’s gait throughout the day and exercise. People could save themselves a lot of knee pain with something like this.

[Umar] also proposes that an insert like this could record a user’s weight throughout the day. Using the data on the weight fluctuation, it should be possible to calculate someone’s metabolism and hydration from this data.

DIY Electric Roller Bender Can Handle The Thick(er) Stuff

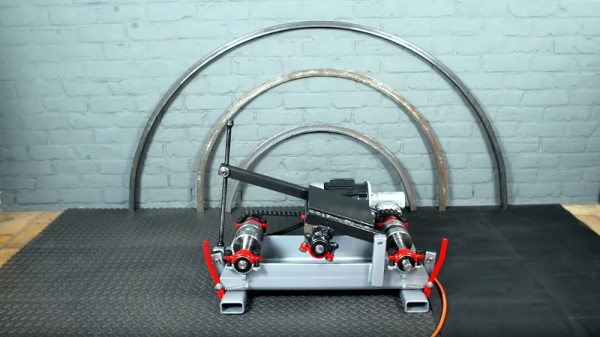
Every serious metal worker will end up getting themself a roller bender at some point, but if you’re as dedicated as [Meanwhile in the Garage], you might just start building the things yourself. His heavy-duty electric roller bender, demonstrated in the video after the break, is perfect for the thicker steel and bigger radii his smaller manual machine can’t handle.

The basic concept is the same in both machines, with two fixed rollers and a third adjustable opposing one between them. Most of the components are pieces of scrap metal, and each shaft runs on bearings mounted in homemade pillow blocks. The two fixed shafts are connected together by a chain drive, and a scrap industrial motor provides the rotating power through a worm gearbox.  There are two adjustable bushings on each shaft to keep the work piece aligned. The lead screw from an old car jack is used to adjust the position of the moving roller.

We picked up a few interesting tips from the video, like how to properly align a cylindrical workpiece in a drill press for drilling radial holes.  He also used toggle switches as limit switches in a pretty ingenious way, and F-clamps on the work piece to activate them when it reaches the end.

Building your own tools at home is a time-honoured hacking tradition, which we have never seen a shortage of here on Hackaday. Check out this DIY drill press and vertical CNC mill.

Is That Cheap Multimeter As Good As A Fluke? Let’s Find Out

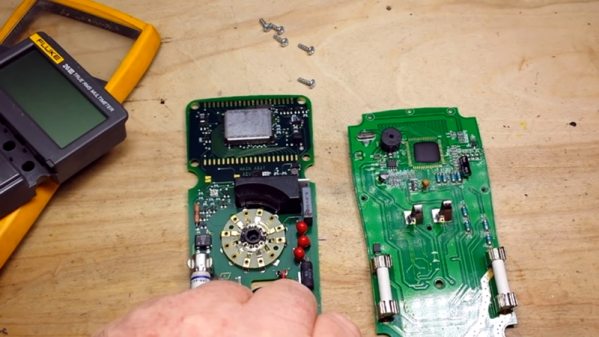
When [learnelectronics] talks about cheap meters, he always says, “If you are doing this for a living, get yourself a Fluke.” But he realized he’s never shown the inside of a Fluke meter, so he rectified that in his most recent post. For comparison, he opens up a Fluke 26-III and an Aneng AN870 (retailing at about $500 and $30, respectively).

The initial opening shows that the Fluke has hefty brand name fuses, but the Aneng has little generic fuses. In addition, the Fluke has an internal case that helps keep you away from live voltage. The Fluke also has a proper rotary switch, while the cheap meter has a switch that is etched on the PC board; a cost-cutting trick that’s often a point of failure on these cheap meters.

The Fluke also has a significantly larger number of protection devices and heftier components, you presume can take more punishment. Of course, if you don’t have a few hundred volts running through your meter, it probably doesn’t matter. The cheap meters are certainly good enough, even though you do get what you pay for, as you might expect.

As long as you have a meter open, you might as well hack it to have WiFi. Or, if you prefer, a serial port.

Continue reading “Is That Cheap Multimeter As Good As A Fluke? Let’s Find Out”

Arcade Buttons Make A Great Multimedia Keyboard

[Giovanni Bernardo] has a very important job – managing the audio for several Christmas events. Desiring a simple and effective control interface, he designed a dedicated media keyboard to run the show.

The project began with an Arduino Leonardo, commonly used in projects that aim to create a USB Human Interface Device. [Giovanni] then installed the HID-Project library from [Nicohood]. This was used to enable the device to emulate media buttons typically found on keyboards, something the standard Arduino HID libraries were unable to do. It’s a useful tool, and one that can be implemented on even standard Arduino Unos when used in combination with the HoodLoader2 bootloader.

For ease of use and a little bit of cool factor, arcade buttons were used for the media functions. Simple to wire up, cheap, and with a great tactile feel, they’re a popular choice for fun human interface projects. It’s all wrapped up in a neat plastic box with Dymo labels outlining the functions. It’s a neat and tidy build that should make running the Christmas show a cinch!