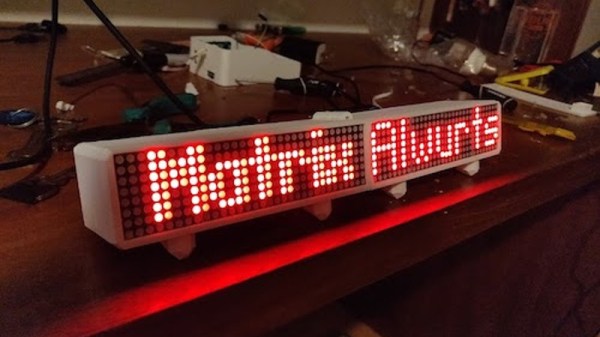
You’ll Never See The End Of This Project

…theoretically, anyway. When [Quinn] lucked into a bunch of 5 mm red LEDs and a tube of 74LS164 shift registers, a project sprang to mind: “The Forever Number,” a pseudo-random number generator with a period longer than the age of the universe. Of course, the components used will fail long before the sequence repeats, but who cares, this thing looks awesome!

Check out the gorgeous wire-wrapping job!

The core of the project is a 242-bit linear-feedback shift register (LFSR) constructed from (31) 74LS164’s. An XOR gate and inverter computes the next bit of the sequence by XNOR’ing two feedback bits taken from taps on the register, and this bit is then fed into bit zero. Depending on which feedback taps are chosen, the output sequence will repeat after some number of clock cycles, with special sets of feedback taps giving maximal lengths of 2N – 1, where N is the register length. We’ll just note here that 2242 is a BIG number.

The output of the LFSR is displayed on a 22×11 array of LEDs, with the resulting patterns reminiscent of retro supercomputers both real and fictional, such as the WOPR from the movie “War Games,” or the CM2 from Thinking Machines.

The clock for this massive shift register comes from – wait for it – a 555 timer. A potentiometer allows adjustment of the clock frequency from 0.5 to 20 Hz, and some extra gates from the XOR and inverter ICs serve as clock distribution buffers.

We especially love the construction on this one. Each connection is meticulously wire-wrapped point-to-point on the back of the board, a relic originally intended for an Intel SBC 80/10 system. This type of board comes with integrated DIP sockets on the front and wire-wrap pins on the back, making connections very convenient. That’s right, not a drop of solder was used on the board.

You can see 11 seconds of the pattern in the video after the break. We’re glad [Quinn] didn’t film the entire sequence, which would have taken some 22,410,541,156,499,040,202,730,815,585,272,939,064,275,544, 100,401,052,233,911,798,596 years (assuming a 5 Hz clock and using taps on bits 241 and 171 ).

Continue reading “You’ll Never See The End Of This Project”

CNC Turns A Single PCB Into Origami Hemisphere

Trying to make a hemispherical surface out of a PCB is no easy feat. Trying to do that and make the result a working circuit is even harder. Doing it with one solid piece of FR4 seems impossible, right?

Not so much. [brainsmoke] came up with a clever way to make foldable, working PCBs that can be formed into hemispheres. The inspiration for this came from a larger project that resulted in a 32-cm diameter LED-studded sphere, which a friend thought would make a swell necklace if it was scaled down. That larger sphere was made somewhat like a PCB soccer ball, with individual panels soldered together. [brainsmoke] didn’t relish juggling dozens of tiny PCBs to make a necklace-sized version, so the unfolded pattern for half a deltoidal hexecontahedron was laid out as one piece on single-sided FR4. The etched boards were then cut out on a CNC mill, with the joints between the panels cut as V-grooves from the rear of the board. By leaving just enough material to act as a live hinge, [brainsmoke] was able to fold the pattern up into a hemisphere while leaving the traces intact. The process was fussy and resulted in a lot of broken FR4 and traces, but with practice and the use of thicker board material and heavier copper, the hemisphere came together. The video below shows the final product

This objet d’art is [brainsmoke]’s entry in the Circuit Sculpture Contest, which is just wrapping up wrapped up last week. We can’t wait to share some of the cool things people came up with in this contest, which really seemed to get the creative juices flowing.

Continue reading “CNC Turns A Single PCB Into Origami Hemisphere”

Hot Glue Makes These Segments Glow

It’s safe to say that hot-melt glue is a staple of the projects we see here at Hackaday. There won’t be many readers who don’t have a glue gun, and a blob of the sticky stuff will secure many a project. But it’s not so often we see it used as an integral component for a property other than its stickiness, so [DusteD]’s reaction timer project is interesting for having hot glue as a translucent light guide and diffuser for its LED seven-segment display.

The timer is simple enough, being driven by an Arduino board, while the display is pre-formed into the 3D-printed case. The hot glue fills the enclosures behind each segment, and after several experiments it was found that the best filling method was from behind against a piece of Kapton tape. The LEDs were wired into a common cathode array, and along with the arcade-style button and the Arduino the whole fitted neatly in the box. You can see the result in action in the video below the break.

Of course, this display is unusual for its use of hot glue, but not unique. We’ve seen a different take on a hot glue light pipe display before.

Continue reading “Hot Glue Makes These Segments Glow”

Addressable 7-Segment Displays May Make Multiplexing A Thing Of The Past

[Sean Hodgins] has a knack for coming up with simple solutions that can make a big difference, but this is one of those “Why didn’t I think of that?” things: addressable seven-segment LED displays.

[Sean]’s design is basically a merging of everyone’s favorite Neopixel RGB LED driver with the ubiquitous seven-segment display. The WS2811 addressable RGB driver chip doesn’t necessarily have to drive three different color LEDs – it can drive three segments of the same display. With three of the chips on a single board, all seven segments plus the decimal point of a display can be controlled over a single data line. No more shift registers, no more multiplexing. And as a nice touch, individual displays can be ganged together with connectors on the back of each module. [Sean] has some code to support the display but is looking for someone to build a standalone library for it, so you might want to pitch in. Yes, he plans to sell the boards in his shop, but as with all his projects, this one is open source and everything you need to build your own is up on GitHub. The brief video below shows a few daisy-chained displays in action.

Like many of [Sean]’s designs, including this Arduino rapid design board, this is a simple way to get a tedious job done, and it wrings a lot of functionality from a single IO pin.

Continue reading “Addressable 7-Segment Displays May Make Multiplexing A Thing Of The Past”

WiFi Remote Control Those Cheap LED Strips With An ESP8266 Passthrough

The explosion of cheap LED lighting products has given a never-ending array of opportunities for the resourceful hacker. A few dollars can secure strings of colourful illumination, but without further expenditure they lack the extra utility of electronic control. This is something that [Albert David has addressed] with his simple ESP8266-based WiFi switcher that he’s added to a string of USB-powered LEDs, and he’s neatly mounted the ESP-12 module it used atop a USB plug.

The circuitry is pretty straightforward, with only a couple of I/O lines being used. A transistor takes care of the heavy lifting, and the software comes courtesy of the Tasmota firmware for Sonoff (and similar) devices. We suspect with this economy of connection, the same task could be achieved even with the limited resources provided by the lesser ESP-01 module.

There was a time not so long ago when performing a task such as controlling a light over a wireless network involved significant cost, power, and complexity. In the nearly five years since we reported on the arrival of the ESP8266 we have progressed to the point at which that task is a simple project using commodity components, and that represents something of a miracle.

Infinity Cube Is Gorgeous Yet Simple

Typically when we hear the words “LED” and “Cube”, we think of small blinking devices on protoboard designed to flex one’s programming and soldering skills. However, while [Heliox]’s Cube Infini could be described as “a cube of LEDs”, it’s rather a different beast (video in French, subtitles available).

The cube starts with a 3D printed frame, designed in Fusion 360. The devil really is in the details — [Heliox] puts in nice touches, such as the artistic cube relief on the base, and the smart integrated cable management in the edges. The faces of the cube are plexiglass sheets, covered with a one-way reflective film that is applied in a similar manner to automotive window tint. For lighting, a high-density LED strip is fitted to the inside edges, chosen for maximum visual effect. It’s controlled by an IR remote and a cheap control module from Amazon.

While the build contains no particularly advanced tools, materials, or techniques, the final result is absolutely stunning. It’s a piece we’d love to have as a lamp in a stylish loungeroom or study. [Heliox] does a great job of explaining how the cube is designed and fits together, and it’s a testament to just what can be achieved with a little ingenuity and hard work.

Once you’re done here, check out this ping-pong based build.

Continue reading “Infinity Cube Is Gorgeous Yet Simple”

Freeforming The Atari Punk Console

This stunning piece of art is [Emily Velasco’s] take on the Atari Punk Console. It’s a freeform circuit that synthesizes sound using 555 timers. The circuit has been around for a long time, but her fabrication is completely new and simply incredible!

This isn’t [Emily’s] first rodeo. She previously built the mini CRT sculpture project seen to the left in the image above. Its centerpiece is a tiny CRT from an old video camera viewfinder, and it is fairly common for the driver circuit to understand composite video. And unlike CRTs, small video cameras with composite video output are easily available today for not much money. Together they bring a piece of 1980s-era video equipment into the modern selfie age. The cubic frame holding everything together is also the ground plane, but its main purpose is to give us an unimpeded view. We can admire the detail on this CRT and its accompanying circuitry representing 1982 state of the art in miniaturized consumer electronics. (And yes, high voltage components are safely insulated. Just don’t poke your finger under anything.)

With the experience gained from building that electrically simple brass frame, [Emily] then stepped up the difficulty for her follow-up project. It started with a sound synthesizer circuit built around a pair of 555 timers, popularized in the 1980s and nicknamed the Atari Punk Console. Since APC is a popular circuit found in several other Hackaday-featured projects, [Emily] decided she needed to add something else to stand out. Thus in addition to building her circuit in three-dimensional brass, two photocells were incorporated to give it rudimentary vision into its environment. Stimulus for this now light-sensitive APC were provided in the form of a RGB LED. One with a self-contained circuit to cycle through various colors and blinking patterns.

These two projects neatly bookend the range of roles brass rods can take in your own creations. From a simple frame that stays out of the way to being the central nervous system. While our Circuit Sculpture Contest judges may put emphasis the latter, both are equally valid ways to present something that is aesthetic in addition to being functional. Brass, copper, and wood are a refreshing change of pace from our standard materials of 3D-printed plastic and FR4 PCB. Go forth and explore what you can do!

Continue reading “Freeforming The Atari Punk Console”