70 LED Matrix In A Jack-o-lantern

What takes eight hours to solder and uses more shrink tubing that you thought imaginable? An LED matrix installed in a real pumpkin. When I mentioned that we’d like the LED pumpkin in last Friday’s post scaled up to a full LED matrix I had no idea it would be me doing the work. But [Caleb] and I thought it might be just the thing to present for the hacker’s favorite holiday.

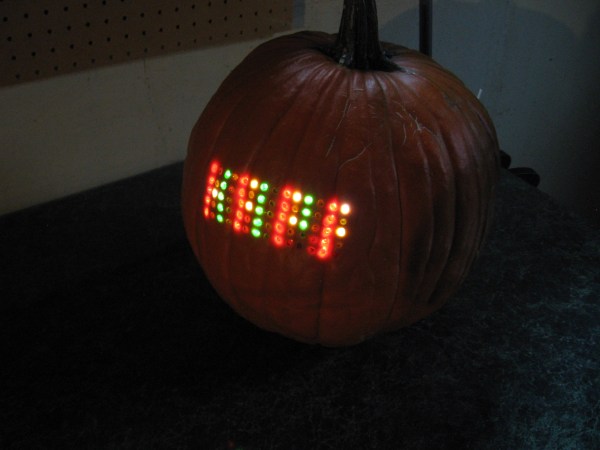
Installed in the autumn vegetable is a marquee made from a 5×14 matrix of light emitting diodes. I spaced them by printing out a grid on the computer, taping it to the pumpkin, and drilling 70 holes in the front of the thing. The real trouble came when inserting all of the LEDs from the inside; each of them has four wires soldered to it, creating a net of black wiring. Above you can see it turned out great. This is a shot of it scrolling the message HAPPY HALLOWEEN.

Join us after the break for video of this prop. But we’re not just sharing the finished product. I’ll take you through the build process. Along the way you’ll learn the design considerations that go into an LED matrix and how you can use these techniques to build your own in any size and configuration you desire.

Continue reading “70 LED Matrix In A Jack-o-lantern”

AVR Programming 02: The Hardware

You may be able to write the most eloquent code in the history of embedded systems but without a way to run it on the hardware it will be worthless. In this installment of the tutorial series we will:

  • Look at some of the available AVR programmer options
  • Place the microcontroller on a breadboard and connect it to a power supply and a programmer.
  • Use programming software to send some example code to the microcontroller

If you missed Part 1 take a few minutes to review that portion of the tutorial and then join us after the break.

Series roadmap:

Continue reading “AVR Programming 02: The Hardware”

AVR Programming 01: Introduction

We love looking at hardcore electronics projects with a beefy microcontroller and hundreds, if not thousands, of lines of code at its center. But everyone needs to get there somehow.

This tutorial series aims to make you comfortable programming the Atmel AVR line of microcontrollers. Whether you’ve never touched a microcontroller before, or you’ve cut your teeth with dozens of Arduino projects, this will help you get right down to the hardware and give you the confidence to build anything.

Series roadmap:

Continue reading “AVR Programming 01: Introduction”

RGB LED Headband

Hard to imagine this going on business trips to Shangai

[Johncon] wrote this fantastic instructible showing us how to make an RGB LED headband. This should come in really handy the next time we find ourselves needing one… it happens. He picked up this little RGB LED strip while on a business trip to Shanghai. He had to reverse engineer the chip that controls each pair, but once that was done there wasn’t much left to do. He’s using a picaxe microcontroller since he had some lying around and, as he points out, they require very little external hardware.

He says he’s going to be ordering more of this LED strip soon and is willing to make a group buy if anyone is interested.

[via MakeZine]

Multiple Core Propeller Speeds Up Display Addressing

Th

If you ever wondered what an eight-core Propeller processor can do for you, [Tom] found one answer. He’s using the multiple cores to individually address serial displays. He has six display modules, and each of them incorporate six 8×8 LED modules. This makes for a total of 2304 LEDs, and since they’re addressed by cascading serial data, that means 2304 bytes pushed to the display. You’re going to suffer from quite a bit of slow-down if you choose that communication method.

This is where multiple-cores come in handy. Instead of cascading data between the six modules, he assigned a different core to each. Now he can concurrently address the six displays, reducing his serial data from 2304 bits per frame down to 384 bits per frame. As you can see in the video after the break, updating the display six times as fast as before yields fantastic results.

Now what if you’re using a processor that has forty of these multi-core Propeller chips?

This does make us wonder, can’t the same thing be done on a single-core processor? An eight-bit device takes one cycle to set all eight bits on a single port. So why not just connect the six serial connections on six bits of the same port? Weigh in with your thoughts in the comments.

Continue reading “Multiple Core Propeller Speeds Up Display Addressing”

Propeller Platform Prototyping Board Gets An Upgrade

[Nick] over at Gadget Gangster has a new version of his prototyping hardware for Propeller microcontrollers, called the Propeller Platform USB. A little more than a year ago we looked at the last version which was larger, used a DIP processor, and came unassembled. The new version does come assembled because of the migration to surface mount components (which may take some of the fun out of it if you just love soldering kits). This not only reduces the board footprint, but makes room for more goodies. As the name implies, there’s now a mini-USB socket with a USB to UART bridge, a microSD card slot as been added, and the onboard EEPROM has been doubled. This is a nice hardware upgrade but the price has been upgraded by $25 as well. No worries, it’s open source so you can roll your own if you have the parts on hand.

ARM Prototyping On-the-cheap With STM32 Discovery

STMicroelectronics has another inexpensive development board out; the STM32 Discovery is an ARM Cortex-M3 prototyping platform. Coming in under $10 puts it right along the lines of their 8-bit offering, but this one is 32-bits with 5 KB of RAM and 128 KB of programming memory. It runs a bootloader and has on-board USB for easy programming. They’ve even got a trio of crippled IDE’s to get you started.

Unfortunately this is following a growing trend with the exclusion of Linux support. [Gordon] wrote in to let us know that there is hope in a couple of forms (but not using the USB functionality). The first is a serial programmer using the RS232 that [Paul] came up with (there’s a lot more on his blog so spend some time there). But you can also use the serial debug protocol to program the board.

Either way you’ll still need a method of compiling the code. We’ve had great success rolling our own GNU ARM cross compiler using this guide. Or you can grab a pre-built package by downloading Sourcery G++ lite.