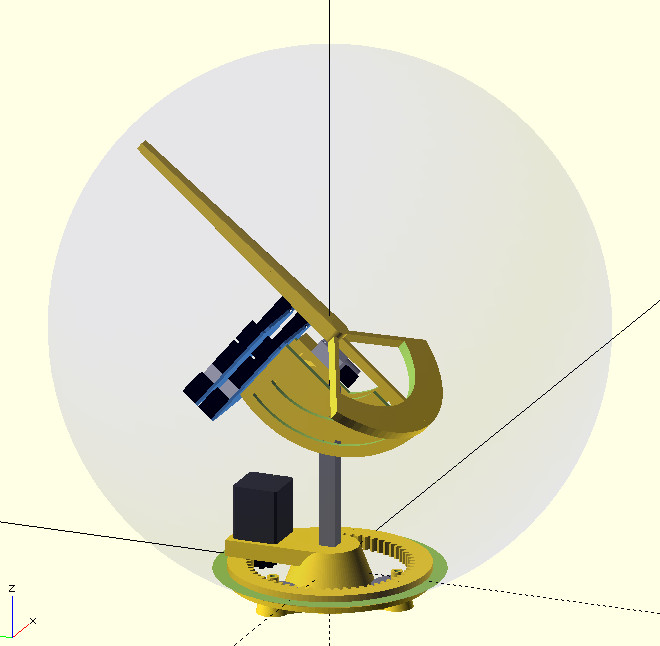
An ESP32 Pomodoro Timer

The Pomdoro technique of time management has moved on a little from the tomato-shaped kitchen timer which gave it a name, as [Rukenshia] shows us with this nifty ESP32 and e-paper design. It’s relatively simple in hardware terms, being a collection of off-the-shelf modules in a 3D printed case, but the software has a custom interface for the friend it was built for.

At its heart is a NodeMCU board and a Waveshare display module, with a rotary encoder and addressable LED as further interface components. A lot of attention has been paid to the different options for the interface, and to make the front end displayed on the screen as friendly and useful as possible. Power comes via USB-C, something that should be available in most working environments here in 2025.

We’ve tried a variant on this technique for a while now with varying success, maybe because a mobile phone doesn’t make for as good a timer as a dedicated piece of hardware such as this. Perhaps we should follow this example. If we did, the Hackaday timer couldn’t possibly use an ESP32.

Pi Pico Turns Atari 2600 Into A Lo-fi Photo Frame

The cartridge based game consoles of decades ago had a relatively simple modus operandi — they would run a program stored in a ROM in the cartridge, and on the screen would be the game for the enjoyment of the owner. This made them simple in hardware terms, but for hackers in the 2020s, somewhat inflexible. The Atari 2600 is particularly troublesome in this respect, with its clever use of limited hardware making it not the easiest to program at the best of times. This makes [Nick Bild]’s Atari 2600 photo frame project particularly impressive.

The 2600 has such limited graphics hardware that there’s no handy frame buffer to place image data into, instead there are some clever tricks evolved over years by the community to build up bitmap images using sprites. Only 64 by 84 pixels are possible, but for mid-70s consumer hardware this is quite the achievement.

In the case of this cartridge the ROM is replaced by a Raspberry Pi Pico, which does the job of both supplying the small Atari 2600 program to display the images, and feeding the image data in a form pre-processed for the Atari.

The result is very 8-bit in its aesthetic and barely what you might refer to as photos at all, but on the other hand making the Atari do this at all is something of a feat. Everything can be found in a GitHub repository.

If new hardware making an old console perform unexpected tricks is your bag, we definitely have more for you.

Continue reading “Pi Pico Turns Atari 2600 Into A Lo-fi Photo Frame”

Metal Detector Built With Smartphone Interface

If you think of a metal detector, you’re probably thinking of a fairly simple device with a big coil and a piercing whine coming from a tinny speaker. [mircemk] has built a more modern adaptation. It’s a metal detector you can use with your smartphone instead.

The metal detector part of the project is fairly straightforward as far as these things go. It uses the pulse induction technique, where short pulses are fired through a coil to generate a magnetic field. Once the pulse ends, the coil is used to detect the decaying field as it spreads out. The field normally fades away in a set period of time. However, if there is metal in the vicinity, the time to decay changes, and by measuring this, it’s possible to detect the presence of metal.

In this build, an ESP32 is in charge of the show, generating the necessary pulses and detecting the resulting field. It’s paired with the usual support circuitry—an op-amp and a few transistors to drive the coil appropriately, and the usual smattering of passives. The ESP32 then picks up the signal from the coil and processes it, passing the results to a smartphone via Bluetooth.

The build is actually based on a design by [Neco Desarrollo], who presents more background and other variants for the curious. We’ve featured plenty of [mircemk]’s projects before, like this neat proximity sensor build. Continue reading “Metal Detector Built With Smartphone Interface”

Three SPI Busses Are One Too Many On This Cheap Yellow Display

The Cheap Yellow Display may not be the fastest of ESP32 boards with its older model chip and 4 MB of memory, but its low price and useful array of on-board peripherals has made it something of a hit in our community. Getting the most out of the hardware still presents some pitfalls though, as [Mark Stevens] found out when using one for an environmental data logger. The problem was that display, touch sensor, and SD card had different SPI busses, of which the software would only recognise two. His solution involves a simple hardware mod, which may benefit many others doing similar work.

It’s simple enough, put the LCD and SD card on the same bus, retaining their individual chip select lines. There’s a track to be cut and a bit of wiring to be done, but nothing that should tax most readers too much. We’re pleased to see more work being done with this board, as it remains a promising platform, and any further advancements for it are a good thing. If you’re interested in giving it a go, then we’ve got some inspiration for you.

World’s Smallest Blinky, Now Even Smaller

Here at Hackaday, it’s a pretty safe bet that putting “World’s smallest” in the title of an article will instantly attract comments claiming that someone else built a far smaller version of the same thing. But that’s OK, because if there’s something smaller than this nearly microscopic LED blinky build, we definitely want to know about it.

The reason behind [Mike Roller]’s build is simple: he wanted to build something smaller than the previous smallest blinky. The 3.2-mm x 2.5-mm footprint of that effort is a tough act to follow, but technology has advanced somewhat in the last seven years, and [Mike] took advantage of that by basing his design on an ATtiny20 microcontroller in a WLCSP package and an 0201 LED, along with a current-limiting resistor and a decoupling capacitor. Powering the project is a 220-μF tantalum capacitor, which at a relatively whopping 3.2 mm x 1.6 mm determines the size of the PCB, which [Mike] insisted on using.

Assembling the project was challenging, to say the least. [Mike] originally tried a laboratory hot plate to reflow the board, but when the magnetic stirrer played havoc with the parts, he switched to a hot-air rework station with a very low airflow. Programming the microcontroller almost seemed like it was more of a challenge; when the pogo pins he was planning to use proved too large for the job he tacked leads made from 38-gauge magnet wire to the board with the aid of a micro hot air tool.

After building version one, [Mike] realized that even smaller components were available, so there’s now a 2.4 mm x 1.5 mm version using an 01005 LED. We suspect there’ll be a version 3.0 soon, though — he mentions that the new TI ultra-small microcontrollers weren’t available yet when he pulled this off, and no doubt he’ll want to take a stab at this again.

Speeding Up Your Projects With Direct Memory Access

Here’s the thing about coding. When you’re working on embedded projects, it’s quite easy to run into hardware limitations, and quite suddenly, too. You find yourself desperately trying to find a way to speed things up, only… there are no clock cycles to spare. It’s at this point that you might reach for the magic of direct memory access (DMA). [Larry] is here to advocate for its use.

DMA isn’t just for the embedded world; it was once a big deal on computers, too. It’s just rarer these days due to security concerns and all that. Whichever platform you’re on, though, it’s a valuable tool to have in your arsenal. As [Larry] explains, DMA is a great way to move data from memory location to memory location, or from memory to peripherals and back, without involving the CPU. Basically, a special subsystem handles trucking data from A to B while the CPU gets on with whatever other calculations it had to do. It’s often a little more complicated in practice, but that’s what [Larry] takes pleasure in explaining.

Indeed, back before I was a Hackaday writer, I was no stranger to DMA techniques myself—and I got my project published here! I put it to good use in speeding up an LCD library for the Arduino Due. It was the perfect application for DMA—my main code could handle updating the graphics buffer as needed, while the DMA subsystem handled trucking the buffer out to the LCD quicksmart.

If you’re struggling with updating a screen or LED strings, or you need to do something fancy with sound, DMA might just be the ticket. Meanwhile, if you’ve got your own speedy DMA tricks up your sleeve, don’t hesitate to let us know!

Checking In On The ISA Wars And Its Impact On CPU Architectures

An Instruction Set Architecture (ISA) defines the software interface through which for example a central processor unit (CPU) is controlled. Unlike early computer systems which didn’t define a standard ISA as such, over time the compatibility and portability benefits of having a standard ISA became obvious. But of course the best part about standards is that there are so many of them, and thus every CPU manufacturer came up with their own.

Throughout the 1980s and 1990s, the number of mainstream ISAs dropped sharply as the computer industry coalesced around a few major ones in each type of application. Intel’s x86 won out on desktop and smaller servers while ARM proclaimed victory in low-power and portable devices, and for Big Iron you always had IBM’s Power ISA. Since we last covered the ISA Wars in 2019, quite a lot of things have changed, including Apple shifting its desktop systems to ARM from x86 with Apple Silicon and finally MIPS experiencing an afterlife in  the form of LoongArch.

Meanwhile, six years after the aforementioned ISA Wars article in which newcomer RISC-V was covered, this ISA seems to have not made the splash some had expected. This raises questions about what we can expect from RISC-V and other ISAs in the future, as well as how relevant having different ISAs is when it comes to aspects like CPU performance and their microarchitecture.

Continue reading “Checking In On The ISA Wars And Its Impact On CPU Architectures”