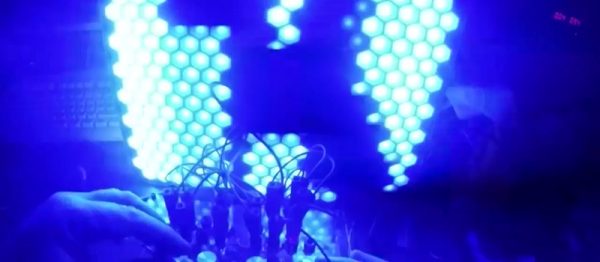
Vintage Stereo Reborn With All The Bells And Whistles

We always like seeing projects that salvage a classic piece of technology, and this one doesn’t disappoint. It’s a vintage kiosk- or console-style stereo, repurposed with every useful feature imaginable, but still made to look original. Until you open the lid, that is.

[Julian] has been hard at work on rebuilding this 1957 RCA stereo, and since he’s no stranger to these types of rebuilds, the results are pretty impressive. Underneath the hood is a 22″ touchscreen running Windows 7 and a Lepai amplifier. The controls for the stereo were placed towards the back, along with USB ports and an RJ45 connector for the computer.

The speakers in the stereo also needed to be replaced. For this, [Julian] used a set of Dayton speakers that worked well enough for this application. After mounting the speakers and all the other hardware in the unit, [Julian] noted that while it isn’t an audiophile’s dream stereo, it was nice to have all of these parts integrated together into something that looks nice. We’d have to agree!

There are a lot of rejuvenated antique stereos around too, like this Bluetooth-enabled tube amp radio, or this Soviet-era handheld, or even this slightly more modern stereo. There’s just something classy about having a vintage-looking thing spruced up with modern technology!

Microcassette Recorders Become A Tape Delay

Long before audio engineers had fancy digital delays, or even crappy analog delays, there were tape delays. Running a tape around in a loop with a record and play head is the basis of the Echoplex and Space Echo, and both of these machines are incredible pieces of engineering.

Microcassette recorders are not, in general, incredible pieces of engineering. They do, however, have a strip of magnetic tape, a record head, and a play head. Put two of them together, and you can build your own tape delay.

The basic principle of a tape delay is simple enough – just run a loop of tape round in a circle, through a record and playback head, record some audio, and send the output to an amplifier. In practice, it’s not that simple. [dogenigt] had to manufacture his own tape loop from microcassettes, a process that took far too long and was far too finicky.

For a control circuit, [dogenigt] is using four audio pots and one linear pot for speed control. The audio pots are responsible for input gain, feedback, the amplitude of the clean signal, and the output of the signal after it’s been run through the delay.

Apart from being one of those builds that’s very dependent on the mechanical skill of the builder, it’s a pretty simple delay unit, with all the electronics already designed for a stripboard layout. You can hear an example of what it sounds like below.

Continue reading “Microcassette Recorders Become A Tape Delay”

SamplerBox Uses Raspberry Pi 2 To Make Music

[JosephErnest] wanted a cost-effective alternative to the commercially available MIDI samplers and expanders on the market. He also wanted to avoid being tethered to a computer all the time. His solution is the SamplerBox, a standalone drop-and-play sampler that costs less than 100 euros to make. Simply insert an SD card with your sample set in WAV format, boot it up, and play it through your keyboard or MIDI controller to your heart’s content!

[JosephErnest] used a Raspberry Pi 2 in the SamplerBox because it provided higher performance. He wasn’t thrilled with the sound quality of its built-in soundcard, so he installed a USB DAC PCM2704 (an older model, but any USB DAC will do) to output the audio. He also installed a USB card reader to make switching SD cards containing sampler sets easier while keeping the Pi 2’s own microUSB card exclusively for the OS and software. Both a DIN MIDI connector and USB are included as MIDI inputs in the design. If you only plan to use a USB, the MIDI connector can be omitted from the build. The software is written in Python and cython which allows the Pi 2 to have over 128-voice polyphony. Users can also create their own sample sets to use with the SamplerBox. Preset changes can be made on the fly. All we need to rock out are some music lessons!

Continue reading “SamplerBox Uses Raspberry Pi 2 To Make Music”

Bringing A Century Stereo Into The 21st Century

Way back in the previous century, people used to use magnetized strips of tape to play music. It might be hard to believe in today’s digital world, but these “cassette” tapes were once all the rage. [Steve] aka [pinter75] recently found a Bang & Olufsen stereo with this exact type of antequated audio playback device, and decided to upgrade it with something a little more modern.

Once the unit arrived from eBay and got an electronic tune-up, [pinter75] grabbed a Galaxy S3 out of his parts drawer and got to work installing it in the old cassette deck location. He used a laser cutter to make a faceplate for the phone so it could be easily installed (and removed if he decides to put the tape deck back in the future).

The next step was wiring up power and soldering the audio output directly to the AUX pins on the stereo. Once everything was buttoned up [pinter75] found that everything worked perfectly, and mounted the stereo prominently on his wall. It’s always great when equipment like this is upgraded and repaired rather than thrown out.

Pendulum MIDI Controller Really Swings

Once in a while, we see a project that makes us want to stop whatever we’re doing and build our own version of it. This time, it’s Modulum, a pendulum-based MIDI controller. It’s exactly what it sounds like. The swinging pendulum acts as a low-frequency oscillator. In the demo video configuration, you can hear it add a watery, dreamlike quality, sort of like a lap steel guitar on LSD.

The pendulum’s motion is detected by four pieces of stretchy, conductive cord. These are wired to an Arduino Nano in a voltage divider fashion. [Evan and Kirk] used the Maxuino library to determine x and y mapping of possible pendular positions as well as perform the necessary MIDI processing. Get your groove on after the break, and check out some of the many other fantastic MIDI controllers we’ve had the pleasure of covering.

Continue reading “Pendulum MIDI Controller Really Swings”

Tiny Robot Jazz

Microcontroller-based projects don’t have to be fancy to be fantastic. Case in point: [r0d0t]’s “Musicomatic: the random jazz machine“. Clever programming and a nice case can transform a few servos and a microcontroller into something delightful.

musicomat_schematicsHardware-wise, there’s really nothing to see here; a speaker and some servos are hooked up to an ATmega328. We think it’s cute to have the microcontroller control its own power supply through a relay, but honestly a MOSFET in place of the relay or better still using the AVR’s shutdown sleep mode would be the way to go.

Nope, where this project shines is the programming. Technically, it might make some of you cringe — full of blocking delays and other coding “taboos”. But none of that matters, because [r0d0t] put his work in where it counts: the music. You simply must hear it for yourself in the clip after the break.

The basis of making music that humans like is rhythm, so [r0d0t] doesn’t leave this entirely to chance. The array “rhythms” has seven beat patterns that get randomly selected. The other thing humans like is predictability and repetition, so choruses and “improvs” repeat as well. All of the random notes are constrained to the pentatonic scale, which keeps it from ever sounding too bad. (The secret sauce of Kenny G.)

In short, [r0d0t] packs a lot of basic music theory into a very basic device, and comes up with something transcendent. We’re a bit reminded of the Yellow Drum Machine robot, and that’s high praise. Both projects are testaments to building something simple and then investing the time and effort into the code to make the project awesome.

For another slice of [r0d0t]’s excellent minimalist pie, check out his take on the classic Snake game: Twisted Snake.

Continue reading “Tiny Robot Jazz”

finger board radius cutter

Router Fixture For Radiusing Guitar Fretboards

Unless you’ve been up close and personal with a guitar, it’s easy to miss that the fretboard (where a guitar player presses on the strings) is not flat. There is a slight curve, the amount of which varies with the type and brand of guitar. There are even guitars with fretboards that have a compound radius that changes from one end to the other.

finger board radius cutter

[Mike] is a guitar builder and needed a way to radius his own fretboards. He did what any other DIYer would, he designed and built a tool to do exactly what he needed. The fretboard radius cutting fixture consists of a new large router base that has a curved bottom. This base rests on two metal pipes and can slide both back and forth in addition to along the new base’s curve. The flat fretboard blank is secured to the fixture below the router and is slowly nibbled away at using a standard straight flute router bit. A little sanding later and [Mike] will be able to keep moving forward on his guitar builds.