Game Boy Camera Cartridge Reversed, Photos Dumped

There’s something magical and nostalgic about extremely low resolution in this era of mega-megapixels on every cell phone. And the Game Boy’s big bulbous camera module just looks so cool. [Robson Couto] didn’t stop at simply using the camera — that’s been done before — but actually reversed the card’s protocol so that he could leave it entirely intact. As you can see from the banner image, it was a success.

A project like this doesn’t get done overnight, and [Robson] drew on a lot of his own previous work as well as the work of others. For instance, he’d already made a board that interfaces Game Boy Paks to his PC through an ATmega32 and a serial port. He’d also written software that understands the card header format on the PC side. So dumping the ROMs contents should be no problem. But of course, it was.

[Robson] could read one bank of memory, but not any of the others. It turns out that the camera pack uses a clock signal that not many other cards use. It took [Robson] some serious work — a lot of it false starts and dead ends — to get this particular part working.

Success!
Success!

If you’re into Game Boy hacking, give [Robson]’s writeup a good read. Also note that he’s got fantastic links to previous research in all of his posts. If you couldn’t care less about keeping the cartridge intact, you can simply interface the camera with a TI calculator, use the camera to transmit Morse code, or simply add a thermal printer for a low-res instant camera with style.

Raspberry Pi 2 Game Boy Brings Sexy Back From 1989

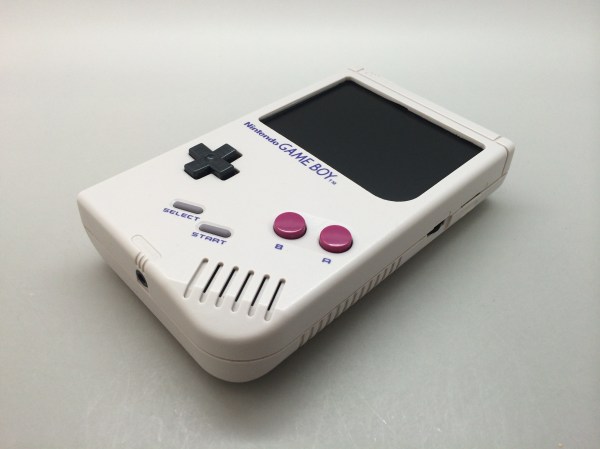
When the ever-versatile Raspberry Pi was released, the potential for cheap video game emulation was immediately obvious. Some of the very first Raspi projects to hit the internet were arcade cabinets, and it wasn’t long until people were making them portable. A purpose-build Linux distort called RetroPie has become very popular specifically because of the Raspi’s game-emulation potential. However, the actual hardware for these emulation systems isn’t always the most aesthetically (or ergonomically) pleasing. That’s where reddit user [Cristov9000] has managed to stand out from the crowd.

[Cristov9000] accomplished this by combining high-quality design (and 3D printing) with the careful use of original Nintendo parts. Game Boy and SNES buttons and elastomers were used to achieve the correct button feel. Other original Game Boy parts, like the volume wheel and power switch, ensure that the system feels as much like 1989 OEM hardware as possible.

Also impressive is the internal hardware, including 3 custom PCBs used to tie everything together to work via the Raspberry Pi 2 GPIO pins. The display is a 3.5″ TFT screen, and with the 6000 mAh it can handle gameplay for more than 7 hours. Other details, like the integrated mono speaker and rear shoulder buttons complete the experience. Combined with the RetroPie and an assortment of emulators, this is one of the most impressive portable gaming builds we’ve seen, especially among a crowded list of awesome raspi-based Game Boy builds.

Introducing The Nintendo Guitar Boy

Need to thrash out some wicked 8-bit riffs? There’s only one guitar you should be doing that with, and it’s a Guitar Boy!

[Fibbef], an administrator on BitFixGaming boards built this as an exhibition piece for his 2015 Game Boy Classic build off. He started the build just three months ago and we have to say we’re impressed. It’s a fully functioning Raspberry Pi Game Boy emulator — and a full fledged electric guitar. The A and B buttons double as volume and tone dials for the guitar, while also being push buttons for the Game Boy!

Under the hood is a Raspberry Pi B+ running RetroPie v2.3, with a 5″ LCD display, custom wooden buttons, the entire body is hand made, and a plexiglass shell covers the whole thing.

Continue reading “Introducing The Nintendo Guitar Boy”

Mythical Game Boy Advance Colors Hacked Into Reality

When it was announced in 2000 at a Nintendo trade show, the Game Boy Advance was clad in beautiful silver plastic, accented with brilliant orange buttons. As is usually the case with product introductions, the first color and style displayed to be public became the most popular. There was one problem with this silver and orange GBA; Nintendo never put it into production. Fast forward fifteen years, and [Michael Choi] decided it was time to make his own silver and orange Game Boy. It’s a great introduction to mold making and very detailed painting, and a useful guide for turning engineering prototypes into beautiful objects.

[Michael]’s build began with an aftermarket shell, painted with Tamiya spray paints. The color is remarkably accurate, considering the only pictures for the silver and orange Game Boy are fifteen years old, and with the right painting technique, these colors are indistinguishable from a properly colored, injection molded piece of plastic.

GBAsquareThe buttons were not as easy as the shell. [Michael] originally decided casting would be the best solution, but after multiple attempts, he couldn’t get the color right. Even with opaque dyes in the resin, the buttons would still come out slightly translucent. In the end, [Michael] decided to paint the original buttons.

This casemod isn’t just about changing the color of the enclosure. [Michael] also wanted is Game Boy to have the backlight found in the second revision clamshell GBA. This was easily acquired on eBay, and with a few slight hardware modifications and a beautiful glass lens to replace the plastic occupying the bezel, [Michael] has a gorgeous Game Boy Advance, taken straight from a press event fifteen years ago.

Mini Fridge Turned Gameboy Puts Hot Games On Ice

The plain old white mini fridge, a staple of many dorm rooms could use a little decoration. The resemblance to a classic gameboy is not that hard to imagine with some novelty stickers, but [ModPurist] went the extra mile with his Cold Boy.

1514387thumbMaking a mini fridge into a playable gameboy involves taking apart the door, once in a Raspberry Pi 2 is fitted in along with a second hand “square screen” LCD. The front of the door is cut for some custom wooden buttons, which are connected to tactile switches. Once everything is fit and finished the door is reassembled, so the fridge can resume its normal life keeping soda and hot dogs good and cold. [ModPurist] covered the progression of the hack in his work log.

While it’s a little low to the ground, it should be a hit at college parties where being on the floor is not unusual. Join us after  the break for a demonstration video and get your game on. It is, of course, missing one thing. There needs to be some type of latch inside to secure the beverages until the Konami code is entered.

Continue reading “Mini Fridge Turned Gameboy Puts Hot Games On Ice”

The Biggest Game Boy Ever?

Feeling nostalgic? Miss the solid feel of an original Nintendo Game Boy? You could smash a window with one and keep playing Pokemon the whole time!  Well, [Raz] was, and he built what might just be the biggest Gameboy ever. Gameboy XXL: The Texas Edition.

Actually, it was commissioned for a Belgian music festival called Nintendoom — picture video game music + rave. Anyway, the organizer thought it would be so cool to have a giant functional Game Boy, so [Raz] got to work. He made it out of 10 square meters of 3mm thick MDF, which he laser cut into shape at the Brussels FabLab. The electronics inside consist of a 19″ LCD monitor, a Raspberry Pi, and a few jumbo size buttons.

It’s pretty freaking awesome. It runs Retropie which allows you to play pretty much whatever game you want. Check it out after the break.

Continue reading “The Biggest Game Boy Ever?”

8-bit Digital Photo Gun

One of the first popular mass-produced digital cameras was the Game Boy camera, a terrible black and white image sensor stuck inside a highly modified Game Boy cartridge. With a Game Boy, the camera, and the Game Boy printer, it was able to produce low-resolution but still surprisingly usable images. Combine all these parts together with the best of hacker art from [vtol] and what do you get? The Game Boy Instant Photo Gun.

There aren’t many details for this build, but it looks like this is an uncased Game Boy Brick, a Game Boy camera, and Game Boy Printer assembled into something that looks dangerous and won’t get past a TSA checkpoint. That might be fixed by repurposing an old NES zapper.

We’ve seen [vtol]’s work before with a machine that probably doesn’t steal your credit card info, a levitating speaker, and something that doesn’t reference [Tarkovsky] enough. This build is right up there with the rest of them.

Thanks [Itay] for the link.