Amateur, or ham radio operators have always been hackers. For much of the early 1900’s, buying a radio was expensive or impossible. Hams would build their own rigs, learning electronics and radio theory along the way. Time moves on, but hams keep hacking. Today we’re highlighting some of the best ham radio projects on Hackaday.io!
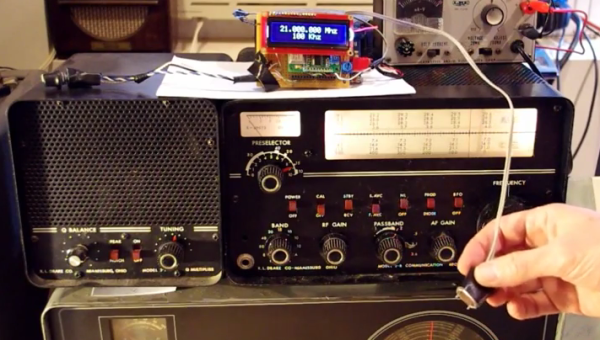
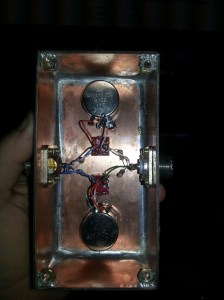
We start with [DainBramage1991] and his very practical RTL-SDR With Upconverter and Case. [DainBramage1991] fell in love with his low-cost RTL software defined radio dongle. He even added a Ham-It-Up upconverter to cover HF bands. The only problem was RF noise. the Realtek USB sticks tend to have little or no filtering, which means they are very susceptible to noise. [DainBramage1991] used the time-honored technique of insulating with copper clad board. Bits of PCB hold the RTL-SDR and upconverter in place. More PCB separates the two boards. Everything goes into a steel enclosure which keeps that unwanted RF at bay.
 Next up is [Ryan Miller’s aka KG7HZQ]’s ham radio fox hunt attenuator. Ham radio fox hunt’s don’t involve baying dogs or horses. In this case a fox hunt is a contest to find hidden low power transmitters. If you’ve never tried one, it’s a heck of a lot of fun. One of the challenges with a fox hunt is to find the direction to the transmitter when you’re very close. Even with directional antennas, reflections and swamped receivers make it hard to figure out just where the transmitter is. The solution is an attenuator, which simply reduces the signal to a more reasonable value. [Ryan] also used copper clad PCB for his circuit. Since the attenuator parts are soldered directly to the PCB, this is more of a Manhattan style design. Two ceramic 1k pots help him achieve his goal of near perfect linear attenuation. We’re betting this attenuator will help [Ryan] win some contests!
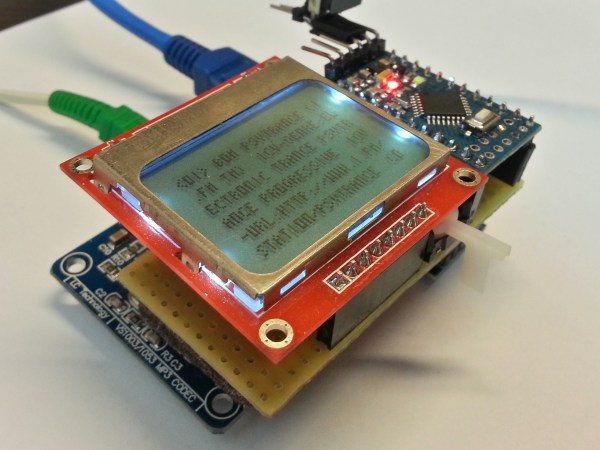
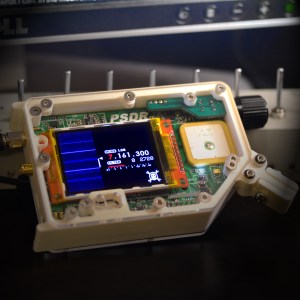 Who says amateur radio won’t take you places? It may well be taking [Michael R Colton] to space! [Michael’s] project PortableSDR is one of the five finalists in The Hackaday Prize. We covered Michael earlier in the contest. PortableSDR started as a ham radio project: a radio system which would be easy for hams to take with them on backpacking trips. It’s grown into so much more now, with software defined radio reception and transmission, vector network analysis, antenna analysis, GPS, and a host of other features. We seriously love how [Michael] optimized a small LCD for waterfall display, tuning, and bandpass filter adjustment.
 [W5VO] is working on an Ethernet to Radio Adapter. Every foot of coax in a radio system loses signal. Connections are even worse. It can all add up to several dB loss. [W5VO] wants to put an SDR at the antenna feed-point. With the signal path minimized, more watts make it out when transmitting, and more signal gets back to the receiver when listening. The interface between the SDR and host computer will be all digital; Ethernet to be precise. [W5VO] isn’t the first person to do something like this, microwave systems have had the transmitter and LNB at the antenna for years. That doesn’t take away from [W5VO’s] design at all He’s been quiet for a while, but we’re hoping he continues on his design!
Where is everyone else? We’re a bit light on projects this week, but we have a good reason. There just aren’t enough ham radio projects on Hackaday.io! We’re hoping to change that though. Are you an amateur radio enthusiast? Document your project on the site. Get input from other hams and push the envelope! You might even find yourself on the Ham Radio List!
That’s all for this episode of The Hacklet. As always, QRX is next week. Same hack time, same hack channel, bringing you the best of Hackaday.io! 73’s!