SNES Controller Has A Pi Zero In The Trunk

We’re no stranger to seeing people jam a Raspberry Pi into an old gaming console to turn it into a RetroPie system. Frankly, at this point it seems like we’ve got to be getting close to seeing all possible permutations of the concept. According to the bingo card we keep here at Hackaday HQ we’re just waiting for somebody to put one into an Apple Bandai Pippin, creating the PiPi and achieving singularity. Get it done, people.

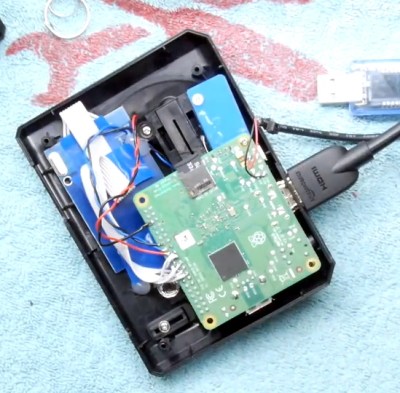
That being said, we’re still occasionally surprised by what people come up with. The Super GamePad Zero by [Zach Levine] is a fairly compelling take on the Pi-in-the-controller theme that we haven’t seen before, adding a 3D printed “caboose” to the stock Super Nintendo controller. The printed case extension, designed by Thingiverse user [Sigismond0], makes the controller about twice as thick, but that’s still not bad compared to modern game controllers.

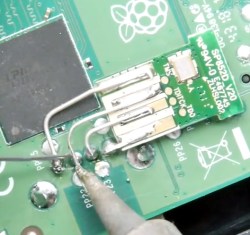
In his guide [Zach] walks the reader through installing the Raspberry Pi running RetroPie in the expanded case. This includes putting a power LED where the controller’s cable used to go, and connecting the stock controller PCB to the Pi’s GPIO pins. This is an especially nice touch that not only saves you time and effort, but retains the original feel of the D-Pad and buttons. Just make sure the buttons on your donor controller aren’t shot before you start the build.

Adding a little more breathing room for your wiring isn’t the only reason to use the 3D printed bottom, either. It implements a very clever “shelf” design that exposes the Pi’s USB and HDMI ports on the rear of the controller. This allows you to easily connect power and video to the device without spoiling the overall look. With integrated labels for the connectors and a suitably matching filament color, the overall effect really does look like it could be a commercial product.

The SNES controller is an especially popular target for hacks and modifications. From commercially available kits to the wide array of homebrew builds, it there’s plenty of people who want to keep this legendary piece of gaming gear going strong into the 21st century

Continue reading “SNES Controller Has A Pi Zero In The Trunk”

The Smaller, More Powerful Raspberry Pi 3 Model A+

It’s that time of year again, and the Raspberry Pi Foundation has some new hardware for you. This time, it’s an improved version of the Raspberry Pi Model A, bringing it the speed and power of its bigger brother, the Raspberry Pi Model 3 B+.

The Raspberry Pi Model A is the weird middle child of the Raspberry Pi lineup, or maybe it’s the Goldilocks choice. It’s not as powerful and doesn’t have the USB ports or Ethernet jack found in the latest revision of the family, the Raspberry Pi Model 3 B+, and it’s not as small or as cheap as the Raspberry Pi Zero W. If you’re running a Pi as just something that takes in power and spits out data on the GPIO pins, the Model A might be all you need.

The full specs include:

  • Broadcom BCM2837B0 Cortex A-53 running at 1.4GHz
  • 512 MB of LPDDR2 SRAM
  • 2.4 GHz and 5 GHz 802.11 b/g/n/ac wireless LAN, Bluetooth 4.2/BLE
  • Full size HDMI
  • MIPI DSI display port / CSI camera port
  • Stereo Output and composite video port

In short, we’re looking at a cut-down version of the Raspberry Pi Model 3 B+ released earlier this year, without an Ethernet port and only one USB port. The wireless chipset is hidden under a lovely embossed can, and until we get our hands on this new model and a pair of pliers, we’re assuming this is a CYW43455, the Cypress chipset found in the Pi 3 B+.

The price of the Raspberry Pi 3 Model A+ will be $25 USD, with availability soon at the usual retailers. Since there’s no such thing as a Pi Zero 3 yet, if you’re looking for a powerful Linux computer, with wireless, in a small form factor, you’re not going to do much better than this little guy. You could of course desolder a Pi 3 B+, but for now this is the smallest, most powerful single board computer with good software support.

Rock Out To The Written Word With BookSound

With his latest project, [Roni Bandini] has simultaneously given the world a new type of audiobook and music. Traditional audiobooks are basically the adult equivalent of having somebody read you a bedtime story, but BookSound actually turns the written word into electronic music. You won’t be able to boast to your friends that as a matter of fact, you have read that popular new novel, but at least you might be able to dance to it.

[Roni] says he’s still working on perfecting the word to music mapping, so the results shown in the video after the break are still a bit rough. But even in these early stages there’s no denying this is an exceptionally unique project, and we’re excited to see where it goes from here.

Inside the classy looking 3D printed enclosure is a Raspberry Pi, an OLED display, and the button and switch which make up the extent of the device’s controls. At the end of the arm is a standard Raspberry Pi Camera module, which gives the BookSound a bird’s eye view of the book to be songified.

To turn your favorite book into electronic beats, simply open it up, put it under the gaze of BookSound, and press the button on the front. Because the Raspberry Pi isn’t exactly a powerhouse, it takes about two minutes for it to scan the page, perform optical character recognition (OCR), and compose the track before you start to hear anything.

If you’re wondering what the secret sauce is to turn words into music, [Roni] isn’t ready to share his source code just yet. But he was able to give us a few high-level explanations of what’s going on inside BookSound. For example, to generate the song’s BPM, the software will count how many words per paragraph are on the page: so a book with shorter paragraphs will consequently have a faster tempo to match the speed at which the author is moving through ideas. Similarly, drum kicks are generated based on the number of syllables in each paragraph. In the future, he’s looking at adding “lyrics” by running commonly used words on the page through a text to speech engine and inserting them into the beat.

We’ve seen practical applications of OCR on the Raspberry Pi in the past and even similar looking book scanning arrangements. But nothing quite like BookSound before, which at this point, is really saying something.

Continue reading “Rock Out To The Written Word With BookSound”

Raspberry Pi PoE Redux

[Martin Rowan] was lucky enough to get his hands on the revised Power Over Ethernet (PoE) hat for the Raspberry Pi. Lucky for us, he wrote it up for our benefit, including inspection of the new hat, it’s circuit, and electrical testing to compare to the original hardware.

You may remember the original release of the PoE hat for the Raspberry Pi, as well as the subsequent recall due to over-current issues. In testing the revised board, [Martin] powered a test load off the USB ports, and pulled over an amp — The first iteration of the PoE hat would often trip the over-current protection at 300 milliamps.

This afternoon, the redesigned PoE board was officially released, and the post mortem of the problem documented in a blog post. It’s a lesson in the hidden complexity of hardware design, as well as a cautionary tale about the importance of thorough testing, even when the product is late and the pressure is on.

The PoE hat converts 48 volt power down to a 5 volt supply for the Pi using a flyback transformer. The problem was that this transformer setup doesn’t deliver clean steady 5 volt power, but instead provides power as a series of spikes. While these spikes were theoretically in spec for powering the Pi and usb devices, some Raspberry Pis were detecting those spikes as too much current pushed through the USB ports. The official solution essentially consists of better power filtering between the hat and the Pi, flattening that power draw.

We’re looking forward to getting our hands on this new and improved PoE Hat, and using it in many project to come.

Using E-Paper Displays For An Electronic Etch A Sketch

Electronic things are often most successful when they duplicate some non-electronic thing. Most screens, then, are poor replacements for paper. Except, of course, for E-paper. These displays have high contrast even in sunlight and they hold their image even with no power. When [smbakeryt] was looking at his daughter’s Etch-a-Sketch, he decided duplicating its operation would be a great way to learn about these paper-like displays.

You can see a video of his results and his findings below. He bought several displays and shows them all, including some three-color units which add a single spot color. The one thing you’ll notice is the displays are slow which is probably why they haven’t taken over the world.

The displays connect to a Raspberry Pi and many of the displays are meant to mount directly to a Pi. The largest display is nearly six inches and some of the smaller displays are even flexible. It appears the three color displays were much slower than the ones that use two colors. To combat the slow update speeds, some of the displays can support partial refresh.

The drawing toy uses optical encoders connected to the Raspberry Pi. The Python code is available. Even if you don’t want to duplicate the toy, the comparison of the displays is worth watching. We were really hoping he’d included an accelerometer to erase it by shaking, but you’ll have to add that feature yourself. By the way, in the video, he mentions the real Etch-a-Sketch might work with magnets. It doesn’t. It is an aluminum powder that sticks to the plastic until a stylus rubs it off.

We’ve seen these displays many times before, of course. If you are patient enough, you can even use them as Linux displays.

Continue reading “Using E-Paper Displays For An Electronic Etch A Sketch”

Pixy2 Is Super Vision For Arduino Or Raspberry Pi

A Raspberry Pi with a camera is nothing new. But the Pixy2 camera can interface with a variety of microcontrollers and has enough smarts to detect objects, follow lines, or even read barcodes without help from the host computer. [DroneBot Workshop] has a review of the device and he’s very enthused about the camera. You can see the video below.

When you watch the video, you might wonder how much this camera will cost. Turns out it is about $60 which isn’t cheap but for the capabilities it offers it isn’t that much, either. The camera can detect lines, intersections, and barcodes plus any objects you want to train it to recognize. The camera also sports its own light source and dual servo motor drive meant for a pan and tilt mounting arrangement.

Continue reading “Pixy2 Is Super Vision For Arduino Or Raspberry Pi”

Low-cost Autonomous Rover Will Drive Your Projects

[Miguel] wanted to get more hands-on experience with Python, so he created a small robotic platform as a testbed. But as such things sometimes go, it turns out the robot he created is a worthy enough project in its own right. With a low total cost and highly flexible design, it might be exactly what you’re looking for. Who knows, it might even bootstrap that rover project that’s been wandering around the back of your mind.

The robot makes use of an exceptionally simple 3D printed frame. No complicated suspension to worry about, no fasteners to hold together multiple printed parts. It’s just a single printed “L” shaped piece that has mounts for the motors and front sensor board. As designed it simply drags its tail around, which should work fine on smooth surfaces, but might need a bit of tweaking if you plan on taking your new robotic friend on an outdoor adventure.

There’s a big open area on the “tail” to mount a Raspberry Pi, but you could really put whatever board or microcontroller you wish here. In the nose is an HC-SR04 ultrasonic sensor, which [Miguel] is using to perform obstacle avoidance in his Python code. A dual H-Bridge motor driver controls the pair of gear motors in the front to provide propulsion and steering, and a buck converter steps down the 7.4V from the 2S LiPo battery to power the electronics. He’s even included a mini breadboard so you can add circuits or sensors as experimental payloads.

If you’re looking for a slightly more advanced 3D printed robotics platform, we’ve seen our fair share. From the nearly fully printed Watney to a tank that looks like it’s ready for front-line combat.